Semantic Kernel SDK and Quarkus

What is it about?
The goal of this blogpost is to create a simple service that uses the Semantic Kernel SDK to rectify grammatical, punctuation, and logical mistakes in the input text by invoking OpenAI.
The entire source code for this project is available on GitHub.
Backend
Let’s move forward with creating our Quarkus application. While in the root directory of your new project, run the following command:
quarkus create app com.example:text-reviewer \
    --extension=resteasy-reactive-jackson,quarkus-quinoa
resteasy-reactive-jackson is an extension designed for developing REST applications with Quarkus, including the import of resteasy-reactive.
quarkus-quinoa is an extension tailored for building single-page applications.
If you have specific requirements or additional extensions to include, explore further options provided by the Quarkus CLI, or take a look at the previous post.
We also need to add the Semantic Kernel dependencies. Add the following XML in the pom.xml:
    <properties>
      <!-- ... -->
      <semantic-kernel.version>0.2.11-alpha</semantic-kernel.version>
    </properties>
    <dependencyManagement>
      <dependencies>
        <!-- ... -->
        <dependency>
          <groupId>com.microsoft.semantic-kernel</groupId>
          <artifactId>semantickernel-bom</artifactId>
          <version>${semantic-kernel.version}</version>
          <type>pom</type>
          <scope>import</scope>
        </dependency>
      </dependencies>
    </dependencyManagement>
    <dependencies>
      <!-- ... -->
      <dependency>
        <groupId>com.microsoft.semantic-kernel</groupId>
        <artifactId>semantickernel-core</artifactId>
      </dependency>
      <dependency>
        <groupId>com.microsoft.semantic-kernel</groupId>
        <artifactId>semantickernel-settings-loader</artifactId>
      </dependency>
      <dependency>
        <groupId>com.microsoft.semantic-kernel</groupId>
        <artifactId>semantickernel-connectors-ai-openai</artifactId>
      </dependency>
    </dependencies>
Semantic Kernel is an SDK that integrates Large Language Models (LLMs) like for example OpenAI with conventional programming languages. Semantic Kernel achieves this by allowing you to define plugins. The documentation still doesn’t support Java, however, you can read more and find other examples in their repository.
In order to use OpenAI, first we need to create an account on https://platform.openai.com/. Once the account is created, you can find the organization ID here and create the API key here. It is important to mention that to use the API you must have credits in your account.
Well, lets add these values to application.properties file
openai.config.client.openai.key=YOUR_KEY
openai.config.client.openai.organizationid=YOUR_ORGANIZATIONID
Then create a configuration mapping interface:
package com.example.config;

import io.smallrye.config.ConfigMapping;

import java.util.Map;

@ConfigMapping(prefix = "openai")
public interface OpenAIClientConfig {

    Map<String, String> config();
}
Next we need to create an OpenAI client using the provided configuration.
package com.example.config;

import com.azure.ai.openai.OpenAIAsyncClient;
import com.microsoft.semantickernel.connectors.ai.openai.util.OpenAIClientProvider;
import com.microsoft.semantickernel.exceptions.ConfigurationException;
import jakarta.enterprise.inject.Produces;

public class OpenAIClientFactory {
    private final OpenAIClientConfig openAIClientConfig;

    public OpenAIClientFactory(OpenAIClientConfig openAIClientConfig) {
        this.openAIClientConfig = openAIClientConfig;
    }

    @Produces
    public OpenAIAsyncClient getClient() throws ConfigurationException {
        return new OpenAIClientProvider(openAIClientConfig.config(), null).getAsyncClient();
    }
}
Before continuing, we have to define a template for our request. The request itself is similar to the type of content manually provided to ChatGPT. In our case, the message will have two main parts. First, we define a from and to, and the type of message. Secondly, we add additional features. For instance, you are a Software Engineer, and you are going to send a direct message to the Engineering Manager. The message should be concise and not official. Let’s create a file skprompt.txt in the src/main/resources/TextReviewSkill/TextReview with the following content
Act like you are a {{$from}} and writing a {{$messageType}} to a {{$to}}.

Your goal is to proofread text, make it sound smooth and polite, and correct grammatical and punctuation errors.

Additional requirements for the text:
+++++
Be brief, use short phrases, conciseness is very important: {{$isConcise}}
Be creative, use more beautiful and elegant, upper-level English literary words, but keep the meaning the same: {{$isCreative}}
Be official, the next text will be stored as an official document or part of the documentation: {{$isOfficial}}
+++++

{{$input}}
In the same directory, we also have to create a config.json file with an execution setting:
{
  "schema": 1,
  "description": "Corrects the message according to the specified parameters",
  "type": "completion",
  "completion": {
    "max_tokens": 3000,
    "temperature": 0.0,
    "top_p": 0.0,
    "presence_penalty": 0.0,
    "frequency_penalty": 0.0
  }
}
The most important part is to create a Semantic function for text completion using our OpenAI client and specific model id. Also, specify the skill and function name by referring the name of the corresponding directories where we put config.json and skprompt.txt files.
package com.example.config;

import com.microsoft.semantickernel.SKBuilders;
import com.microsoft.semantickernel.exceptions.ConfigurationException;
import com.microsoft.semantickernel.textcompletion.CompletionSKFunction;
import jakarta.enterprise.inject.Produces;

public class CompletionFunctionFactory {

    private static final String GPT_3_5_TURBO = "gpt-3.5-turbo";
    private static final String FUNCTION_NAME = "TextReview";
    private static final String SKILL_NAME = "TextReviewSkill";

    private final OpenAIClientFactory openAIClientFactory;

    public CompletionFunctionFactory(OpenAIClientFactory openAIClientFactory) {
        this.openAIClientFactory = openAIClientFactory;
    }

    @Produces
    public CompletionSKFunction getFunction() throws ConfigurationException {
        var textCompletion = SKBuilders.chatCompletion()
                .withOpenAIClient(openAIClientFactory.getClient())
                .withModelId(GPT_3_5_TURBO)
                .build();

        var kernel = SKBuilders.kernel()
                .withDefaultAIService(textCompletion)
                .build();

        return kernel.importSkillFromResources("", SKILL_NAME, FUNCTION_NAME)
                .getFunction(FUNCTION_NAME, CompletionSKFunction.class);
    }
}
The TextCompletionService uses a Semantic Kernel context to populate the request prompt using the data provided and fetches the answer synchronously by calling the block() method.
package com.example.service;

import com.example.model.Text;
import com.microsoft.semantickernel.SKBuilders;
import com.microsoft.semantickernel.orchestration.SKContext;
import com.microsoft.semantickernel.textcompletion.CompletionSKFunction;
import jakarta.enterprise.context.ApplicationScoped;

@ApplicationScoped
public class TextCompletionService {

    private final CompletionSKFunction completionSKFunction;

    public TextCompletionService(CompletionSKFunction completionSKFunction) {
        this.completionSKFunction = completionSKFunction;
    }

    public String review(Text text) {
        SKContext reviewerContext = SKBuilders.context().build();
        reviewerContext.setVariable("input", text.input());
        reviewerContext.setVariable("messageType", text.messageType().getMessageTypeName());
        reviewerContext.setVariable("from", text.from().getTittleName());
        reviewerContext.setVariable("to", text.to().getTittleName());
        reviewerContext.setVariable("isConcise", String.valueOf(text.optionalFeatures().isConcise()));
        reviewerContext.setVariable("isCreative", String.valueOf(text.optionalFeatures().isCreative()));
        reviewerContext.setVariable("isOfficial", String.valueOf(text.optionalFeatures().isOfficial()));

        return completionSKFunction.invokeAsync(reviewerContext)
                .block().getResult();
    }
}
Lastly, we have to define the controller that has only one method that will be called by our frontend application for propagating the data to our OpenAI request prompt:
package com.example.controller;

import com.example.model.Text;
import com.example.service.TextCompletionService;
import jakarta.ws.rs.POST;
import jakarta.ws.rs.Path;
import jakarta.ws.rs.Produces;
import jakarta.ws.rs.core.MediaType;

@Path("/api/v1/text-review")
public class TextReviewerResource {

    private final TextCompletionService textCompletionService;

    public TextReviewerResource(TextCompletionService textCompletionService) {
        this.textCompletionService = textCompletionService;
    }

    @POST
    @Produces(MediaType.TEXT_PLAIN)
    public String review(Text text) {
        return textCompletionService.review(text);
    }
}
The dto itself has the following fields:
package com.example.model;

public record Text(String input, Tittle from, Tittle to, MessageType messageType,
                   OptionalFeatures optionalFeatures) {

    public enum Tittle {
        SE("Software Engineer"),
        EM("Engineering Manager");

        private final String tittleName;

        Tittle(String tittleName) {
            this.tittleName = tittleName;
        }

        public String getTittleName() {
            return tittleName;
        }
    }

    public enum MessageType {
        EMAIL("email"),
        DM("direct message");

        private final String messageTypeName;

        MessageType(String messageTypeName) {
            this.messageTypeName = messageTypeName;
        }

        public String getMessageTypeName() {
            return messageTypeName;
        }
    }

    public record OptionalFeatures(boolean isConcise, boolean isCreative, boolean isOfficial) {
    }
}
To run our application navigate to the root directory and execute:
quarkus devFrontend
Prior to developing the new frontend application, it is necessary to delete the entire directory src/main/webui to eliminate the default implementation. Afterward, navigate to file-sharing-bot/src/main and execute:
npx create-react-app webui --template typescriptAdditionally, include bootstrap. While in /frontend/src/main/webui, execute:
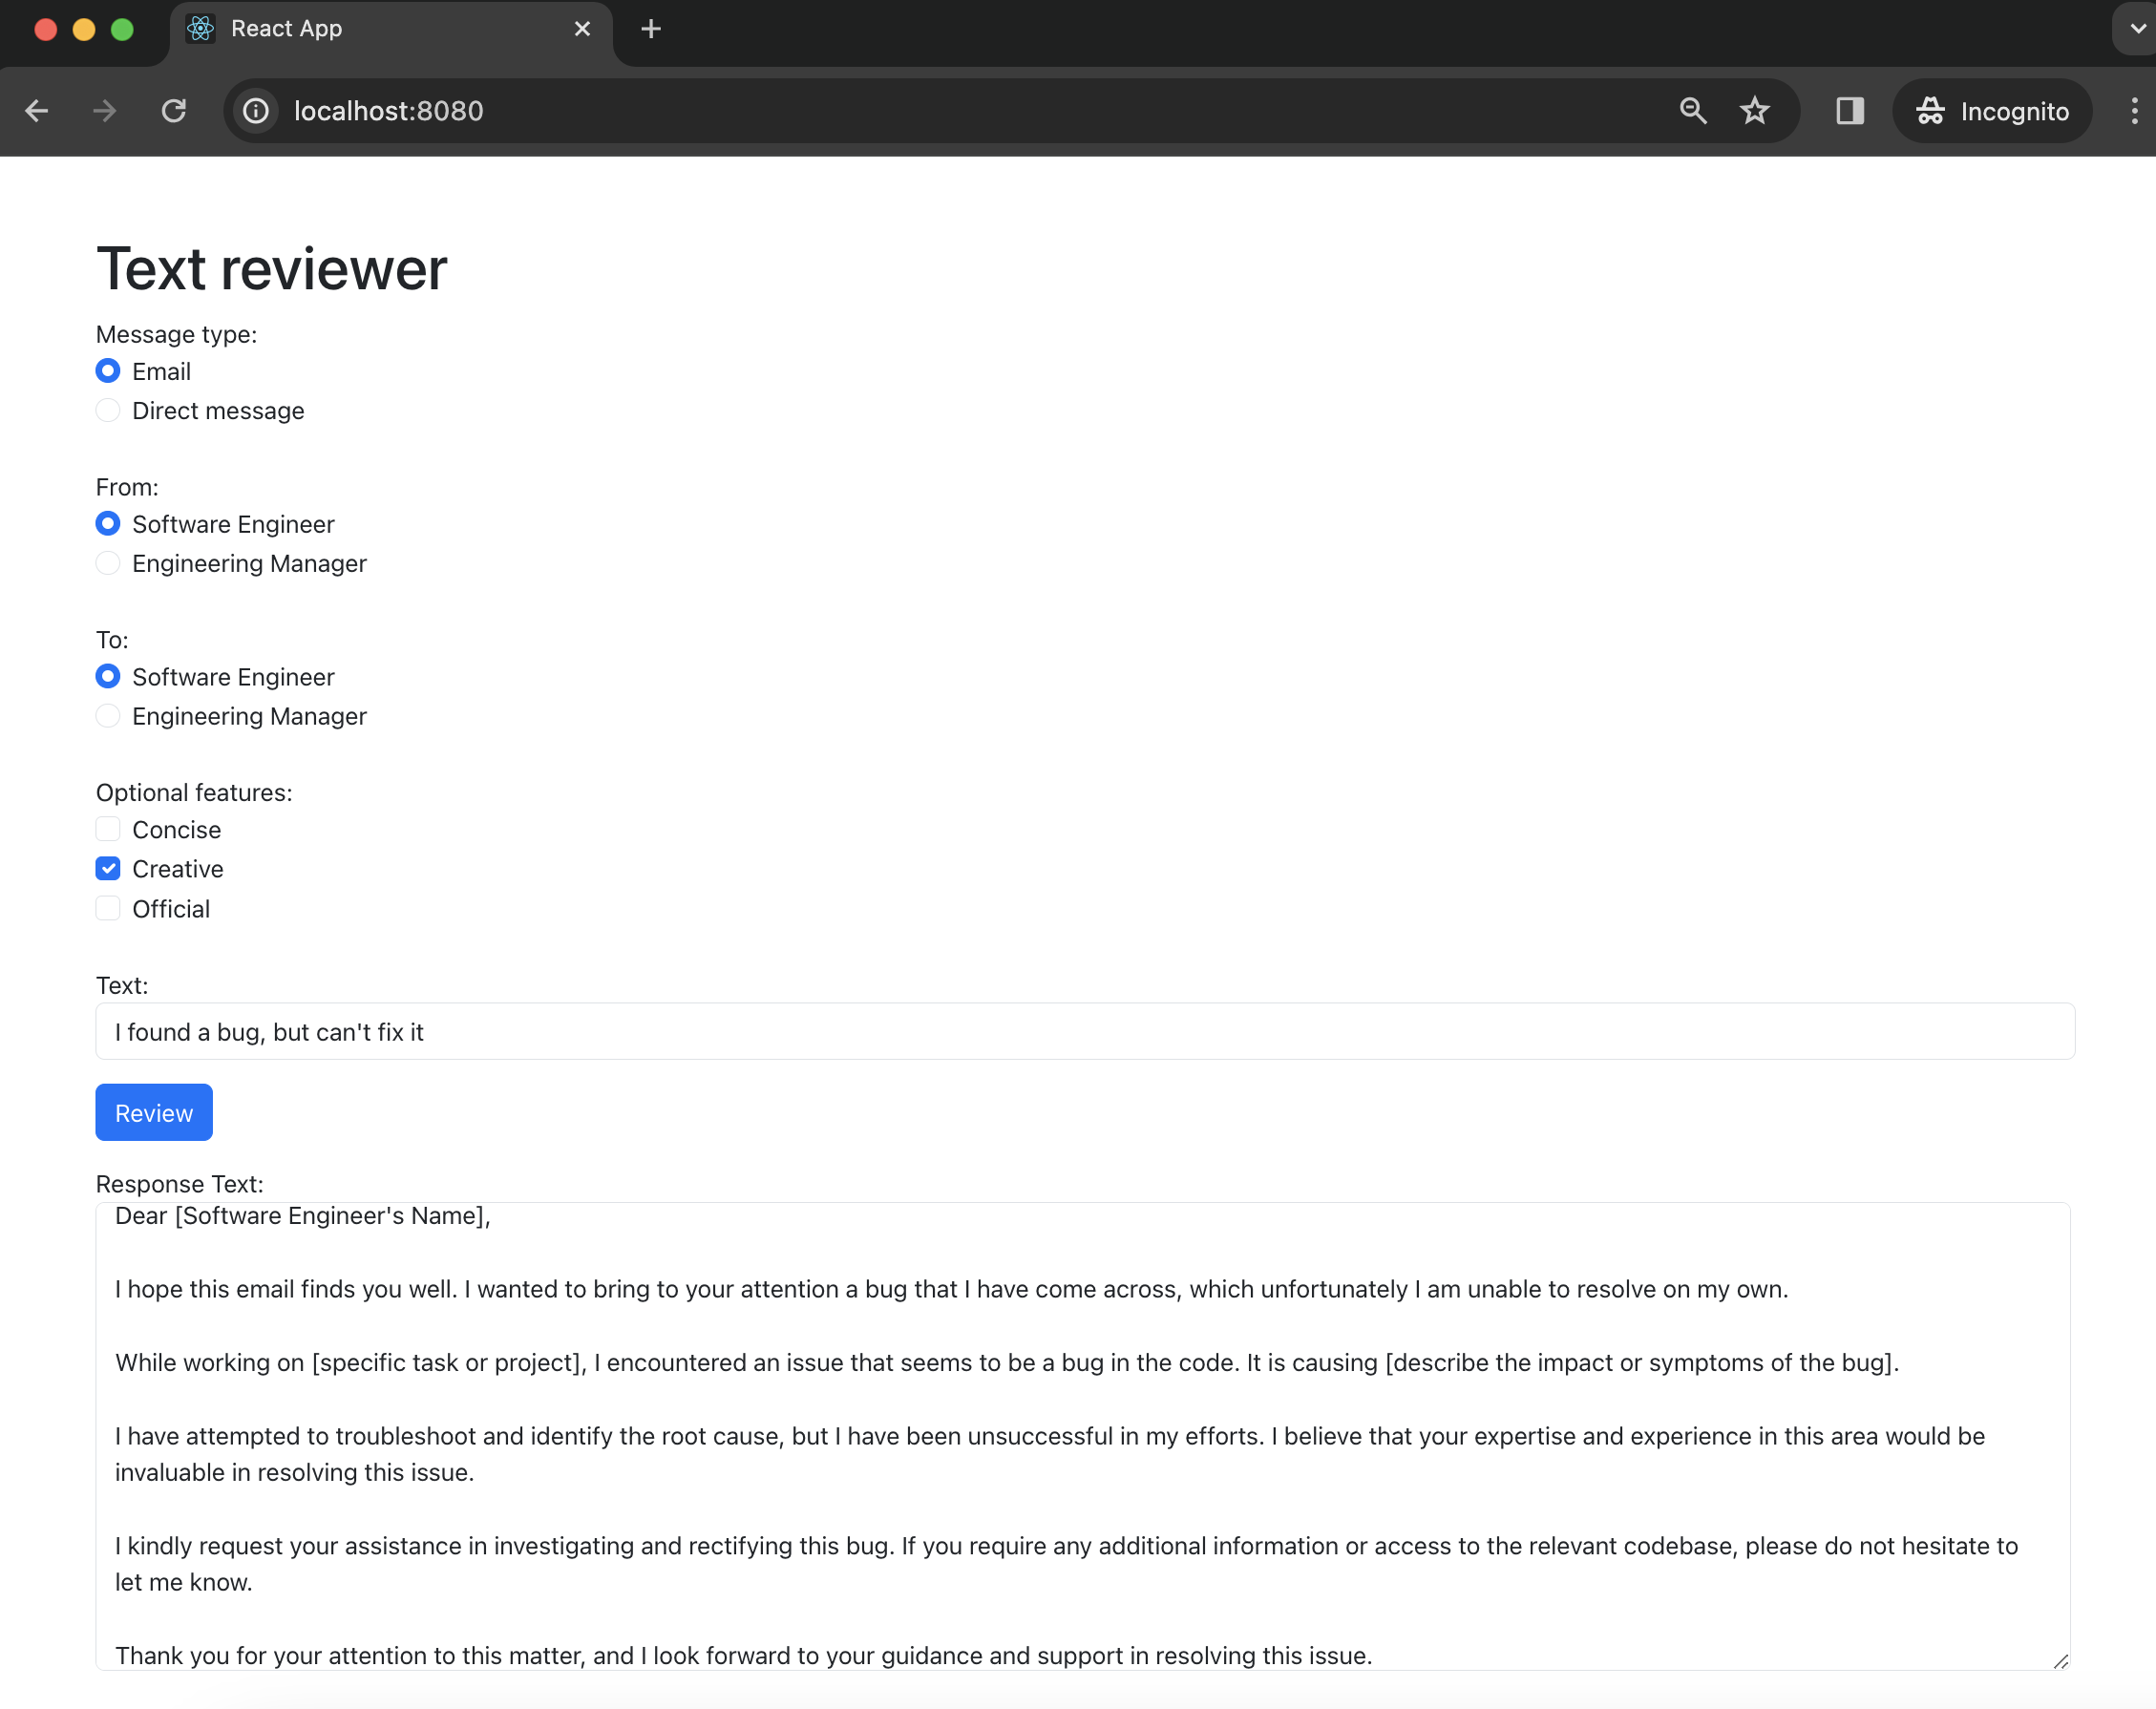
npm install bootstrapAll the needful changes will be done in src/main/webui/src/App.tsx. We need to design an interface that includes a single input field, two radio buttons for selecting "from" and "to" options, three checkboxes for additional features, an output field, and a submit button. Upon pressing the submit button, the filled information will be sent to our backend. After receiving the response, the result will be displayed in the output field.
import React, { useState } from 'react';
import 'bootstrap/dist/css/bootstrap.min.css';
import './App.css';
import logo from './logo.svg';


interface FormData {
  messageType: string;
  from: string;
  to: string;
  optionalFeatures: Record<string, boolean>;
  input: string;
  responseText: string;
}

const initialFormData: FormData = {
  messageType: 'DM',
  from: 'SE',
  to: 'SE',
  optionalFeatures: {
      isConcise: false,
      isCreative: false,
      isOfficial: false,
    },
  input: '',
  responseText: '',
};

const App: React.FC = () => {
  const [loading, setLoading] = useState<boolean>(false);
  const [formData, setFormData] = useState<FormData>(initialFormData);

  const handleRadioChange = (field: string, value: string) => {
    setFormData({ ...formData, [field]: value });
  };

  const handleCheckboxChange = (checkbox: string) => {
    setFormData((prevFormData) => ({
      ...prevFormData,
      optionalFeatures: {
        ...prevFormData.optionalFeatures,
        [checkbox]: !prevFormData.optionalFeatures[checkbox],
      },
    }));
  };

  const handleTextFieldChange = (event: React.ChangeEvent<HTMLInputElement>) => {
    setFormData({ ...formData, input: event.target.value });
  };

  const handleSubmit = () => {
    if (!formData.input.trim()) {
      console.error('Input cannot be empty');
      setFormData({ ...formData, responseText: 'Input cannot be empty' });
      return;
    }

    setLoading(true);

    const apiUrl = 'http://localhost:8080/api/v1/text-review';
    const requestOptions: RequestInit = {
      method: 'POST',
      headers: {
        'Content-Type': 'application/json',
      },
      body: JSON.stringify(formData),
    };

    fetch(apiUrl, requestOptions)
      .then((response) => response.text())
      .then((data) => {
        console.log('Form submitted successfully:', data);
        setFormData({ ...formData, responseText: data });
      })
      .catch((error) => {
        console.error('Error submitting form:', error);
        setFormData({ ...formData, responseText: 'Error submitting form' });
      })
      .finally(() => {
        setLoading(false);
      });
  };

  return (
    <div className="container mt-5">
      <h1>Text reviewer</h1>
      <form>
        <div className="mb-3">
          <label className="form-label">
            Message type:
            <div className="form-check">
              <input
                type="radio"
                className="form-check-input"
                value="EMAIL"
                checked={formData.messageType === 'EMAIL'}
                onChange={() => handleRadioChange('messageType', 'EMAIL')}
              />
              <label className="form-check-label">Email</label>
            </div>
            <div className="form-check">
              <input
                type="radio"
                className="form-check-input"
                value="DM"
                checked={formData.messageType === 'DM'}
                onChange={() => handleRadioChange('messageType', 'DM')}
              />
              <label className="form-check-label">Direct message</label>
            </div>
          </label>
        </div>
        <div className="mb-3">
          <label className="form-label">
            From:
            <div className="form-check">
              <input
                type="radio"
                className="form-check-input"
                value="SE"
                checked={formData.from === 'SE'}
                onChange={() => handleRadioChange('from', 'SE')}
              />
              <label className="form-check-label">Software Engineer</label>
            </div>
            <div className="form-check">
              <input
                type="radio"
                className="form-check-input"
                value="EM"
                checked={formData.from === 'EM'}
                onChange={() => handleRadioChange('from', 'EM')}
              />
              <label className="form-check-label">Engineering Manager</label>
            </div>
          </label>
        </div>
        <div className="mb-3">
          <label className="form-label">
            To:
            <div className="form-check">
              <input
                type="radio"
                className="form-check-input"
                value="SE"
                checked={formData.to === 'SE'}
                onChange={() => handleRadioChange('to', 'SE')}
              />
              <label className="form-check-label">Software Engineer</label>
            </div>
            <div className="form-check">
              <input
                type="radio"
                className="form-check-input"
                value="EM"
                checked={formData.to === 'EM'}
                onChange={() => handleRadioChange('to', 'EM')}
              />
              <label className="form-check-label">Engineering Manager</label>
            </div>
          </label>
        </div>
        <div className="mb-3">
          <label className="form-label">
            Optional features:
            <div className="form-check">
              <input
                type="checkbox"
                className="form-check-input"
                value="isConcise"
                checked={formData.optionalFeatures.isConcise}
                onChange={() => handleCheckboxChange('isConcise')}
              />
              <label className="form-check-label">Concise</label>
            </div>
            <div className="form-check">
              <input
                type="checkbox"
                className="form-check-input"
                value="isCreative"
                checked={formData.optionalFeatures.isCreative}
                onChange={() => handleCheckboxChange('isCreative')}
              />
              <label className="form-check-label">Creative</label>
            </div>
            <div className="form-check">
              <input
                type="checkbox"
                className="form-check-input"
                value="isOfficial"
                checked={formData.optionalFeatures.isOfficial}
                onChange={() => handleCheckboxChange('isOfficial')}
              />
              <label className="form-check-label">Official</label>
            </div>
          </label>
        </div>
        <div className="mb-3">
            Text:
            <input
                type="text"
                className="form-control"
                value={formData.input}
                onChange={handleTextFieldChange}
            />
        </div>
        <div className="mb-3">
          <button type="button" className="btn btn-primary" onClick={handleSubmit} disabled={loading}>
            {loading && (
              <span className="spinner-border spinner-border-sm me-2" role="status" aria-hidden="true"></span>
            )}
            Review
          </button>

        </div>
        <div className="mb-3">
            Response Text:
                <textarea
                    value={formData.responseText}
                    rows={8}
                    readOnly
                    style={{ width: '100%', resize: 'both' }}
                    className="form-control"
                />
        </div>
      </form>
    </div>
  );
};

export default App;
Let’s restart our application
quarkus devNow we can open http://localhost:8080 and check what we have in the result.
Use case
1) Open the frontend application.
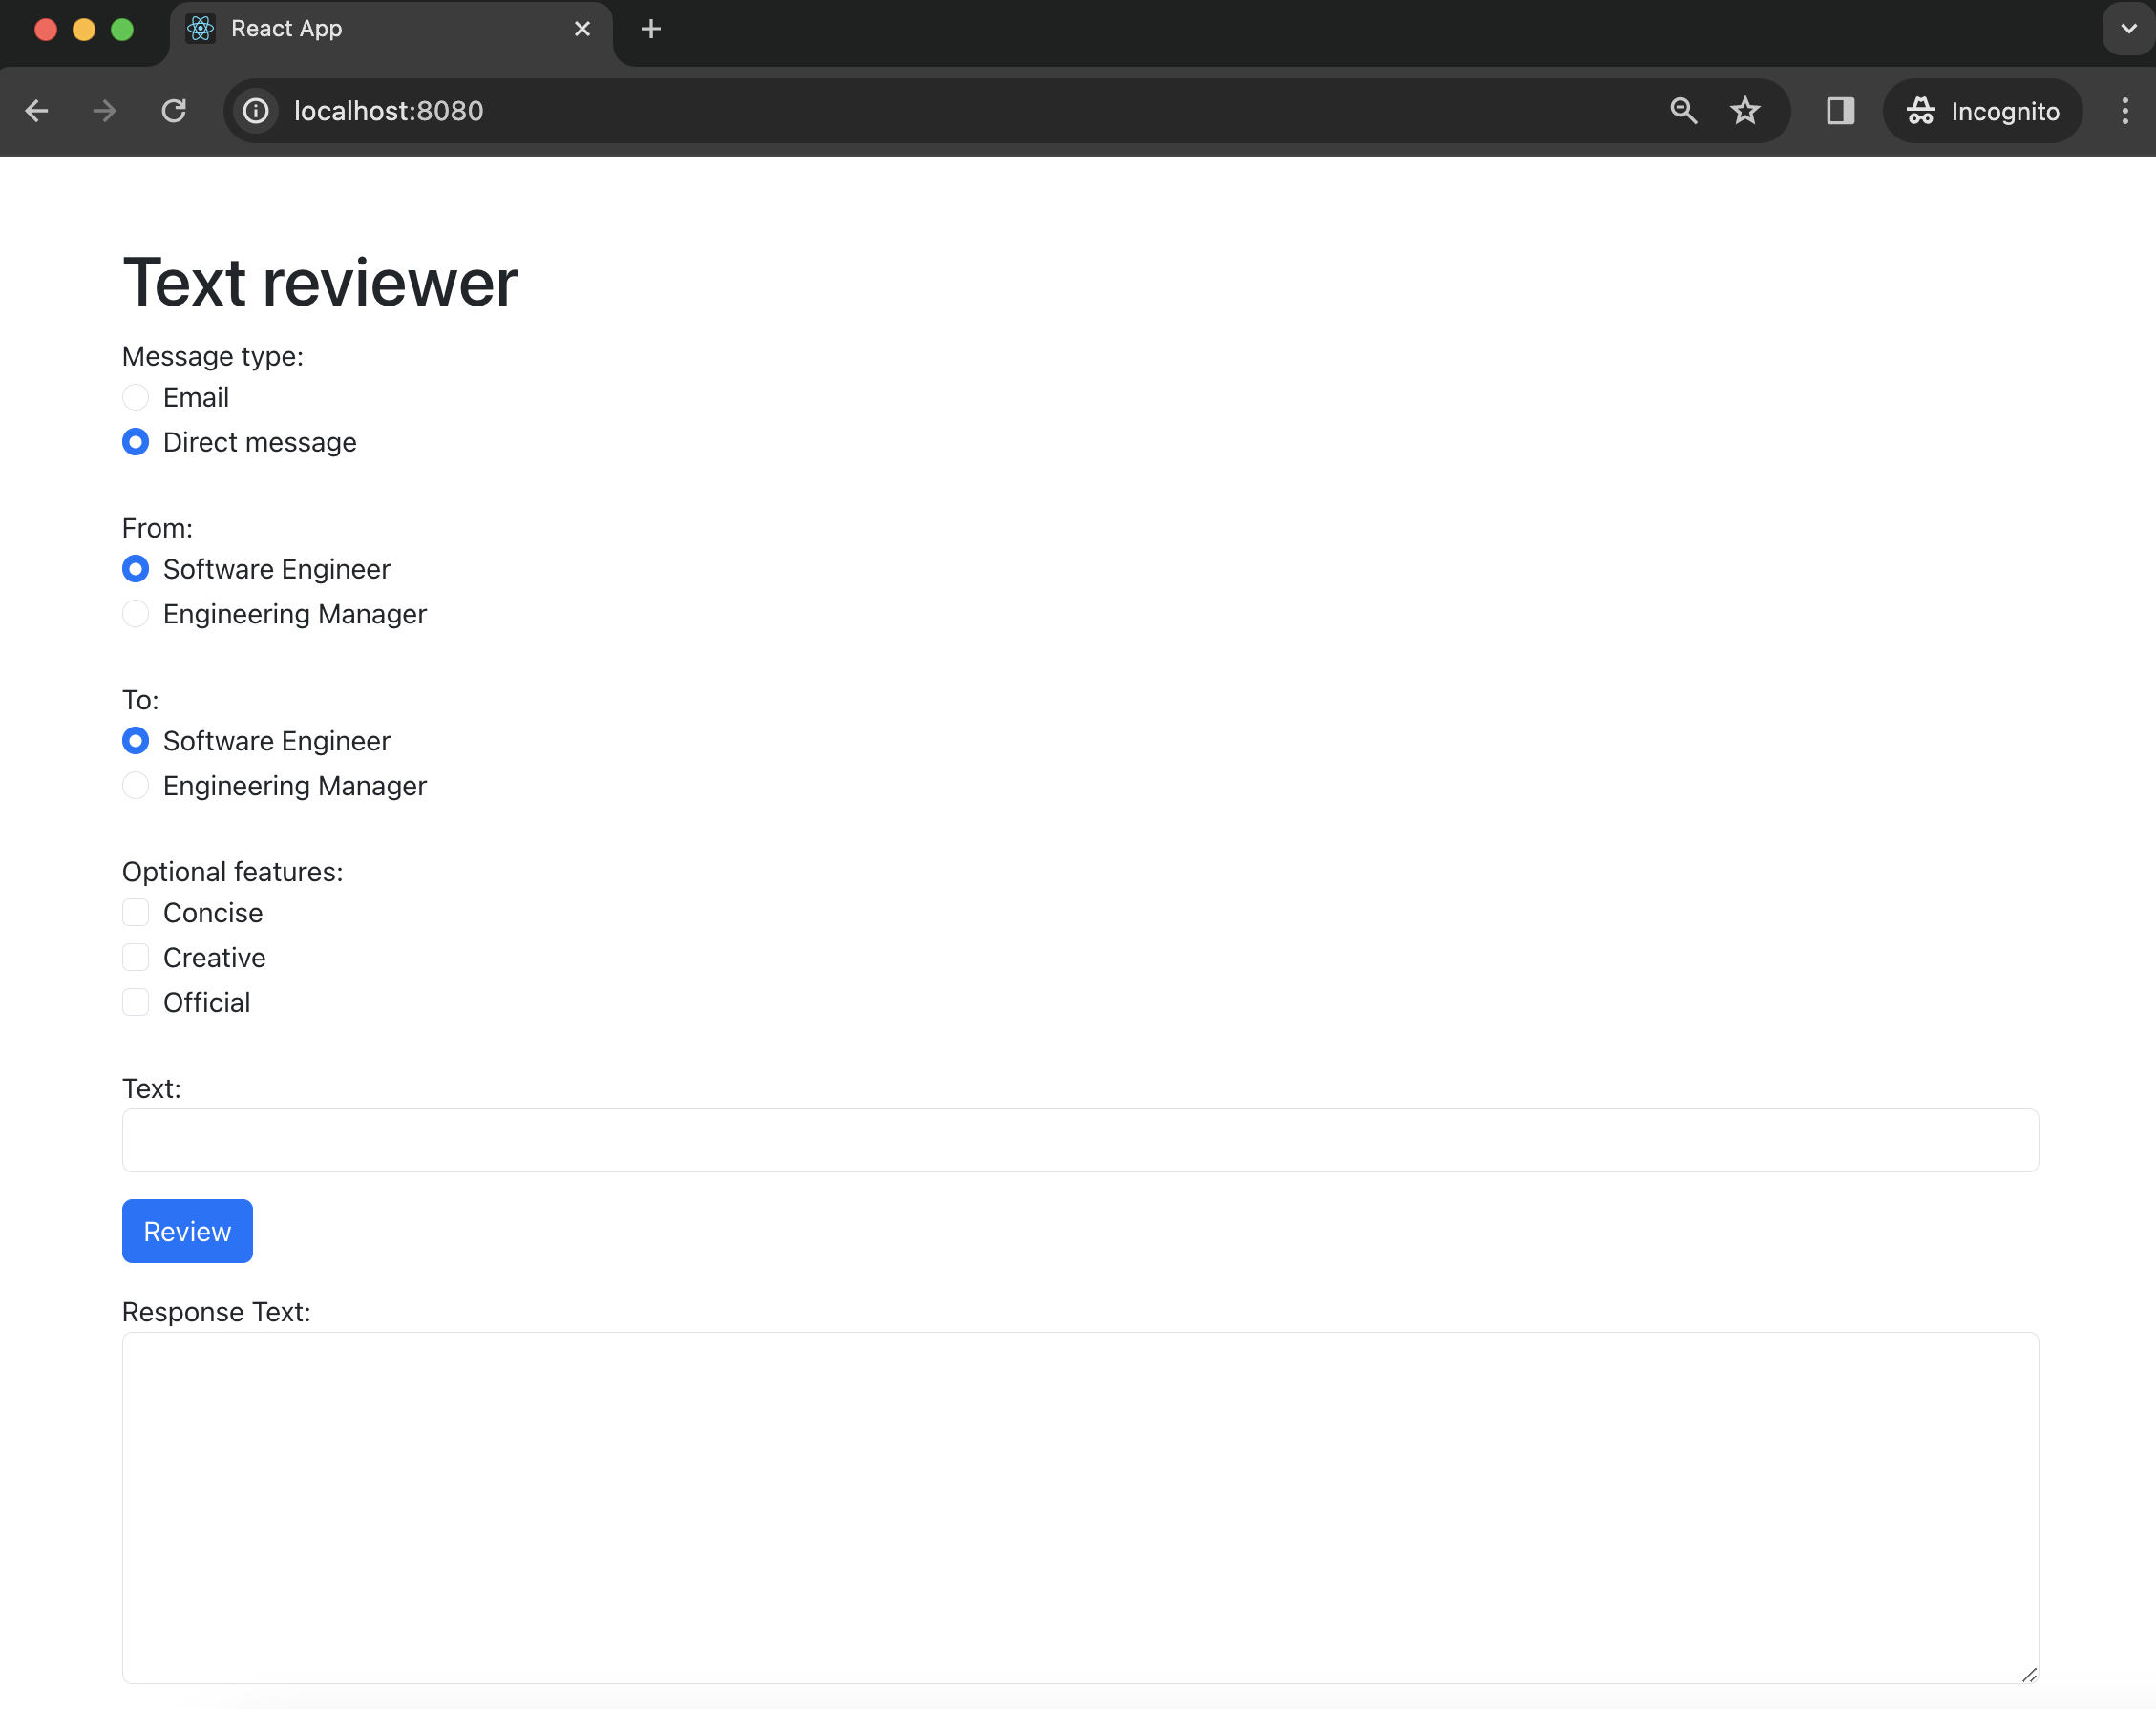
2) Fill the Text field, select needful options and press Review button.
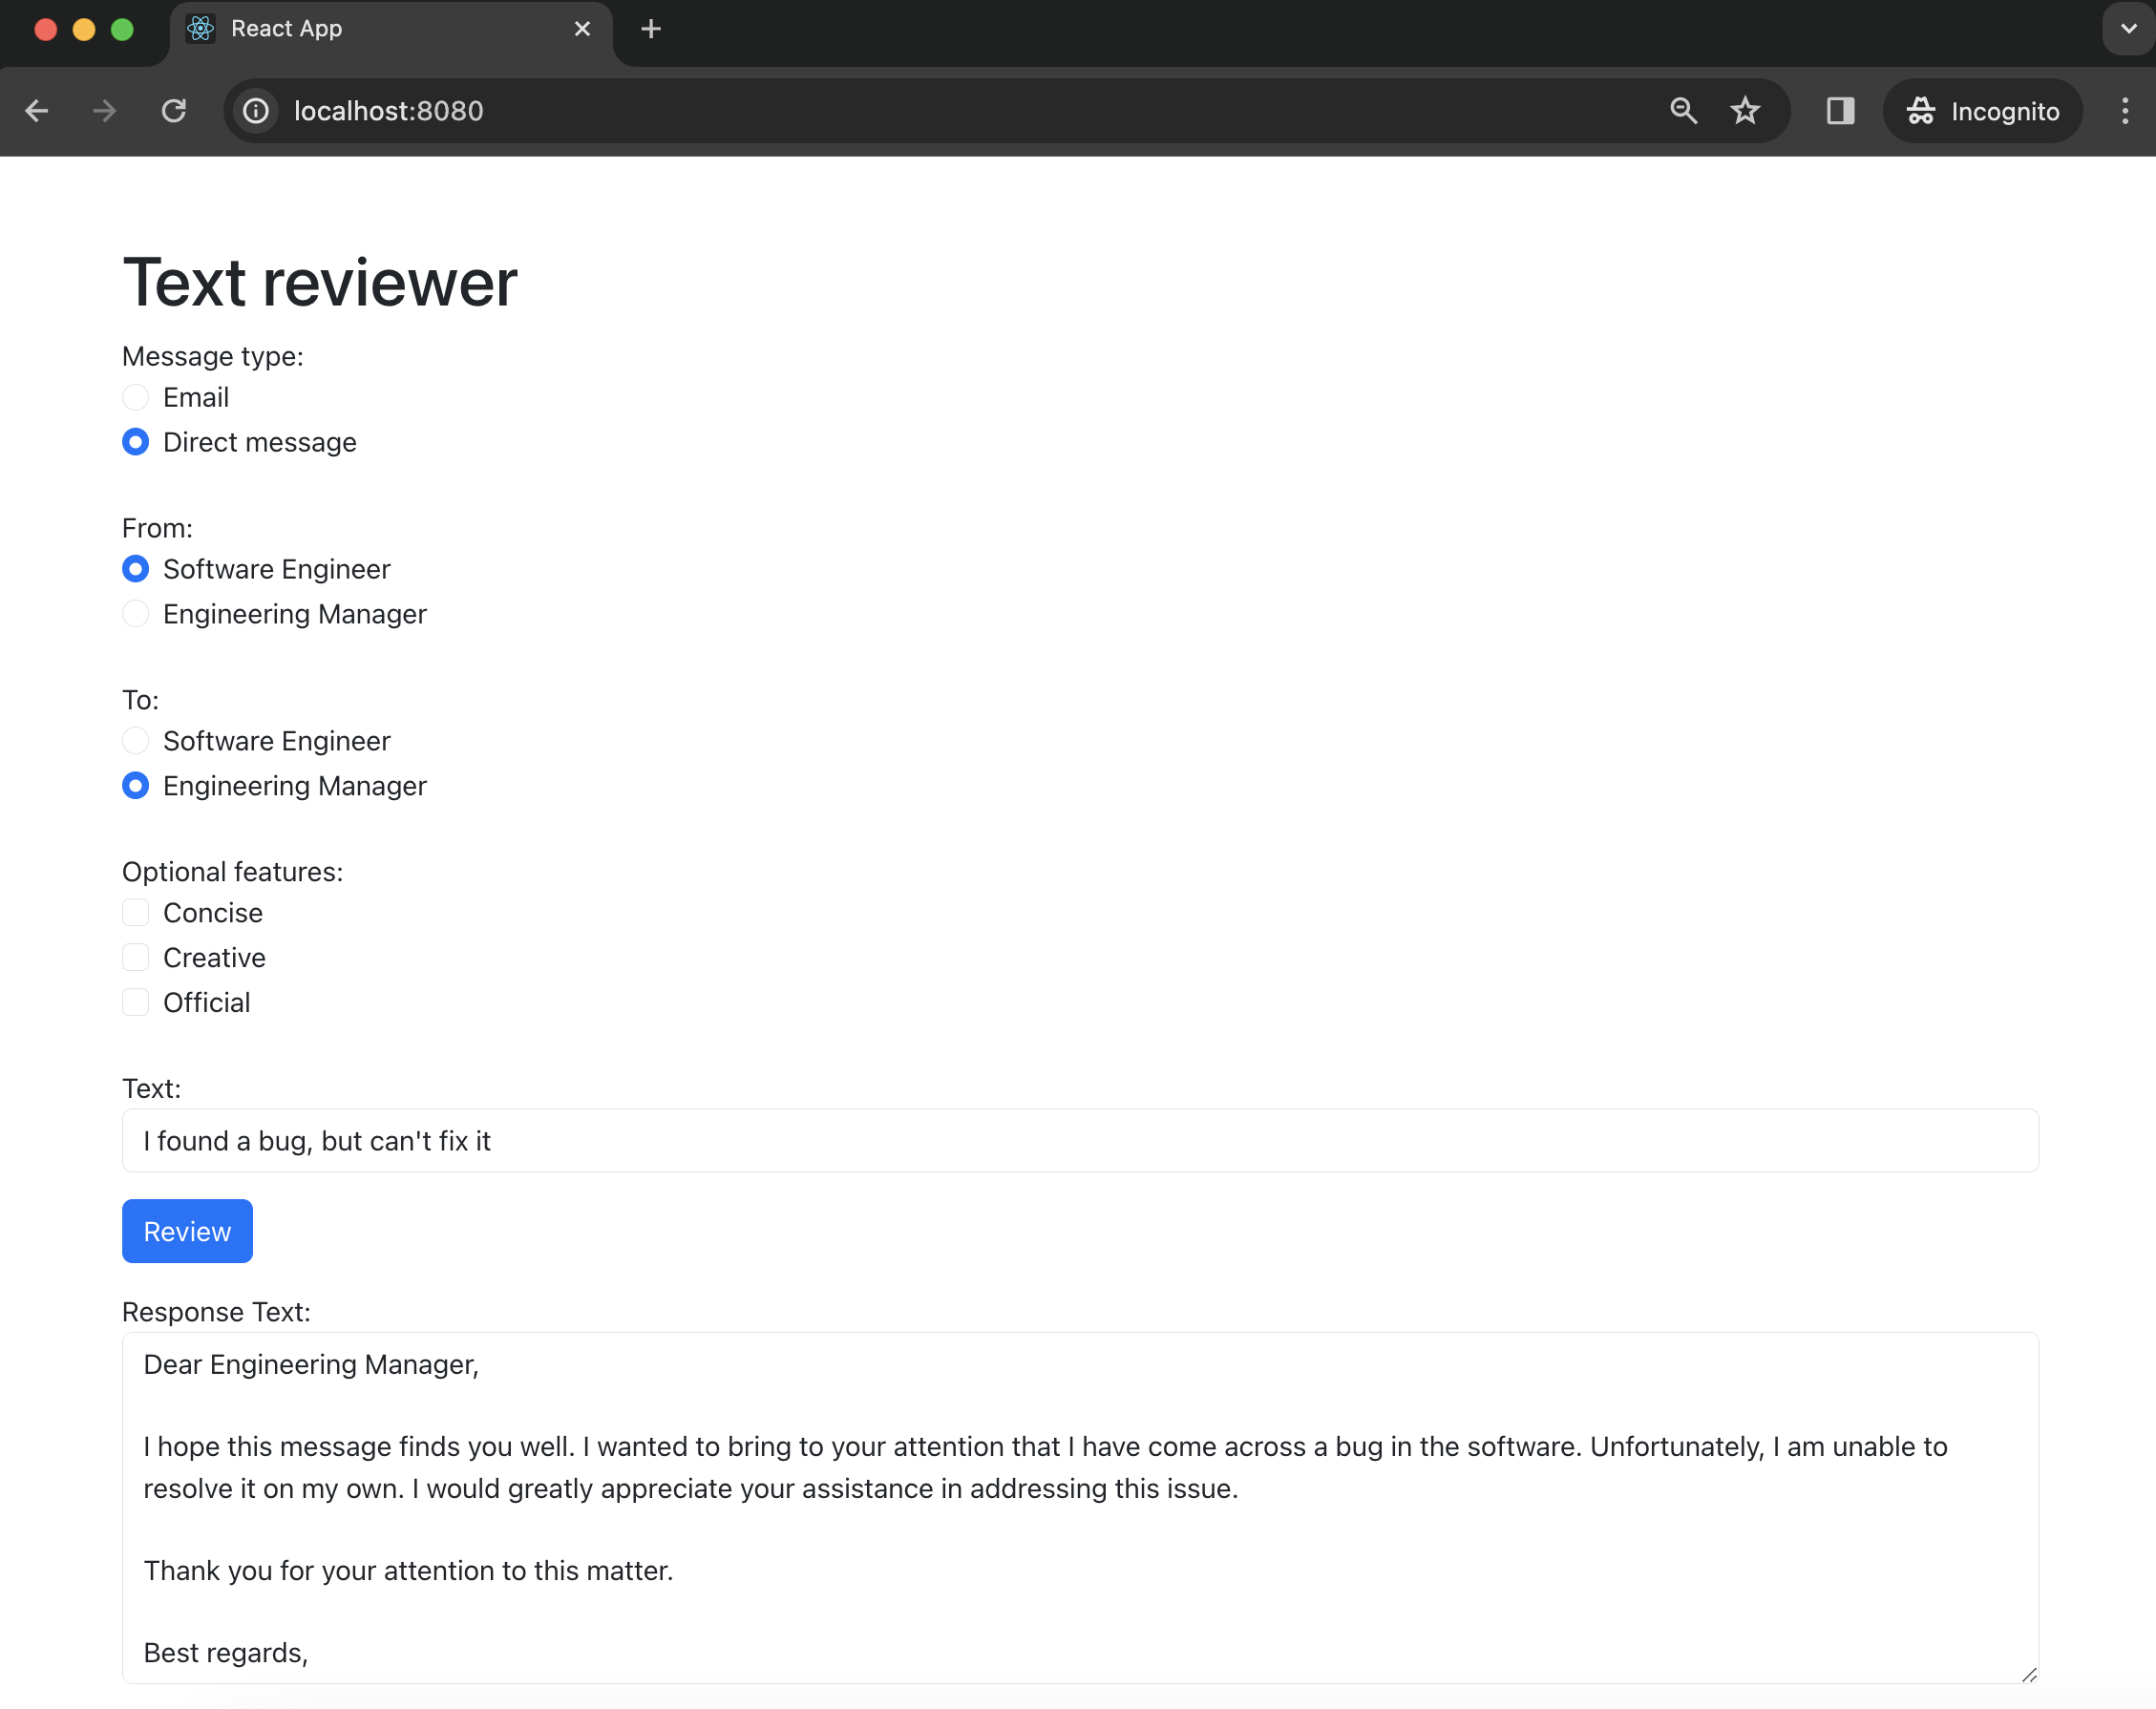
3) Also, you can play around with optional features.
Conclusion
As a result, we have a simple example of using Semantic Kernel SDK with Quarkus. Please pay attention to additional features due to the combination and chaining with different plugins.