Load testing with Gatling

In essence, load testing is the process of verifying whether an application can handle an expected load. It is done by injecting a defined number of users into the application. A typical example is to do a load test on your APIs to see if the maximum number of requests can be supported. This allows us to test the robustness of applications and how they react under a load by many users. Thanks to this, we can identify bottlenecks, potentially fixing design issues and fine-tune our applications’s sizing.
In this article, we will introduce Gatling as load testing tool. After that, we will talk about Gatling Recorder, a tool which is very useful to create our load tests. Finally, we will set up a simple load test in Scala with the SBT Gatling plugin.
Gatling
Before I introduce Gatling, I would like to go back to the definition of a load test. Load testing is part of the performance testing family. We can find different types of performance tests for our applications:
-
load test: simulates the load of use foreseen by our specifications
-
stress test: simulates the simultaneous arrival of a very large number of users
-
capacity test: simulates users in stages to identify the maximum limit
-
endurance test: simulates a large load over a long period of time to check that our application does not degrade performance
Gatling is an Open Source solution that allows us to set up performance tests. It was created in 2012 by Stéphane Landelle in France and is supported on a broad range of operations systems The tests are defined in Scala thanks to a simple and intuitive DSL (Domain Specific Language). The first publication dates from 13 January 2012. Gatling benefits from a large community and regular updates. Finally, Gatling provides an enterprise solution since June 2016: https://gatling.io/enterprise/.
Before we get into creating a load test, I’d like to introduce you to the Gatling Recorder tool, which can save us a lot of time when writing our tests.
Gatling Recorder
Gatling Recorder allows you to generate Scala tests directly from your interactions with your application.
To do this, you have two choices:
-
Configure the tool as an HTTP proxy that will intercept your requests
-
Load a HAR (Http ARchives) file
In this section, I will show you how to configure Gatling recorder as an HTTP proxy.
Once the tool is launched, you have this screen (for the installation, I leave you the official page: https://gatling.io/docs/gatling/reference/current/http/recorder/):
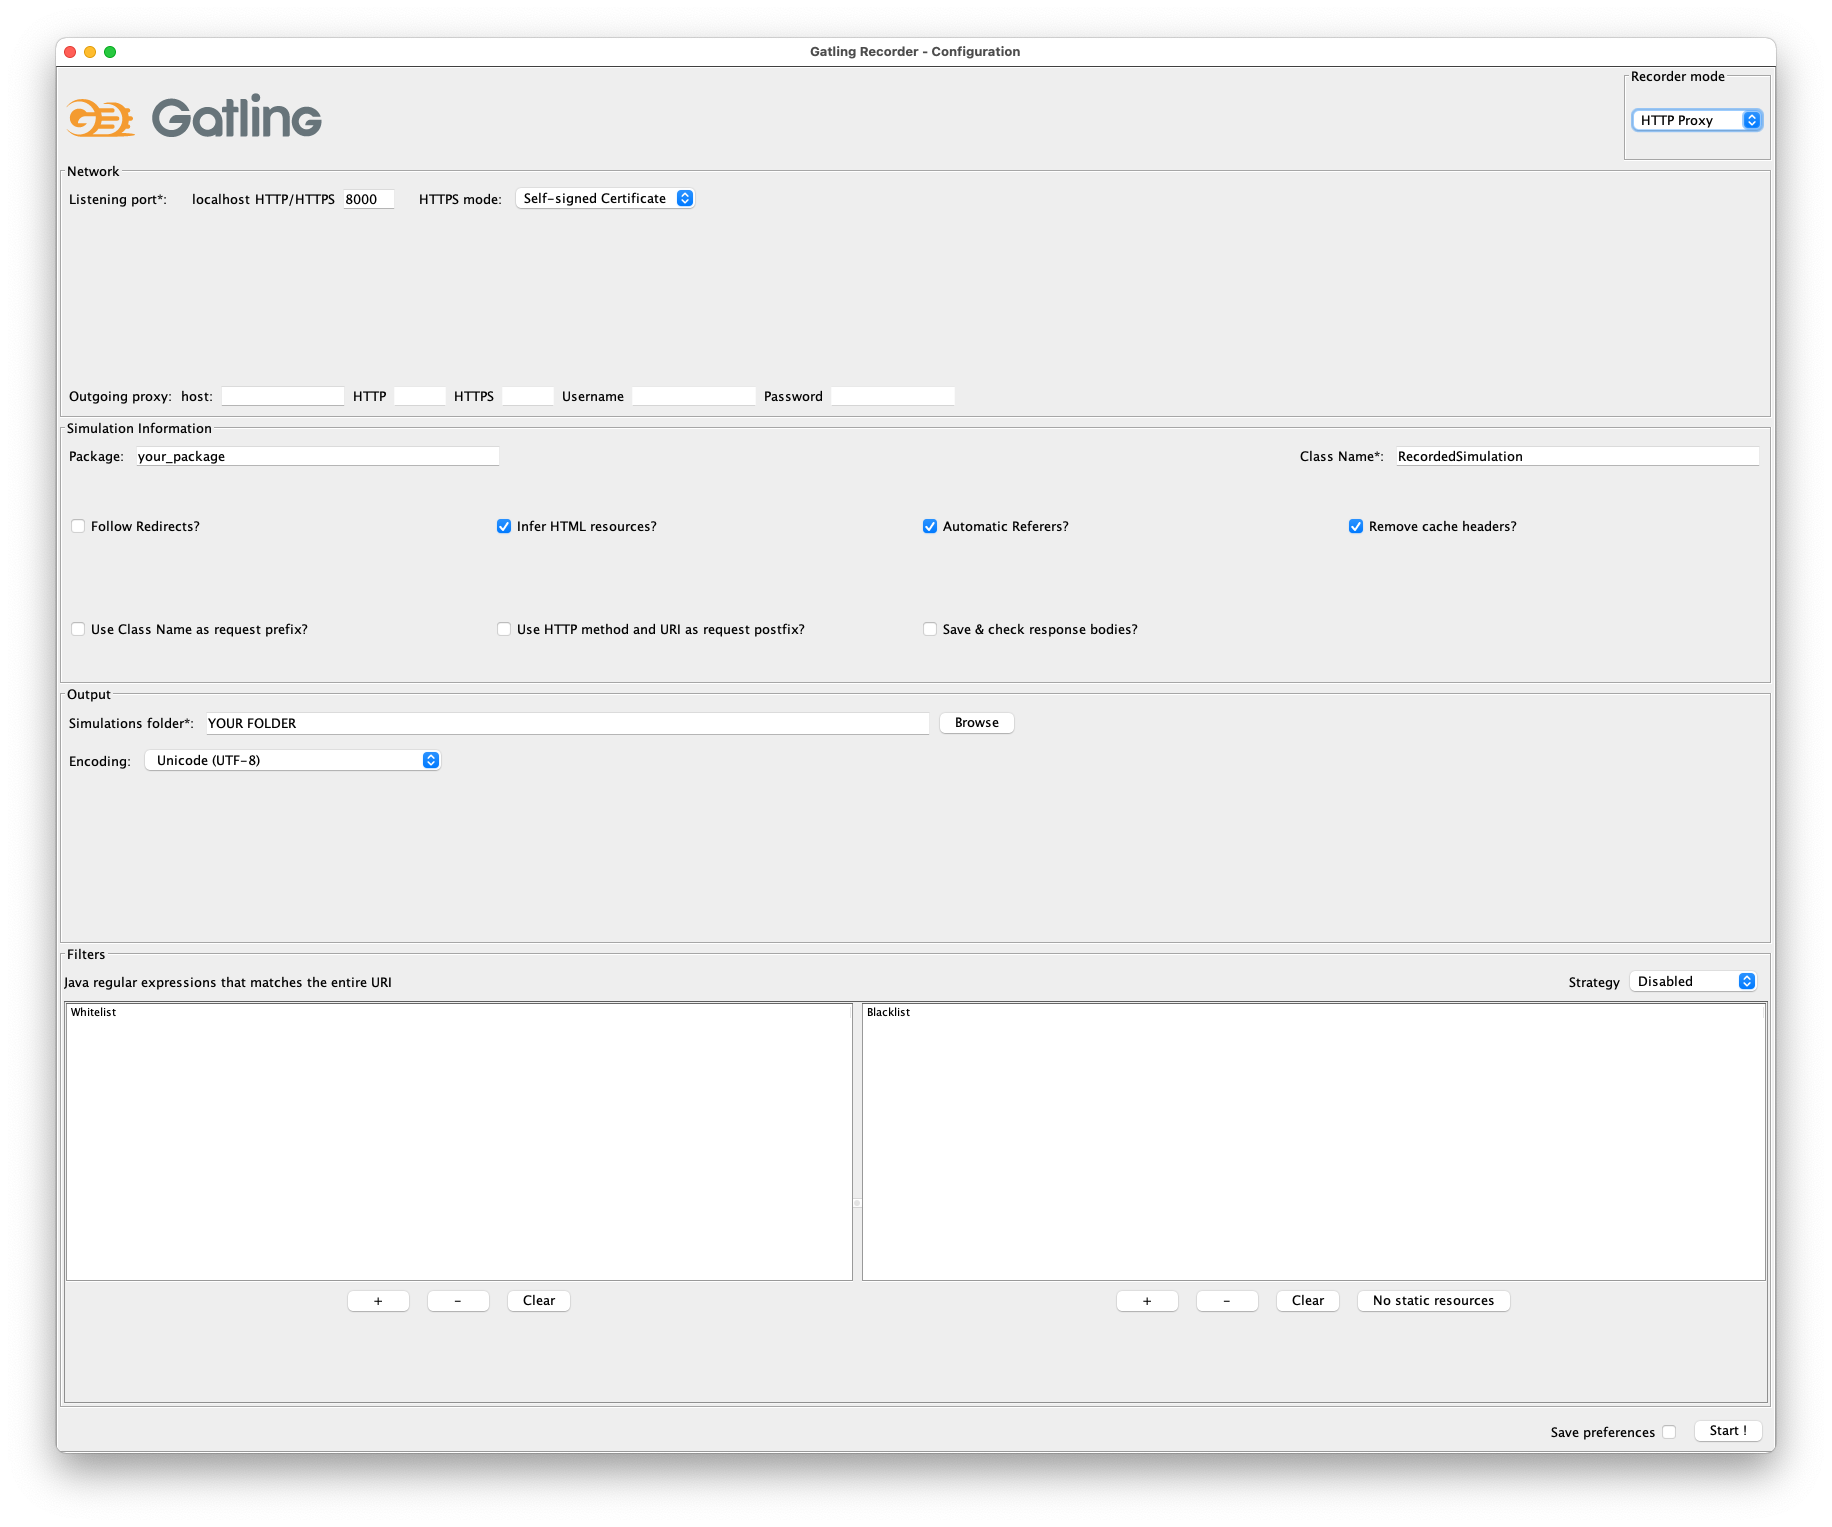
Before starting, you need to configure several things:
-
the port used (8000 in the example above)
-
the mode: HTTP Proxy in our case
-
the name of the package for your tests
-
the final folder
-
the name of the class
-
you have several other options available depending on your needs
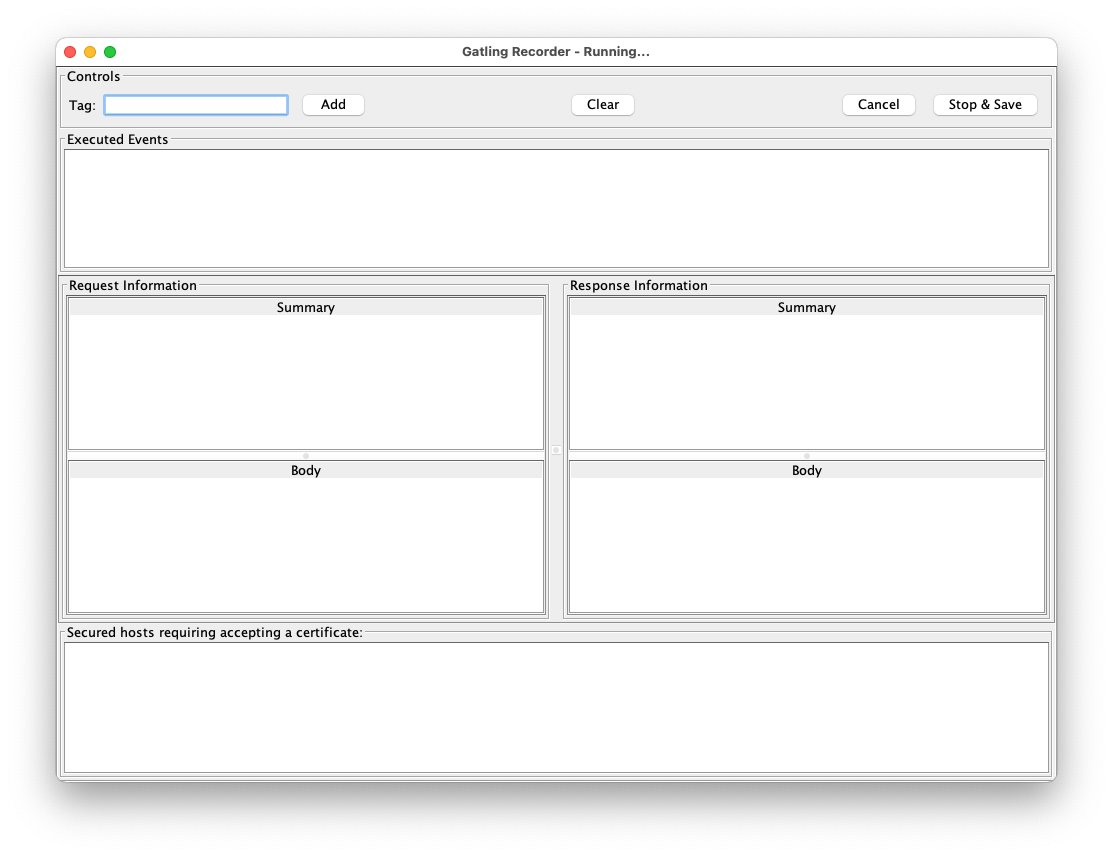
Once everything is set up, you can click on the "Start" button. You should get the same screen as below:
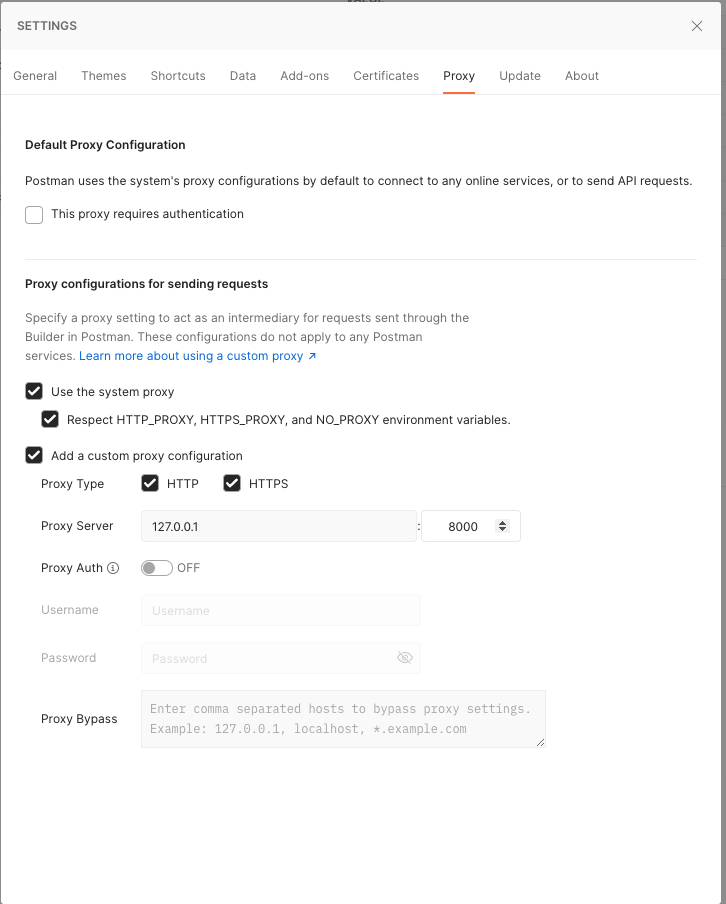
After that, you can use Postman for example to launch a query through Gatling Recorder as you can see in picture 3.
Once the query has been executed, it can be seen in the Gatling Recorder interface (image 4).
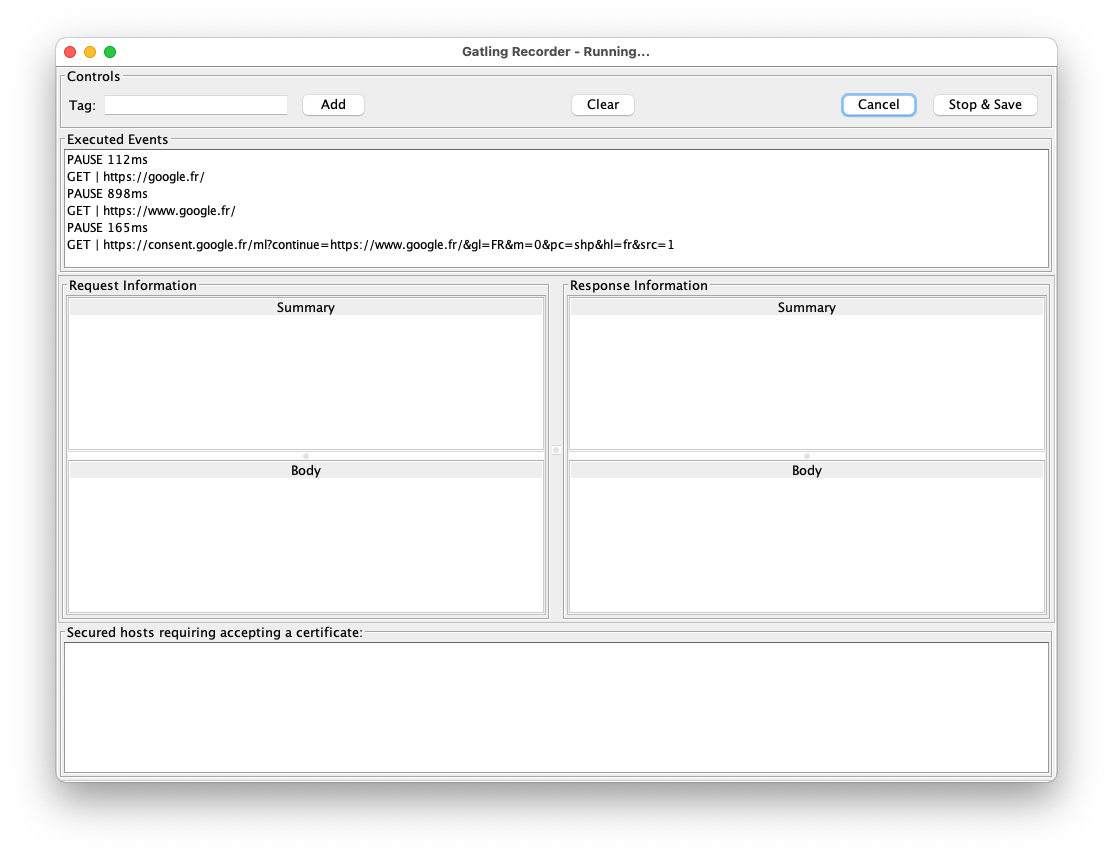
Once all your interactions are complete, you can end the recording by clicking on "Stop and Save". The tool will then generate a Scala file that will allow you to restart all your queries with the same attributes as during the recording.
This tool is very useful to have a first draft that we can refine later to exactly match the desired result.
In the next section, we will explore the definition of these tests in more detail.
Defining tests in Scala for Gatling
For this example, we are going to use the SBT Gatling plugin in order to have everything available quickly (Gatling + Gatling Recorder). To do this, simply add the plugin with:
addSbtPlugin("io.gatling" % "gatling-sbt" % "VERSION")Then activate the plugin with:
lazy val testBlog = project.enablePlugins(GatlingPlugin)The plugin exposes several tasks, but the two most important for our example are:
-
sbt gatling:startRecorder : starts the recorder as in the previous section
-
sbt gatling:test : launches the load tests and generates a report with the results
It is possible to configure Gatling much more specifically but I will not go into detail in this article. If you are interested, I refer you to the documentation: https://gatling.io/docs/gatling/tutorials/ Below, you can see the final code that we will detail piece by piece in the rest of the article:
class SimulationForTheBlog extends Simulation { // 1

 val httpProtocol: HttpProtocolBuilder = http // 2
   .baseUrl("https://test-blog-vincent.fr")

 val scn: ScenarioBuilder = scenario("Simulation For The Blog")
   .exec(
     http("Basic Get Request")
       .get("/")
       .check(status.is(200)) // 3
   )

 setUp(scn.inject(atOnceUsers(10))).protocols(httpProtocol) // 4
}-
Your class must extend Simulation in order to be recognized later
-
Here you can define all the common properties for your tests. For example, we define a URL that will be used in all requests. You can also for example define headers to be included every time or some strategies like follow redirects. This page lists all the available properties: https://gatling.io/docs/gatling/reference/current/http/protocol/
-
In the scenario, we define the blueprint that the simulation should follow. At this stage, no simulation starts but we specify all the actions to be performed. In our case, we create a scenario with a single GET request and make sure that the response is OK = 200. You can chain the requests and conditions together to create very detailed scenarios. Gatling provides a cheat-sheet with all the possible options, I recommend you take a look at it before you start: https://gatling.io/docs/gatling/reference/current/cheat-sheet/. You can, for example, pause the simulation between different queries or extract information from a response to use in the next query. In short, with the Gatling DSL, you can write a scenario that mimics your real interactions exactly (or even better, use the Recorder to generate this code automatically).
-
In the last part, we put all the pieces together. In our example, we inform Gatling that it has to inject 10 users at the same time and that the simulation has to use the parameters previously defined in httpProtocol. Gatling provides many strategies for injecting users, such as:
-
rampUser: injects a number of users over a given time
-
constantUsersPerSec: injects users at a constant rate defined in users per second
-
etc.
All these strategies are explained here: https://gatling.io/docs/gatling/reference/current/general/simulation_setup
-
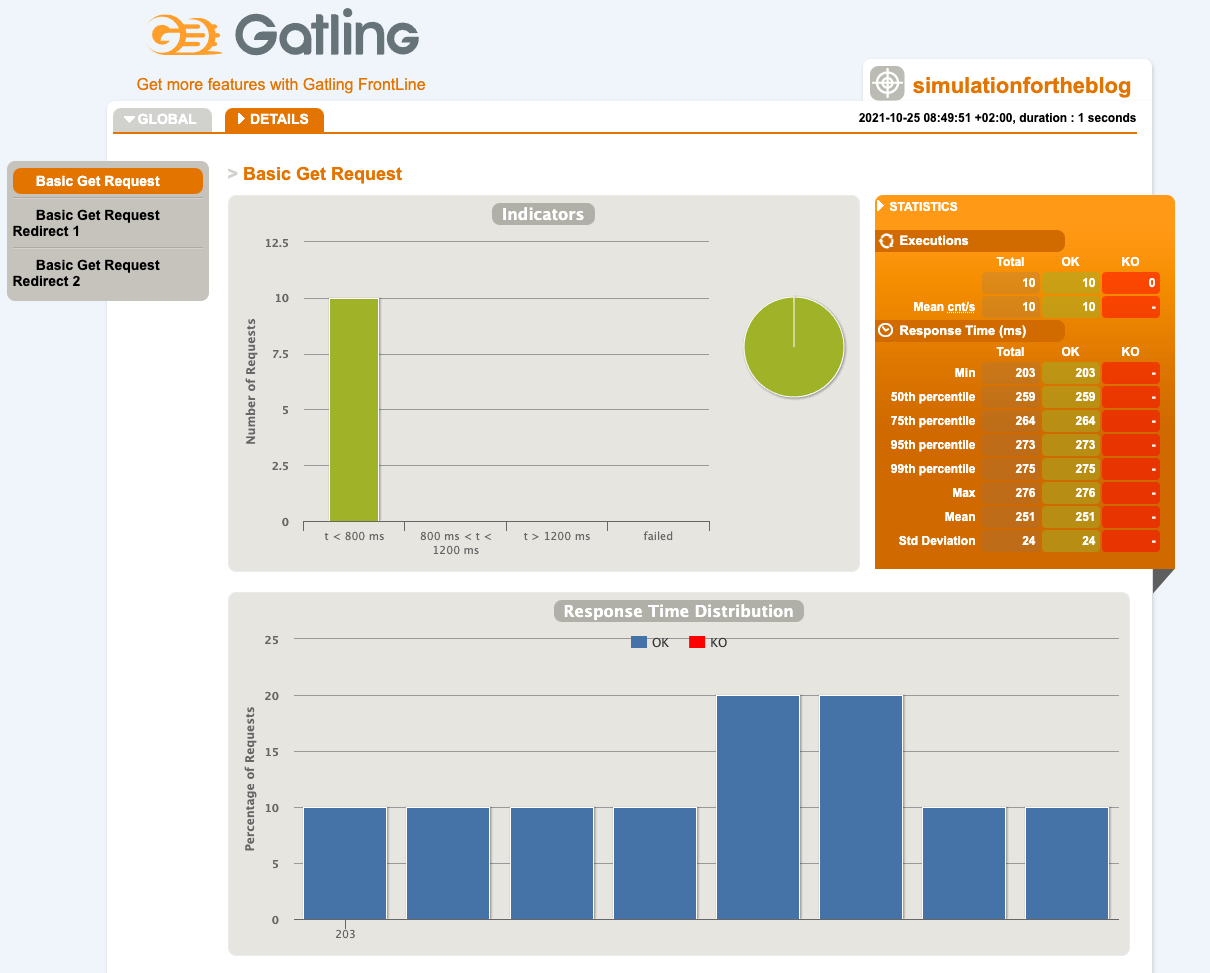
After completing our simulation, a detailed HTML report is generated (Image 5). We can find a lot of information such as response time, status of requests, etc.
Conclusion
Gatling is a complete and easy-to-implement solution, thanks to its Gatling Recorder. Its DSL makes development easy even without knowing Scala in detail. In this article I have presented the basics as well as a simple use case but if you are curious, stay tuned because I am writing another blog post about my feedback following the implementation of the tool in my current project. In addition, we’ll go into more detail about Gatling’s functionality to unlock its full potential!
I hope you enjoy this article and don’t hesitate to contact me if you have any questions!