Running The Spark-Notebook On A Kubernetes Google Cloud Cluster

Modern data intensive applications rely on distributed computing and storage to leverage scalability and reliability. Frameworks and infrastructure are required to get a running environment, we will work with Kubernetes on google cloud for the infrastructure layer. Of course, any cloud vendor with a kubernetes service or an on premise install of a kubernetes cluster would work. Spark is a popular computing framework and the spark-notebook is used to submit jobs interactivelly.
In this blog, you will learn how to configure a set-up for the spark-notebook to work with kubernetes, in the context of a google cloud cluster.
1. Intro To The Stack
1.1 Spark and the spark-notebook
Spark is one of the post popular distributed computing framework, it was developed as a functional programming enabled version of the map-reduce paradigm with an in-memory caching mechanism to impove performance.
Spark is developed in Scala and provides python and R apis. Scala spark jobs can be submitted to a spark cluster by two main mechanism, either as a submitted application (a jar), or through interactive sessions with a REPL. In both case, the REPL or application need to instantiate a SparkSession object, this spark session being the gateway in the application to submit tasks (execute functions) to a spark cluster.
Modern data science is extensively using notebooks, i.e. user interfaces to interact with a computing environment. The spark-notebook is providing the user with web pages for editing code and execute this code in a scala REPL with a SparkSession. This Spark Session can be configured to connect any kind of spark enabled cluster.
Spark has several cluster options:
-
local: no cluster, just the local resources are used
-
standalone: the spark native cluster, a spark executor has to be started on each node (static set-up).
-
YARN: the Hadoop yarn scheduler is used to dispatch tasks on a Hadoop cluster
-
mesos: the spark framework is running on Mesos, instanciating executors/driver on the mesos cluster.
-
Kubernetes: spark executor/driver are scheduled by kubernetes.
1.2 Kubernetes
Kubernetes is a system to automate the deployment of containerized applications. In the context of spark, it means spark executors will run as containers. The spark driver also can be run in kubernetes as a container, this is the so-called cluster mode available for spark-submit command.
There are many solutions to get a kubernetes instance running, either single local node for testing, or full production set-up on premises or cloud-based, see: https://kubernetes.io/docs/setup/pick-right-solution/ We will work on Google Kubernetes Engine so we have a real multinode cluster without the burden of installation. Alternativelly, Minikube is the popular way to get started with kubernetes in single local node.
From a user perspective, kubernetes is used with the kubectl command. kubectl must connect to a kubernetes master node to request execution of commands. The scope here is to get kubectl, and configure it to connect to the (gcloud) kubernetes cluster. Spark is dealing for us with the use of kubectl to deploy the spark-executor/driver containers.
1.3 gcloud
Google cloud is an extensive suite of services, from infrastructure to AI, storage, or application deployment. Major cloud services vendors like Amazon and Azure provide equivalent services and could be substitued for your needs.
In this blog, we use specifically the Kubernetes Engine and the Container Registry. gcloud is a tool to manage google cloud services, i.e. creating projects, clusters, managing data etc.
Most actions done on the web ui have an equivalent as a gcloud command.
Install And Configure
2.1 gcloud
This step can be replaced with local or other vendors solutions if a billing account is not an option for you.
Create a project
First step is to create a project on you google cloud account with billing enabled.
We assume here you have a project named spark-kubernetes and the project id generated for you is spark-kubernetes-224613.

Install and configure gcloud
Install gcloud on your machine, I used homebrew on my MacBook:
brew cask install google-cloud-sdk
Alternative install options are available for different platforms:
gcloud must be configured to work with your project and credentials with the command:
gcloud init
This will open a browser window to login into your google account and will allow you to select your project as the default one. You can also manually pick your project:
gcloud config set core/project spark-kubernetes-224613
This makes our project as the default one for every gcloud call. 'gcloud config list' should show your project is the one selected.
Create a kubernetes cluster
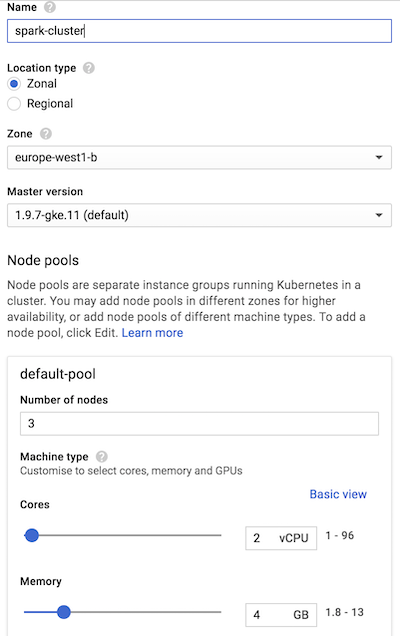
On the google cloud web dashboard, select Kubernetes Engine → Clusters → Create Cluster. Note that the first time kubernetes is set-up on your project , it may take a few minutes to complete.
I picked 'Standard cluster' with 3 nodes (2vCPU, 4 GB RAM per node), so I have a cluster with enough resources to run spark jobs, with a couple of spark executors.
2.2 kubectl Install kubectl
kubectl can be installed by different ways, I used homebrew install on my development machine, for other options/environments, see:
Configure kubectl kubectl must connect to a cluster in a context (relating users to clusters). General information on this
step is given here: https://kubernetes.io/docs/tasks/tools/install-kubectl/
For our google cloud cluster, we leave it to gcloud to create a configuration for the cluster
spark-cluster :
gcloud container clusters get-credentials spark-cluster
This will configure kubectl to use the cluster and context, you can check with:
$ kubectl config get-clusters
NAME
docker-for-desktop-cluster
gke\_spark-kubernetes-224613\_europe-west1-b\_spark-cluster
$ kubectl config current-context gke\_spark-kubernetes-224613\_europe-west1-b\_spark-cluster
The context is connecting to the Google Kubernetes cluster we just created. We are ready to work with our infrastructure on kubernetes now.
2.3 Spark install and config
Spark on kubernetes started at version 2.3.0, in cluster mode where a jar is submitted and a spark driver is created in the cluster (cluster mode of spark). From Spark version 2.4, the client mode is enabled. This mode is required for spark-shell and notebooks, as the driver is the spark-shell jvm itself.
To run spark on kubernetes, spark docker images must be available on a registry. We will push these images on the google registry of our project.
Spark provides a tool to build images and push to a registry. It would be possible to extend these base images in more advanced cases, for example where you want some libraries to be intalled on spark executors.
Download and install
You can download a spark build from here:
I installed version 2.4.0 for hadoop 2.7, in /opt :
cd /opt/spark-2.4.0-bin-hadoop2.7/
For reference, the Dockerfile to build the images are in the kubernetes subdirectory, and the docker tool is in bin .
Publish spark images to docker registry
Note: it is assumed you have docker installed and running on your machine. First, you need to build the spark images, we basically follow here the spark documentation on
The google repository for our spark-kubernetes-224613 project is on eu.gcr.io (located in Europe), and we specify a tag test-tag :
$ ./bin/docker-image-tool.sh -r eu.gcr.io/spark-kubernetes-224613 -t test-tag build

$ ./bin/docker-image-tool.sh -r eu.gcr.io/spark-kubernetes-224613 -t test-tag push
Three docker container images should appear in your project:
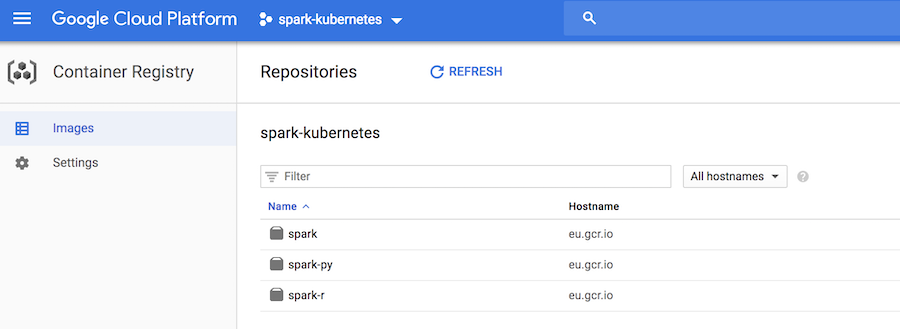
Only the spark image is of interest here, the others provide support for the python and R APIs.
Spark on kubernetes architecture and networking
The principle behind spark on kubernetes is that a SparkSession is configured to request resources, i.e. executors with some memory and CPU. In. order to do this, the Spark application must access the
kubectl command, with rights to hit to the kubernetes cluster API endpoint and create pods (run containers), this is a first problem to solve. At the same time, to execute tasks, the Spark driver must be accessible from the executors with an IP or hostname, this is a second issue to be addressed.
We cannot have a spark driver running on the development environment and easily get this networking requirement. The driver will have to run inside the kubernetes cluster as a pod with the right configuration, and access to kubectl. Within the kubernetes cluster, the driver and the executor communicate easily, the network being open.
The spark documentation explains how to submit jobs with spark-submit:
$ bin/spark-submit \\
    --master k8s://https://: \\
    --deploy-mode cluster \\
    --name spark-pi \\
    --class org.apache.spark.examples.SparkPi \\
    --conf spark.executor.instances=5 \\
    --conf spark.kubernetes.container.image= \\
    local:///path/to/examples.jar
We need to set-up a solution to get a REPL started ( spark-shell ) with access to kubectl, and within the cluster.
Service Accounts, Roles, and Role Bindings
So far, kubectl was used by us, a human user. From within the pod hosting the Spark REPL (or notebook), it has to be a Service Account using kubectl. This account will have to be bound to some Role, granting rights to create pods for our executors.
See the diagram in:
We start by creating the Service Account, with name spark-notebook :
kubectl create -f - <<EOF
apiVersion: v1
kind: ServiceAccount
metadata:
name: spark-notebook
EOF
Note how kubernetes commands are executed by parsing yaml configuration files.
We bind the edit role at the cluster level (allowing to create pods) to the spark-notebook Service Account we just created:
kubectl create rolebinding spark-notebook-pods \\
    --clusterrole=edit \\
    --serviceaccount=default:spark-notebook \\
    --namespace=default
When starting the pod hosting the spark REPL, we will use the spark-notebook Service Account, and we’ll make sure the kubectl is installed in the docker container. This solves the issue of creating the executors from the driver pod.
Here is an example of session, where we run a bash session on the spark image with the spark-notebook service account, and we manually install kubectl inside the container. That would be
a first step before testing the spark-shell on kubernetes:
$ kubectl run spark-bash-session \
    --rm  \
    -i    \
    --tty \
    --image eu.gcr.io/spark-kubernetes-224613 spark:test-tag \
    --serviceaccount spark-notebook \
    -- bash

If you don't see a command prompt, try pressing enter.
bash-4.4#
At that point we have a bash session running inside a pod, let’s install kubectl:
bash-4.4# wget "https://storage.googleapis.com/kubernetes-release/release/v1.6.4/bin/linux/amd64/kubectl"
bash-4.4# chmod +x kubectl
bash-4.4# mv kubectl /usr/local/bin/
bash-4.4#
We can check that kubectl sees the pods:
bash-4.4# kubectl get pods
NAME                                  READY     STATUS    RESTARTS   AGE
spark-bash-session-55695fd589-2r9lp   1/1       Running   0          3m
And check we have creation rights for pods:\
bash-4.4# kubectl auth can-i create pods
yes
Without the spark-notebook Account Service, it wouldn’t be allowed.
Expose the driver to executors: Headless Service
We know that the driver has to be accessible from the executors. The default spark set-up gives a hostname to the driver that is not working, so we need to fix it. This is done with the concept of kubernetes Services.
A headless service will expose the pod, but without loadbalancer or IP, just with a chosen hostname, we do this from the development machine to expose the pod with label app=sparkdriver.
kubectl create -f - << EOF
apiVersion: v1
kind: Service
  metadata:
    name: sparkdriver
  labels:
    app: sparkdriver
spec:
  clusterIP: None
  type: ClusterIP
  ports:
    - port: 4040 # <-- spark UI
  selector:
    app: sparkdriver
EOF
With this service up, the pod will resolve to sparkdriver and we will just need to set this name as the spark.driver.host configuration value.
Manual test for spark-shell (REPL)
We can now test if the spark REPL can get executors up on the kubernetes cluster and execute tasks, this is the last requirement before working on the spark-notebook deployment.
Prepare spark-shell driver pod
We can run the spark image with a bash shell like previously, taking care of setting the label app=sparkdriver:
kubectl run spark-shell \
    --rm  \
    -i    \
    --tty \
    --image eu.gcr.io/spark-kubernetes-224613/spark:test-tag \
    --serviceaccount spark-notebook \
    --labels app=sparkdriver -- \
    bash
Note: the shell is now the spark container in the cluster We can check that the sparkdriver name is resolved:
nslookup sparkdriver
nslookup: can't resolve '(null)': Name does not resolve
Name:      sparkdriver
Address 1: 10.20.2.40 spark-notebook-f58966f-4292z
We install kubectl (for the spark-notebook, we will create a custom docker image…):
wget "https://storage.googleapis.com/kubernetes-release/release/v1.6.4/bin/linux/amd64/kubectl"
chmod +x kubectl
mv kubectl /usr/local/bin/
And we go into the spark installation directory:
cd /opt/spark
Run spark-shell
Compared to the spark-submit command we have seen before, as we work with the spark-shell, these configurations are not needed:
-
-deploy-modebecause the spark driver is the spark-shell container -
--classThere is no main class to provide, we work interactively, the main class was provided by spark- shell
No jar for the application is given either. We need to override defaults for the following:
-
spark.kubernetes.executor.limit.coresmust be set to1(We have 1 core per node, thus maximum 1 core per pod, i.e. kubernetes container) -
spark.kubernetes.executor.request.coresis set to100milli-CPU, so we start with low resources
Finally, the cluster url is obtained with kubectl cluster-info , on my set-up it was:
$ kubectl cluster-info
Kubernetes master is running at https://10.23.240.1
And the command to run spark-shell is:
bin/spark-shell \
    --master k8s://https://10.23.240.1 \
    --name spark-kub \
    --conf spark.driver.host=sparkdriver \
    --conf spark.executor.instances=2 \
    --conf spark.kubernetes.executor.request.cores=100m \
    --conf spark.kubernetes.executor.limit.cores=1 \
    --conf spark.kubernetes.container.image=eu.gcr.io/spark-kubernetes-224613/spark:test-tag
A spark shell prompt appears:
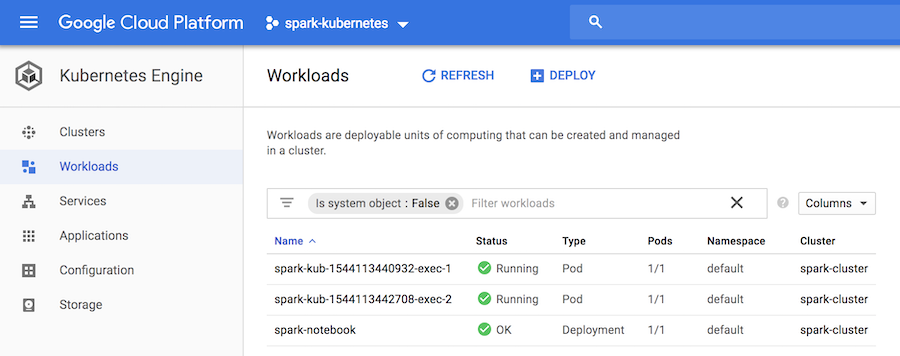
2018-12-06 16:23:48 WARN  NativeCodeLoader:62 - Unable to load native-hadoop library for your platform... using builtin-java classes where applicable
Setting default log level to "WARN".
To adjust logging level use sc.setLogLevel(newLevel). For SparkR, use setLogLevel(newLevel).Spark context Web UI available at http://sparkdriver:4040
Spark context available as 'sc' (master = k8s://https://10.23.240.1, app id = spark-application-1544113440860).
Spark session available as 'spark'.
Using Scala version 2.11.12 (OpenJDK 64-Bit Server VM, Java 1.8.0\_181)
Type in expressions to have them evaluated.
Type :help for more information.

scala>
And the google cloud UI shows the sparkdriver and executors pods:
We can test that a simple job executes in the cluster:
scala> sc.parallelize(1 to 1000000).count
res1: Long = 1000000
The spark REPL being functional, we can start with the spark-notebook.
2.4 Spark-notebook
Build/push a docker image for the spark-notebook
The spark-notebook is a web application with sources available in github:
We need to get the source code:
git clone https://github.com/spark-notebook/spark-notebook.git
cd spark-notebook
Then we must provide a configuration for the docker image build, for this we start from the provided template:
cp .docker.build.conf.kubernetes.example .docker.build.conf
And edit the file to set the right maintainer and registry, for example:
$ cat .docker.build.conf
docker {
    maintainer = "Xavier Tordoir"
    registry = "eu.gcr.io/spark-kubernetes-224613"
    commands = [
        { cmd = USER, arg = root },
        { cmd = RUN, arg = "apt-get update --fix-missing && apt-get install -y -t jessie-backports --no-install-recommends openjdk-8-jdk" },
        { cmd = ENV, arg = "JAVA\_HOME /usr/lib/jvm/java-8-openjdk-amd64" },
        { cmd = RUN, arg = "apt-get install -y wget curl"},
        { cmd = ADD, arg = "https://storage.googleapis.com/kubernetes-release/release/v1.6.4/bin/linux/amd64/kubectl /usr/local/bin/kubectl" },
        { cmd = RUN, arg = "chmod +x /usr/local/bin/kubectl" }
    ]
}
As you see, this docker build configuration installs java (required to run the spark-notebook) and kubectl (required for kubernetes support — creation of executor pods) in the container.
You are now ready to build the spark-notebook image, specifying the spark version and request for kubernetes support with sbt:
sbt -Dspark.version=2.4.0 -Dwith.kubernetes=true docker:publishLocal
This builds the image locally, with a tag corresponding to the versions of the spark-notebook, scala, spark and hadoop, in my case:
$ docker images
REPOSITORY                                         TAG
IMAGE ID            CREATED            SIZE
eu.gcr.io/spark-kubernetes-224613/spark-notebook   0.9.0-SNAPSHOT-scala2.11.8-spark-2.4.0-hadoop-2.7.3   e854fd7b63de        7 seconds ago       1.27GB
We can push this image to the docker registry, after adding the latest tag:
export FULLTAG=0.9.0-SNAPSHOT-scala-2.11.8-spark-2.4.0-hadoop-2.7.3

docker tag eu.gcr.io/spark-kubernetes-224613/spark-notebook:$FULLTAG eu.gcr.io/spark-kubernetes-224613/spark-notebook:latest
docker push eu.gcr.io/spark-kubernetes-224613/spark-notebook
The result is visible on the registry page:
Create a spark-notebook deployment
We have now everything in place to start a spark-notebook server instance.
We will use a deployment yaml config file named spark-notebook.yml . It specifies that we want a single instance (the service is stateful), it will be labelled sparkdriver so it will be recognized by the service we created to obtain a hostname, and is run with the ServiceAccount named spark-notebook so the pod has the rights to create executor pods:
apiVersion: "extensions/v1beta1"
kind: "Deployment"
metadata:
  name: "sparkdriver"
  namespace: "default"
  labels:
    app: "sparkdriver"
spec:
  replicas: 1
  selector:
    matchLabels:
      app: "sparkdriver"
   template:
     metadata:
       labels:
         app: "sparkdriver"
    spec:
      serviceAccountName: "spark-notebook"
      containers:
        - name: "spark-notebook"
          image: "eu.gcr.io/spark-kubernetes-224613/spark-notebook:latest"
And we create this deployment in our cluster:
kubectl create -f spark-notebook.yml
The application is started after a little while:
We need to expose the spark-notebook for us to use it, we could use a loadBalancer and expose it to the public, but it would require to configure some security.
Instead, port forwarding will work to get a simple private access to the application:
We identify the pod running the spark notebook:
$ kubectl get pods
NAME                           READY     STATUS    RESTARTS   AGE
sparkdriver-77b76546fd-5ms8b   1/1       Running   0          6m
We create the port forwarding rule:
kubectl port-forward sparkdriver-77b76546fd-5ms8b 9000:9000
Open http://localhost:9000/ and you should have the spark-notebook server page:
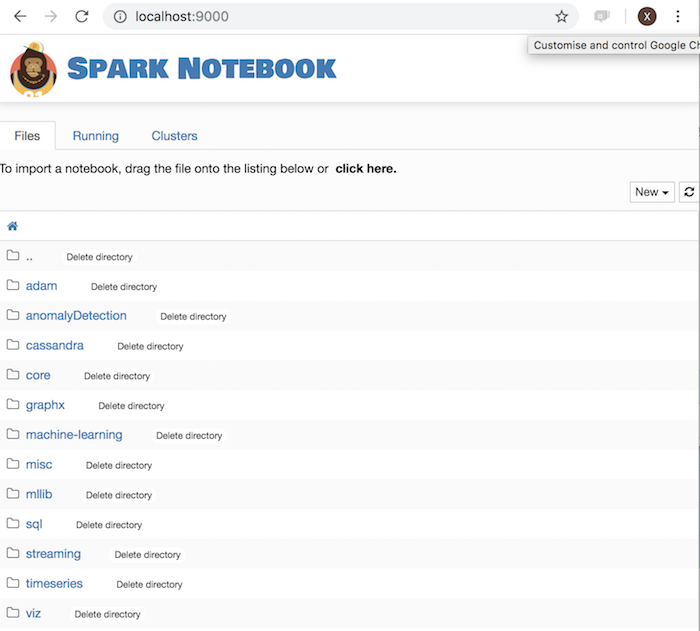
Create and configure a notebook
The next step is to create a notebook, and configure it to use the kubernetes cluster for executors:
Create a new notebook:
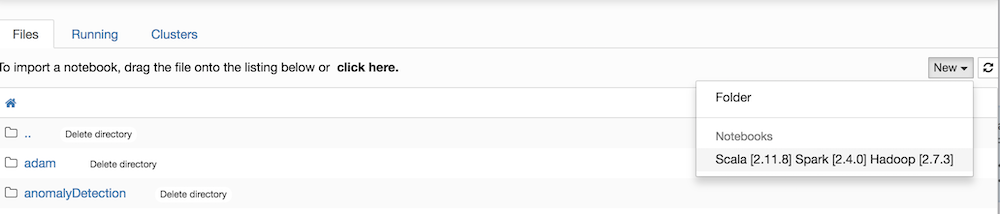
A new browser tab opens with an empty notebook. By default, spark is started in local mode. To override this behaviour, you must edit the notebook metadata (Menu Edit → Edit Notebook Metadata).
The json should have a "customSparkConf" property like:
"customSparkConf": {
    "spark.master"  : "k8s://https://10.23.240.1",
    "spark.app.name": "spark-kubernetes",
    "spark.driver.host": "sparkdriver",
    "spark.executor.instances":"2",
    "spark.kubernetes.executor.request.cores": "100m",
    "spark.kubernetes.executor.limit.cores": "1",
    "spark.kubernetes.container.image": "eu.gcr.io/spark-kubernetes-22461/spark:test-tag"
}
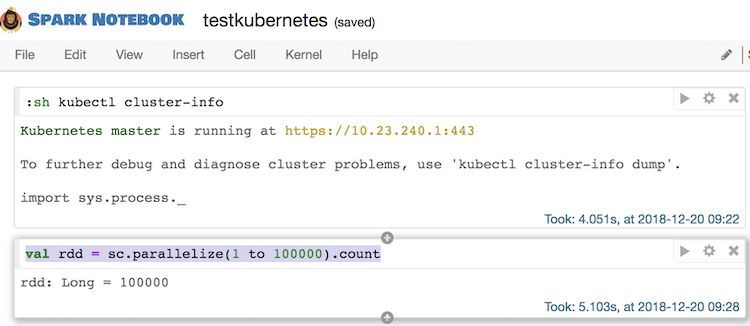
Note: if you are not sure about the spark.master url, you can execute the following in a notebook cell (hit ctrl-Enter after editing a cell):
:sh kubectl cluster-info
This will execute the command in the spark-notebook pod, and return the kubernetes master IP as needed.
Save the notebook (Menu File → Save) then reload the Kernel to take the new configuration into account (Menu Kernel → Reload)
Run some spark command on the cluster
We can now edit a new cell and execute code with some computation on the cluster:
val rdd = sc.parallelize(1 to 100000).count
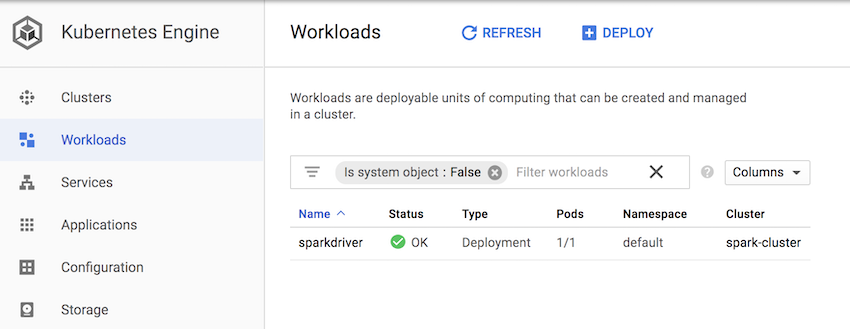
This will require spark to start executor pods in the kubernetes cluster, and here are the results:
On the kubernetes UI, we see 2 executors running, as expected:

Takeaways
The work of deploying the spark-notebook on kubernetes got us to cover a range of features of kubernetes like pods, services, roles, service accounts, some networking, port forwarding.
Also, it required to understand how spark is working on a cluster, what the REPL mode is and how the spark-notebook works, i.e a web application on top of the spark REPL.
We also got to see how gcloud is providing kubernetes clusters to work with.
Where to go from here
There is still quite some way to cover in order to have a fully working environment. The details will be discussed in a second post, with shared code.
Default notebook configuration
We want to avoid editing the notebooks metadata and reload the kernel, by just getting a default configuration. The spark-notebook allows to edit server configuration files in order to achieve this.
Secure notebook access
Working through port forwarding is not the way to go in a team using the spark-notebook server. Authentication should be enabled on the spark-notebook and a service exposing the pod should also be started, with the right security layer enabled.
Deal with state
Notebooks are json files stored on the local filesystem of the server. Failure/restart of the spark-notebook pod will result in loss of the work.
The spark-notebook integrates with git, and kubernetes provides persistent volumes, this would allow to retain the state of the application (notebook persistence).
Productize as a configurable recipe
With an understanding of the deployment details, it would be good to work on organising the code and provide easy to use recipes to deploy pre-configured spark-notebook environments, even providing java dependencies for advanced spark use cases.