jQuery UI Ajax autocomplete with Play 1.2

When Matt Raible compared JVM web frameworks last December, he gave the (Play framework (version 1.2) null points for ‘components’. Aside from other criticism of Raible’s comparison or the lack of definition of what a ‘component’ is in this context, it is worth mentioning that this evaluation is either inaccurate, misleading or both. It is accurate to say that Play does not have ‘components’, in the sense that Play does not ship with a UI component toolkit/library/framework/whatever, but it also misses the point somewhat.
I hereby declare that all jQuery UI components are Play UI components. After all, Play is designed to make it easy to implement RESTful web services for use with Ajax clients, and has a view template system that makes it easy to use HTML5 and jQuery. In other words, Play successfully decouples user-interface widgets from the server-side web framework by providing effective support for HTML5 in general, and jQuery and Ajax in particular.
To start with, this article is an example of the autocomplete (a.k.a. autosuggest) component with Play, to implement a suggest-while-you-type text input that fetches data from a server application written in Play.
The goals of this article are to show you how to do this in Play, to show you how easy it is, and to provide some simple jQuery code examples for Java developers who are less familiar with it.
This article’s examples and source code are available as part of the Play framework jQuery UI module.
Architecture
The simplest way to use a server-side web framework is to dynamically generate HTML on the server, send this to the client, and use hyperlinks and HTML forms for all application interaction, without any JavaScript. Within this approach, the server application layer can be stateful or stateless. Also, the user-interface can be decomposed into user-interface components that are modelled on the server-side or represented purely in page templates, with things like ‘tags’ to avoid view template code duplication. Play is stateless and represents views purely as templates. In other words, there is no server-side application layer state (excluding caches and persistent data stores) and there are no server-side user-interface components.
Things get more interesting when your web application has a ‘rich client’ that uses JavaScript to provide direct interaction with the HTML document object model (DOM) and its own run-time client-side state (in JavaScript objects). One approach to integrating this with a server-side web framework is for the framework to use Ajax to manage synchronisation between server-side user-interface components and client-side JavaScript and DOM state; this is how JavaServer Faces works. Play uses a different approach: user-interface components only exist on the client, with JavaScript and DOM state, and communicate with the server using Ajax requests managed by the client component, typically with JSON or (less commonly) XML requests and responses.
In other words, a rich client user-interface in a Play framework web application typically consists of jQuery-based user-interface components that use JSON over Ajax to communicate with a RESTful web service exposed the Play application layer. Play enables this architecture by not putting any restrictions on the rendered HTML, so you can design a DOM structure that works with the jQuery component, and by making it easy to implement an arbitrary JSON-based RESTful web service on the server side, to make the jQuery component’s API.
The rest of this article shows you how to implement one example of this architecture: a jQuery UI component that sends Ajax requests to a Play server application and renders a JSON response.
Autocomplete for selecting a String value
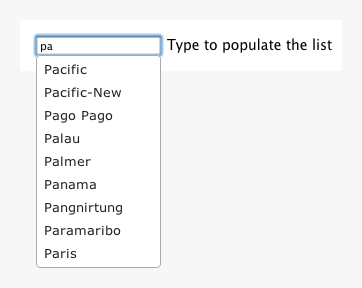
The autocomplete widget displays a drop-down list of suggestions while you type text into an input field. Although the widget can show suggestions from a list of values in the HTML document, it is far more interesting to fetch suggestions from the result of a server-side search, because then you can autocomplete values from a far longer list, such as thousands of employee names.
Client
The HTML part of the client is trivial: a text input with two additional attributes. First, the class name allows the JavaScript to select this element. Second is an HTML5 data attribute which we use to capture the server-side controller URL in the HTML document and therefore make it available to the JavaScript. We do this to avoid having to put the URL in the static JavaScript code, and so we can use the Play template syntax for generating the URL from a controller action reference.
<input name="location" class="autocomplete" data-url="@{Application.autocompleteLabel()}”>We then use some JavaScript to turn the input element into an
autocomplete component. This code simply selects and iterates over input
elements with the autocomplete class: for each one, the code extracts
the URL from the data attribute and transforms the input element into an
autocomplete widget whose data source is the URL.
$('input.autocomplete').each( function() {
   var $input = $(this);
   var serverUrl = $input.data('url');
   $input.autocomplete({ source:serverUrl });
});
Server
The server-side is a Play controller action that returns a list of suggestions. The first part, for this example, is some test data - a list of ‘location’ names extracted from the JDK’s time zone list:
public static List<String> locations() {
   final List<String> result = new ArrayList<String>();
   final String[] timeZones = TimeZone.getAvailableIDs();
   for (int i = 0; i < timeZones.length; i++) {
      final String[] parts = timeZones[i].split("/");
      if (parts.length == 2 && parts[1].matches("[A-Za-z_]+")) {
         final String location = parts[1].replaceAll("_", " ");
         result.add(location);
      }
   }
   Collections.sort(result);
   return result;
The interface with the client-side widget is the following controller
action. The Ajax request includes a query string that consists of a
single term field, for the user-entered text. This action simply
constructs a list of strings for the names that match (case-insensitive
initial substring) the search term, and renders the list in JSON format.
Note that we limit the total number of results to a maximum of 10, to
avoid slowing down the autocomplete by loading and rendering more
suggestions than the user is reasonably likely to choose from.
public static int AUTOCOMPLETE_MAX = 10;

public static void autocompleteLabel(final String term) {
   final List<String> response = new ArrayList<String>();
   for (String label : locations()) {
      if (label.toLowerCase().startsWith(term.toLowerCase())) {
         response.add(label);
      }
      if (response.size() == AUTOCOMPLETE_MAX) {
         break;
      }
   }
   renderJSON(response);
The result is an input field that displays a list of location names that match the user input.
Autocomplete for selecting a JPA entity
A more complex use case is using the autocomplete to select a JPA entity
instance instead of a string value: when you want to select a
models.Person instead of a person’s name.
Client
In this case, the HTML mark-up is more or less the same. The from
control name is now location.id since we will submit the value to a
controller action with a parameter of type models.Location, which the
JPA binder will load based on the supplied ID. The class autocomplete
controller names only differ to separate them from the previous example.
<input name="location.id" class="autocomplete-relation" data-url="@{Application.autocompleteLabelAndValue()}">The JavaScript, however, is more complex because we need to manipulate
the DOM and customise the autocomplete configuration. This is because
although we want to select the location instance by name, we actually
want to submit its ID with the form. To make this possible, the
JavaScript dynamically adds a hidden input field to the form that will
be used to store the location ID. To submit the ID instead of the
location name (which will be the value of the visible input field), the
JavaScript changes the visible input’s form control name and sets the
original name on the hidden input field. Finally, the autocomplete
configuration sets the focus event handler (fired when a suggestion
list item acquires focus) to populate the input field with the selected
location’s name (label) instead of its ID (value), and sets the select
event to copy the name and label in the appropriate form control values
when a suggestion is selected.
$('input.autocomplete-relation').each( function() {
   var $input = $(this);

   // Create a hidden input with the same form control name to submit the value.
   var controlName = $input.attr('name');
   var $hidden = $('<input type="hidden"/>').attr('name', controlName);
   $input.after($hidden).attr('name', controlName + '_label');

   // Set-up the autocomplete widget.
   var serverUrl = $input.data('url');
   $(this).autocomplete({
      source: serverUrl,
      focus: function(event, ui) {
         // Set the text input value to the focused item's label, instead of the value.
         $input.val(ui.item.label);
         return false;
      },
      select: function(event, ui) {
         // Save the selection item and value in the two inputs.
         $input.val(ui.item.label);
         $hidden.val(ui.item.value);
         return false;
      }
   });
});
Also, the following JavaScript disables the redundant visible text input fields on form submit, to avoid sending the additional label with the form data.
// On form submit, suppress autocomplete fields that only contain a label.
$('form').submit(function() {
   $(this).find('input.autocomplete-relation').attr('disabled', 'disabled');
});
Server
The main difference on the server-side is that the response JSON must now be a list of label/value pairs instead of a simple list of labels. The jQuery UI autocomplete component supports both kinds of response. To make this easier to render, we add a simple wrapper class whose structure results in the correct JSON structure in the response.
public class AutocompleteValue {

   private String value;
   private String label;

   public AutocompleteValue(final String value, final String label) {
      this.value = value;
      this.label = label;
   }
The new controller action, with the same logic but a different response structure is now as follows.
public static void autocompleteLabelAndValue(final String term) {
   final List<AutocompleteValue> response = new ArrayList<AutocompleteValue>();
   int index = 1;
   for (String label : locations()) {
      final String value = String.valueOf(index);
      if (label.toLowerCase().startsWith(term.toLowerCase())) {
         response.add(new AutocompleteValue(value, label));
      }
      if (response.size() == AUTOCOMPLETE_MAX) {
         break;
      }
      index++;
   }
   renderJSON(response);
Now we can use the autocomplete as a simple selector for model entities.
Conclusion
This was actually so easy that it was something of an anti-climax, which is precisely the point. If you are not sure what I mean, then just try doing this with JSF.
Implementing rich-client web application user-interfaces with jQuery UI widgets and Play RESTful web services is simpler, more elegant, easier to test and debug, and just more pleasant than implementing the same user-interface using other Ajax-based Java EE user-interface component frameworks. I for one am glad that I will not have to use RichFaces again.
For Java web developers, the good news is that JavaScript-based rich client interfaces are no longer scary or too difficult. The bad news is that you now how have less excuse for not learning to use JavaScript and jQuery. And if you don’t, someone else will.