Telegram bot for file sharing using Quarkus

About what is it?
The project’s objective is to explore the practical applications of Quarkus. In this post, I won’t delve into a detailed comparison with other similar frameworks, instead, I’ll provide a brief and beginner-friendly overview. This overview will be somewhat high-level, omitting discussions on deployment and native features. Most of the concepts will be simplified to fit within a single class, avoiding complex patterns and minimizing the amount of code.
Let’s begin with the project idea: creating a Telegram bot. This bot will allow you to send one or more attachments and receive a link in return. You can share this link with people who may not use Telegram. When they open the link, they will be directed to a simple one-page frontend with a single button. Clicking on this button will enable them to download all the attachments as a zip file.
Additionally, the entire source code for this project is available on GitHub.
Architecture and use case
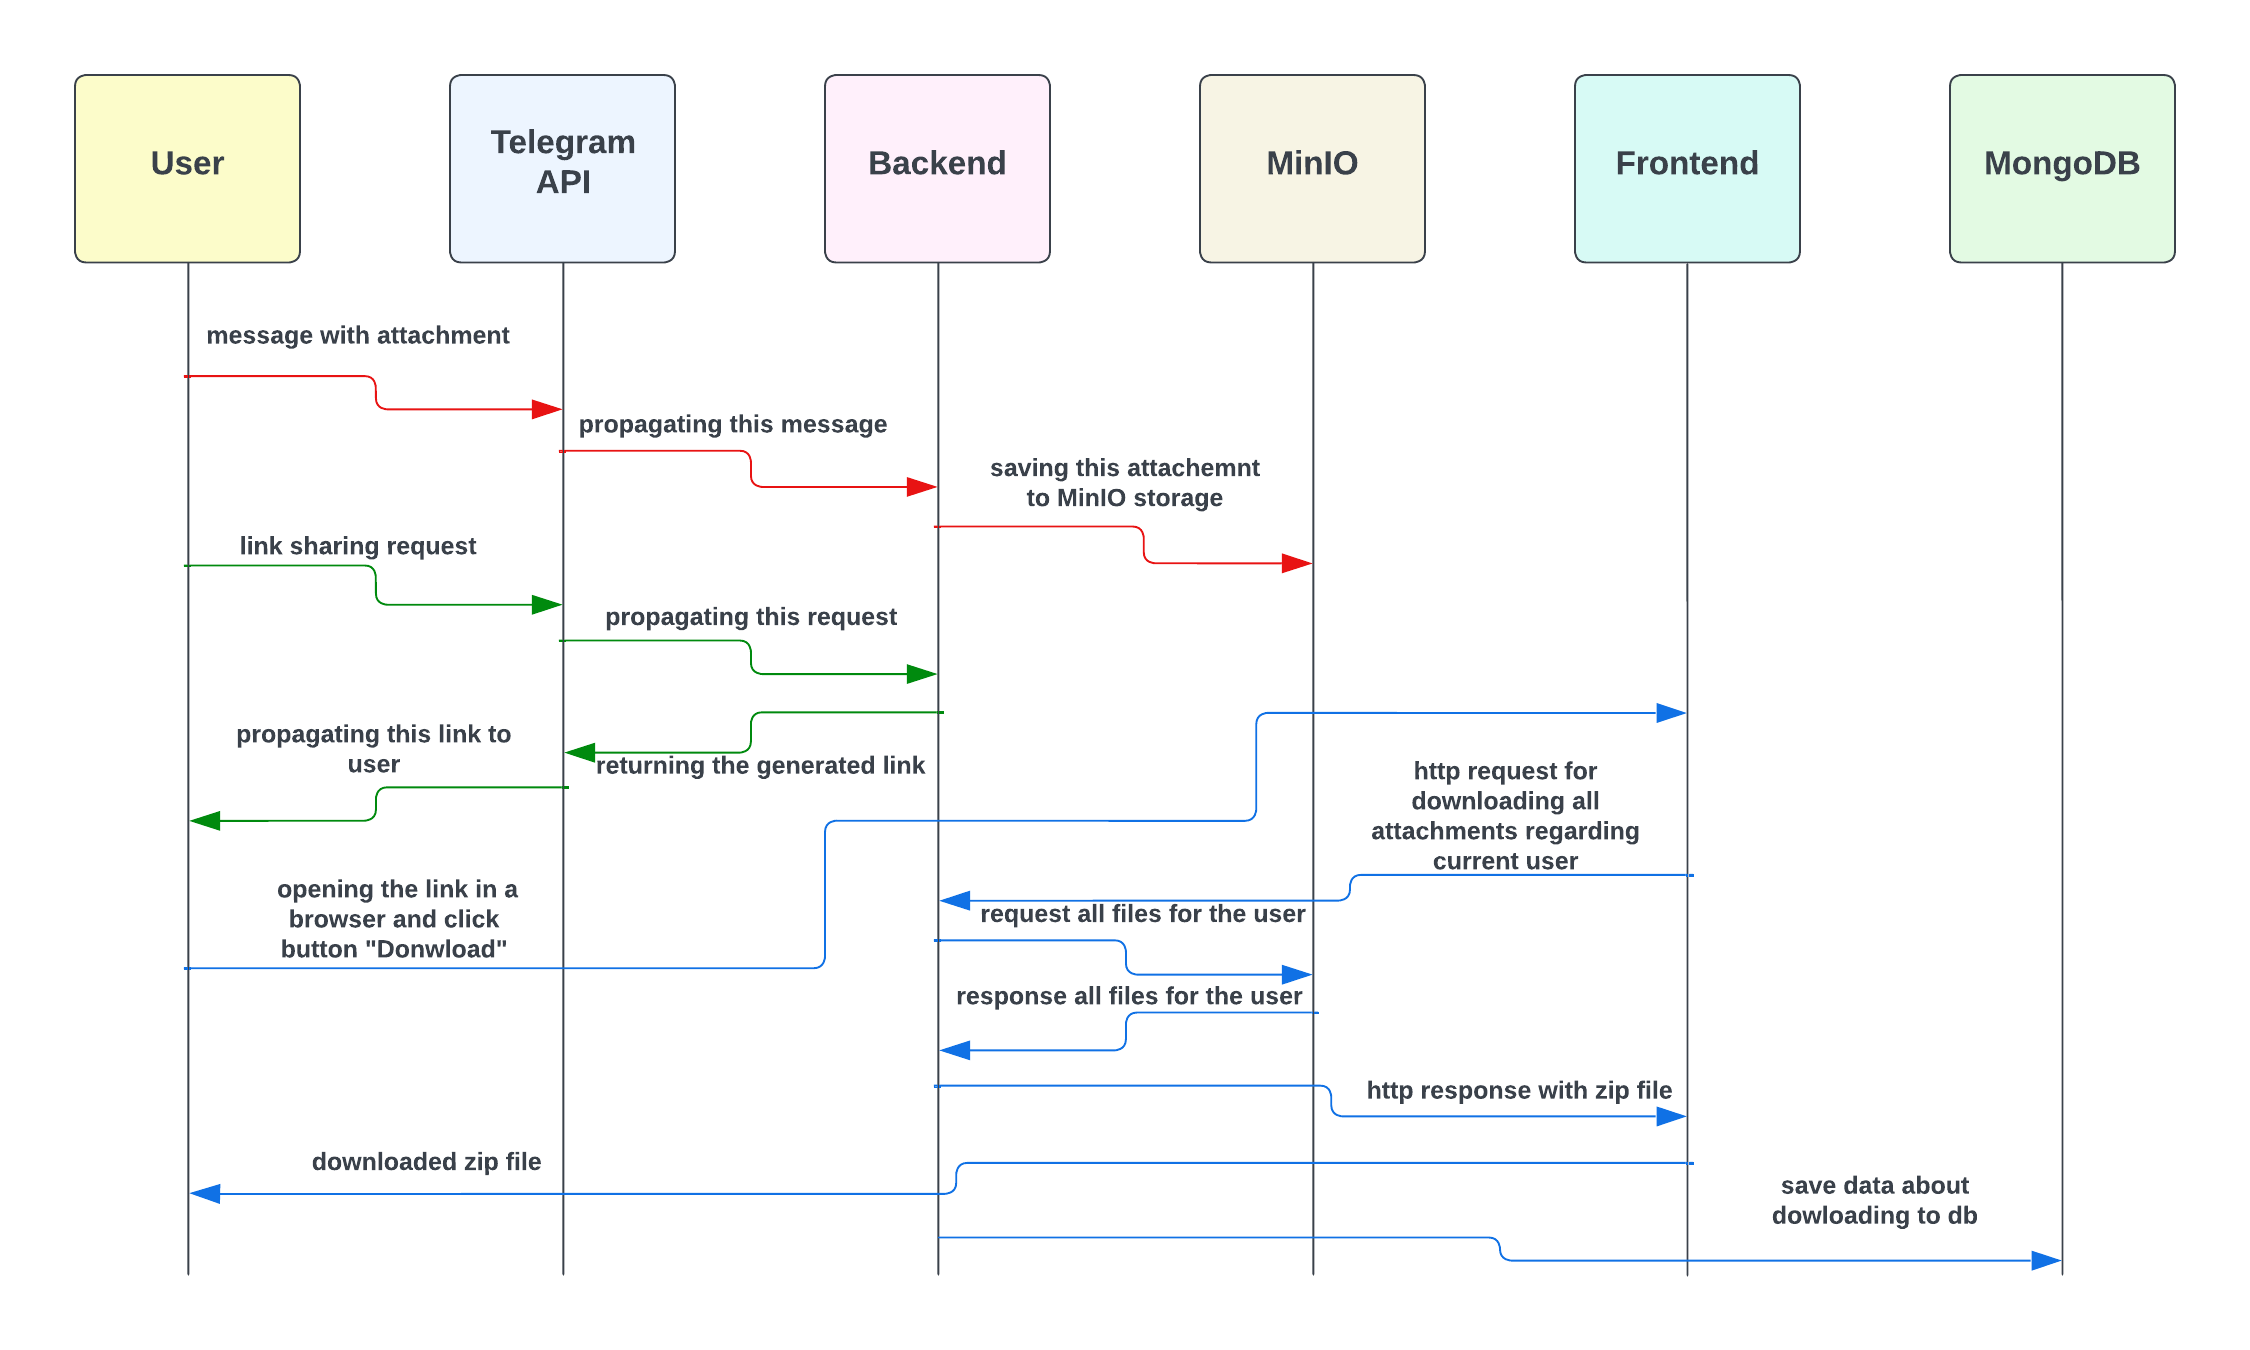
The primary user scenario unfolds as follows:
-
The user initiates a conversation with a Telegram bot and sends an attachment.
-
The Telegram bot forwards this message to our backend application.
-
The backend application stores this attachment in MinIO storage.
-
The user sends the command
/linkto the Telegram bot to obtain a shareable link. -
The backend application generates a link to our frontend application and provides it to the user.
-
The user can copy and share this link, that accesses the frontend application which features a "Download" button.
-
When the "Download" button is pressed, the frontend sends an HTTP request to our backend. The backend application retrieves all attachments associated with this user, compiles them into a zip file, and returns it to the user. Simultaneously, the backend application records the downloaded data in MongoDB.
In terms of state diagrams:
Backend
For the backend, we’ll be employing a conventional web server. Our journey begins with the Quarkus Get Started page.
To get started, we need to follow step 1 on the provided link, which involves installing the Quarkus CLI.
Now, we can execute:
quarkus --helpto get familiar with the main functionality. This command will be our main entry point for any application manipulation. With its assistance we can create a skeleton, in fact, it will have everything that we need, and it will even be a ready-to-deploy application.
Before we create an application we have to choose which extensions (or dependencies) we’re going to use.
We can find them on https://quarkus.io/extensions/ or by executing:
quarkus extension listFor our needs, it will be enough to add quarkus-mongodb-panache, quarkus-resteasy-reactive and quarkus-quinoa.
Additionally, we have to manually add the library for creating Telegram Bots in Java, and MinIO Java client by Quarkus.
While in the root directory of our new project, run this command:
quarkus create app com.example:file-sharing-bot \
  --extension=quarkus-mongodb-panache,quarkus-resteasy,quarkus-quinoa \
  --gradle
We can already run our application with the default implementation. To do so, navigate to the root directory and execute the command to start our application:
quarkus devNow, you can open the welcome page at http://localhost:8080/
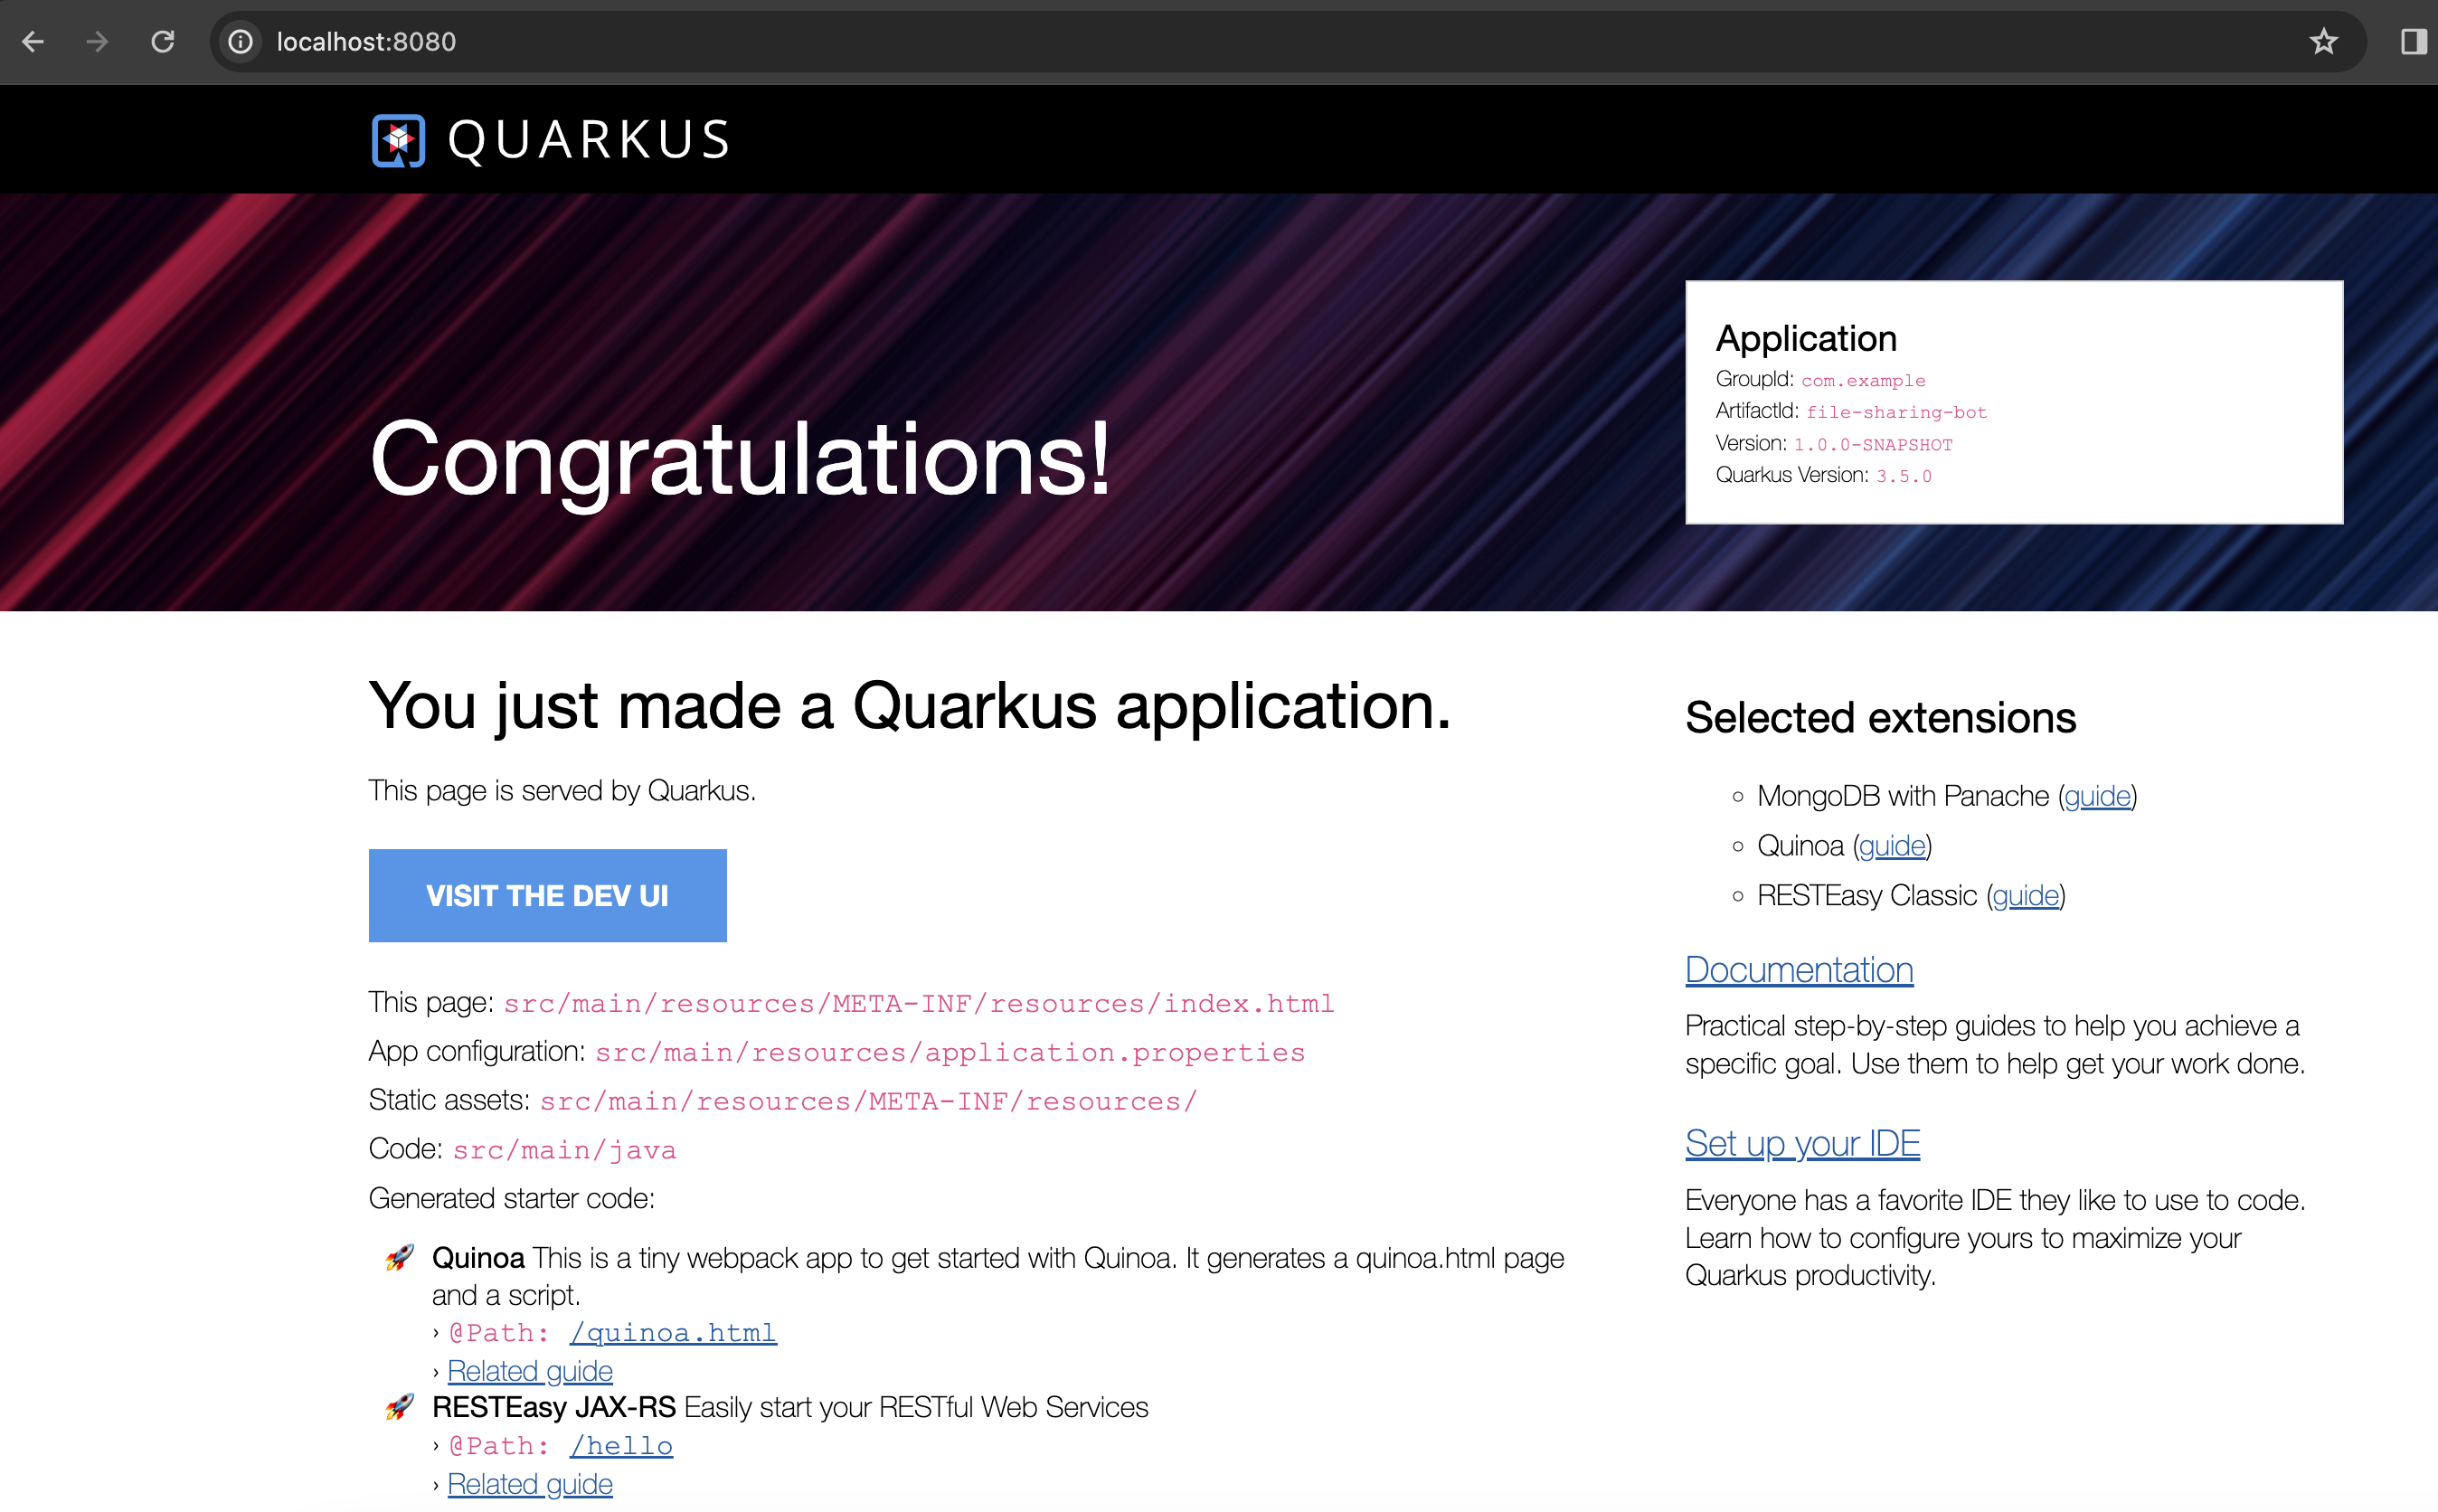
and http://localhost:8080/hello default controller method

and http://localhost:8080/quinoa.html default frontend implementation

It was quite easy, right?
Before we dive into coding the bot’s logic, we need to register our bot and obtain a username and token. To do this, please follow the official instructions provided in this telegram tutorial.
It’s worth noting that there isn’t even a main class like we’re used to seeing in the source code, and which is sometimes considered boilerplate. However, let’s go ahead and create one explicitly now:
package com.example;

import io.quarkus.runtime.Quarkus;
import io.quarkus.runtime.QuarkusApplication;
import io.quarkus.runtime.annotations.QuarkusMain;
import org.jboss.logging.Logger;
import org.telegram.telegrambots.bots.TelegramLongPollingBot;
import org.telegram.telegrambots.meta.TelegramBotsApi;
import org.telegram.telegrambots.meta.exceptions.TelegramApiException;
import org.telegram.telegrambots.updatesreceivers.DefaultBotSession;

@QuarkusMain
public class Main {

    public static void main(String... args) {
        Quarkus.run(MyApp.class, args);
    }

    public static class MyApp implements QuarkusApplication {
        private static final Logger LOGGER = Logger.getLogger(MyApp.class);
        private final TelegramLongPollingBot telegramLongPollingBot;

        public MyApp(TelegramLongPollingBot telegramLongPollingBot) {
            this.telegramLongPollingBot = telegramLongPollingBot;
        }

        @Override
        public int run(String... args) {
            try {
                TelegramBotsApi telegramBotsApi = new TelegramBotsApi(DefaultBotSession.class);
                telegramBotsApi.registerBot(telegramLongPollingBot);
            } catch (TelegramApiException e) {
                LOGGER.errorf(e, e.getMessage());
            }
            Quarkus.waitForExit();
            return 0;
        }
    }
}
Dependency injection in Quarkus is a CDI-based dependency injection. In the case of only one defined constructor, Quarkus uses constructor injection. To satisfy the MyApp constructor parameter TelegramLongPollingBot, let’s create the corresponding bean using the @Produce annotation:
    @Produces
    public TelegramLongPollingBot telegramLongPollingBot() {
        return new TelegramLongPollingBot(botConfig.token()) {
            @Override
            public String getBotUsername() {
                return botConfig.username();
            }

            @Override
            public void onUpdateReceived(Update update) {
                try {
                    var message = update.getMessage();
                    if (message.hasText()) {
                        messageService.handleText(message);
                    } else if (message.hasDocument() || message.hasPhoto() || message.hasVideo()) {
                        messageService.handleMedia(message);
                    } else {
                        execute(SendMessage.builder().text("Please send media").build());
                    }
                } catch (TelegramApiException | IOException e) {
                    LOGGER.errorf(e, "Error while receive update");
                    throw new RuntimeException(e);
                }
            }
        };
    }
Our bot is capable of receiving both text and media. In the case of text, it will expect the following supported commands:
-
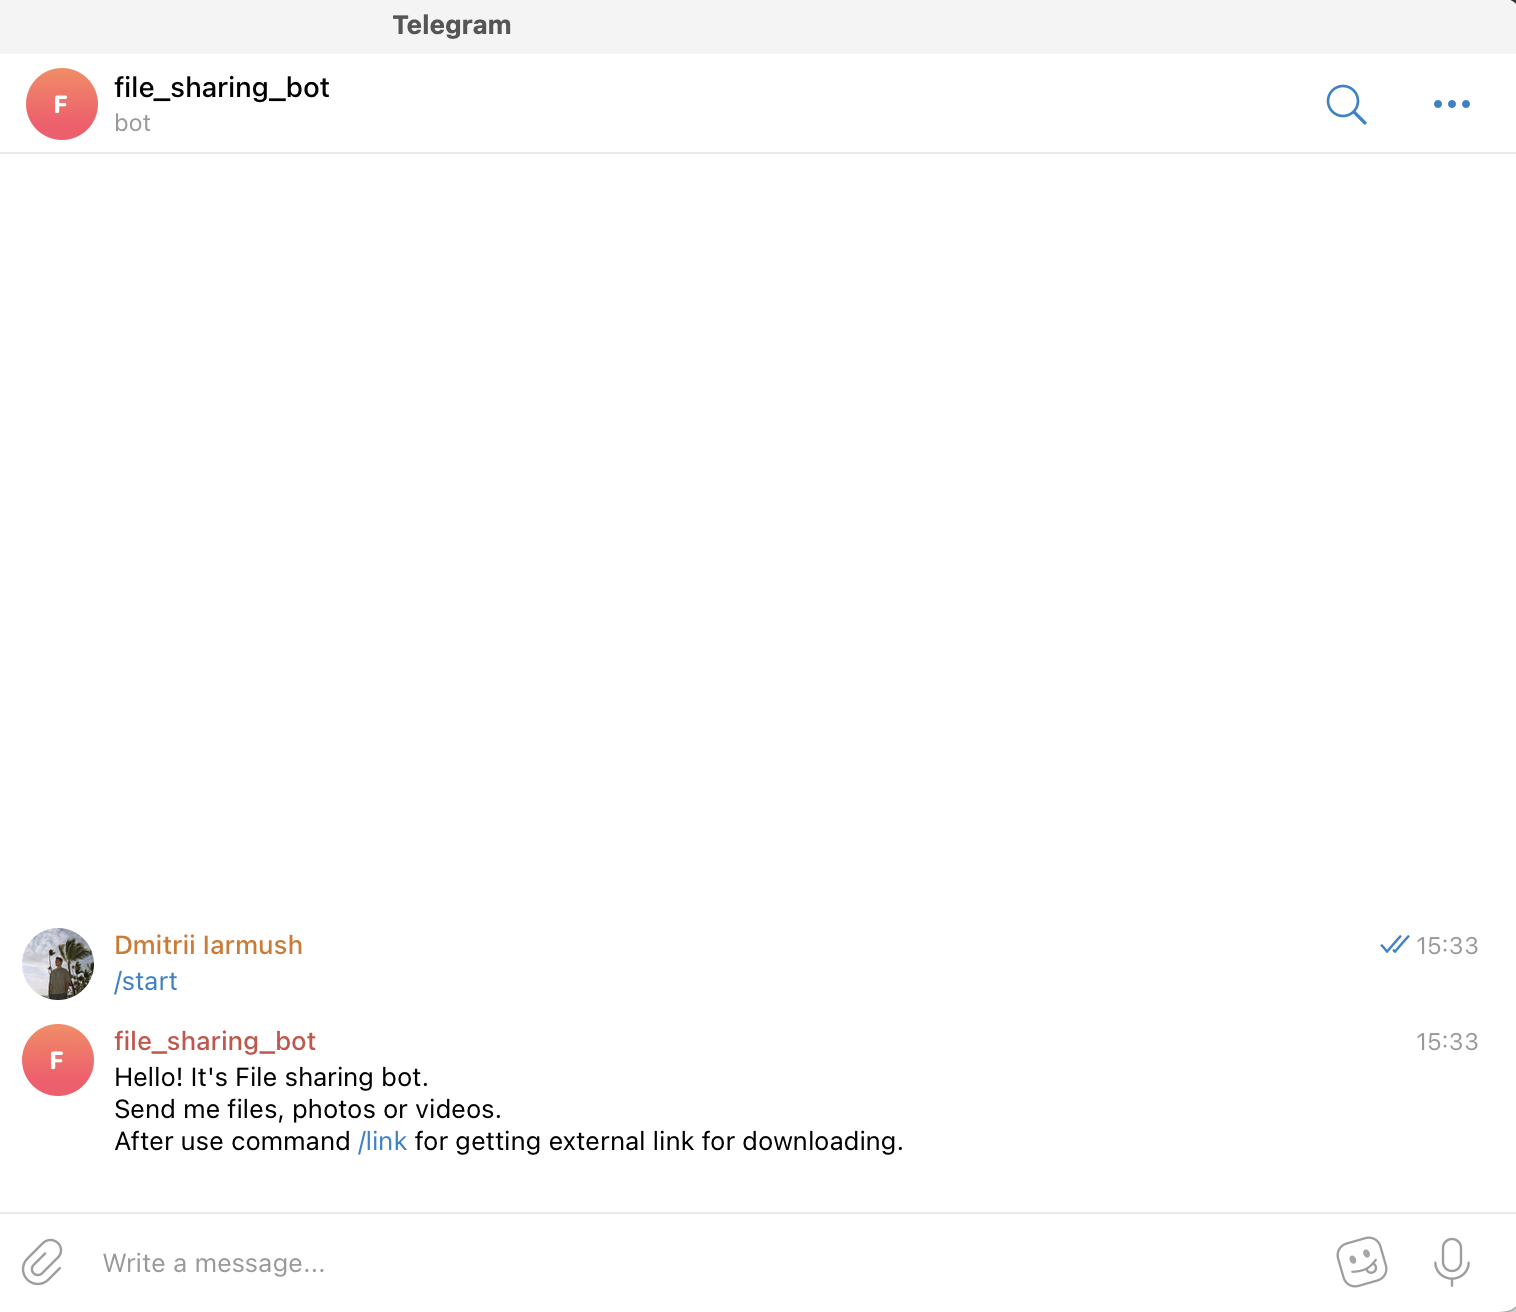
/start- to initiate a chat with the bot and begin sending media. -
/link- to generate a link for downloading all the data sent prior. -
/finish- to clear existing saved media and prepare for new uploads.
    public void handleText(Message message) throws TelegramApiException {
        var chatId = message.getChatId();
        LOGGER.infof("Handled text in chatId: %s", chatId);

        if (message.getText().equals(BotCommand.START.getName())) {
            telegramLongPollingBot.execute(SendMessage.builder().text("""
                            Hello! It's File sharing bot.
                            Send me files, photos or videos.
                            After use command /link for getting external link for downloading.
                            """)
                    .chatId(chatId)
                    .build());
        } else if (message.getText().equals(BotCommand.LINK.getName())) {
            telegramLongPollingBot.execute(SendMessage.builder().text("""
                            Use this link for downloading archive:
                            http://localhost:8091/?chatId=%s
                            """.formatted(chatId))
                    .chatId(chatId)
                    .build());
        } else if (message.getText().equals(BotCommand.FINISH.getName())) {
            minioService.deleteFilesAndBucket(String.valueOf(chatId));
            telegramLongPollingBot.execute(SendMessage.builder()
                    .text("File sharing is ready for new medias")
                    .chatId(chatId)
                    .build());
        } else {
            telegramLongPollingBot.execute(SendMessage.builder()
                    .text("Unknown command")
                    .chatId(chatId)
                    .build());
        }
    }
In the case of media attachment, it will expect a file, photo, or video:
    public void handleMedia(Message message) throws TelegramApiException, IOException {
        var chatId = message.getChatId();
        LOGGER.infof("Handled media in chatId: %s", chatId);

        String fileName;
        String fileId;
        String filePath;
        if (message.getDocument() != null) {
            fileName = message.getDocument().getFileName();
            fileId = message.getDocument().getFileId();
            filePath = telegramLongPollingBot.execute(new GetFile(fileId)).getFilePath();
        } else if (message.getPhoto() != null) {
            fileName = "photo_" + LocalDateTime.now().format(DateTimeFormatter.ISO_LOCAL_DATE_TIME) + ".jpeg";
            fileId = Collections.max(message.getPhoto(), Comparator.comparing(PhotoSize::getFileSize)).getFileId();
            filePath = telegramLongPollingBot.execute(new GetFile(fileId)).getFilePath();
        } else if (message.getVideo() != null) {
            fileName = message.getVideo().getFileName();
            fileId = message.getVideo().getFileId();
            filePath = telegramLongPollingBot.execute(new GetFile(fileId)).getFilePath();
        } else {
            LOGGER.errorf("Error while handling media in chatId: :s", chatId);
            throw new RuntimeException("Error while handling media in chatId: " + chatId);
        }

        var bytes = telegramLongPollingBot.downloadFileAsStream(filePath).readAllBytes();
        minioService.uploadFile(String.valueOf(chatId), fileName, bytes);
    }
MinIO is a high-performance object storage server. MinIO’s core concept is a "bucket" identified by a unique bucket name. All files associated with a bucket are stored kinda together as a group. In our case, we’ll use the chat ID as the bucket name, which is unique for each Telegram user. This way, we can easily retrieve files by specifying the bucket name and their respective file names:
    private byte[] getFileAsBytes(String bucketName, String objectName) {
        try {
            return minioClient.getObject(
                    GetObjectArgs.builder()
                            .bucket(bucketName)
                            .object(objectName).build()).readAllBytes();
        } catch (Exception e) {
            LOGGER.errorf(e, "Error while getting object: :s  from bucket: :s", objectName, bucketName);
            throw new RuntimeException(e);
        }
    }
It is the same for uploading files:
    public void uploadFile(String bucketName, String fileName, byte[] bytes) {
        try {
            createBucketIfNotExist(bucketName);
            var putObjectArgs = PutObjectArgs.builder()
                    .object(fileName)
                    .bucket(bucketName)
                    .stream(new ByteArrayInputStream(bytes), bytes.length, -1L)
                    .build();

            minioClient.putObject(putObjectArgs);
        } catch (Exception e) {
            LOGGER.errorf(e, "Error while uploading file: :s to bucket: :s", fileName, bucketName);
            throw new RuntimeException(e);
        }
    }
And, yes, it is more or less the same for removing:
    private void removeFiles(String bucketName) {
        List<String> objectNameList = getObjectNamesInBucket(bucketName);
        List<DeleteObject> deleteObjects = new LinkedList<>();
        objectNameList.forEach(objectName -> deleteObjects.add(new DeleteObject(objectName)));

        try {
            Iterable<Result<DeleteError>> results = minioClient.removeObjects(
                    RemoveObjectsArgs.builder().bucket(bucketName).objects(deleteObjects).build());

            for (Result<DeleteError> result : results) {
                DeleteError error = result.get();
                LOGGER.errorf("Error in deleting object :s - :s", error.objectName(), error.message());
            }
        } catch (Exception e) {
            LOGGER.errorf(e, "Error while removing bucket: :s", bucketName);
            throw new RuntimeException(e);
        }
    }
Quarkus uses the Vert.x framework with a declarative approach to define and handle HTTP requests, making it well-suited for building efficient, reactive, and scalable web applications. This approach is quite different from the servlet-based model used in Spring. But we still use familiar annotations. We just have to mention the specific return type in the case of the file output:
    @GET
    @Path("/api/v1/file-sharing-bot/download")
    @Produces("application/zip")
    public Response downloadZip(@NotNull @QueryParam("chatId") Long chatId) {
        LOGGER.infof("Attempt to download in %s", chatId);
        byte[] bytes = minioService.downloadZip(String.valueOf(chatId));
        logDataService.save(chatId);
        return Response.ok(bytes)
                .header("Content-Disposition", "attachment; filename=file_sharing_bot.zip")
                .build();
    }
Almost nothing new and still quite easy, right?
The next part is writing to MongoDB. Quarkus Panache is a framework that streamlines and enriches the integration of MongoDB in Quarkus applications. It offers a user-friendly and type-safe approach for interacting with MongoDB databases.
All we need is to create an entity class:
@MongoEntity(collection = "logData")
public class LogData extends PanacheMongoEntity {

    @NotNull
    @BsonProperty("chatId")
    private Long chatId;

    @NotNull
    @BsonProperty("downloadDate")
    public LocalDateTime downloadDate;
}
repository class:
@ApplicationScoped
public class LogDataRepository implements PanacheMongoRepository<LogData> {
}
And nothing more. Again, yes, it was quite easy.
In the last step, we will use the amazing Quarkus feature - Dev Services to provide MongoDB and MinIO docker containers.
All we need to do is to add a few properties to application.properties file:
quarkus.mongodb.devservices.enabled=true
quarkus.mongodb.devservices.image-name=mongo
quarkus.mongodb.devservices.port=27018

quarkus.minio.devservices.enabled=true
quarkus.minio.devservices.image-name=minio/minio
quarkus.minio.devservices.access-key=testtest
quarkus.minio.devservices.secret-key=testtest
quarkus.minio.devservices.port=9000
After we run our application in dev mode, Quarkus will start the specified containers automatically and create a MinioClient with the corresponding properties.
Well, our backend application is ready to start. Being in the root directory run:
quarkus devFrontend
For the frontend application, we will use Quarkus Quinoa project together with React and TypeScript. You can see all possible framework combinations on Quarkus Quinoa - Web Frameworks
Inside our generated application we can see the directory src/main/webui - it’s the root for our NodeJS application with a package.json file. Let’s remove the default implementation by removing the whole directory src/main/webui. Then place yourself in file-sharing-bot/src/main and execute:
npx create-react-app webui --template typescriptIn the directory src/main/webui we can see the new generated project.
As usual, let’s add bootstrap. Being in /frontend/src/main/webui execute:
npm install bootstrapThe last thing we need is to change the webui/src/App.tsx file. We have to add one button and the function that sends an HTTP request to our backend application when the onClick() event is triggered. We will also retrieve the chatId variable from the query parameter:
import React from 'react';
import logo from './logo.svg';
import './App.css';
import '../node_modules/bootstrap/dist/css/bootstrap.css';

function App() {
  const queryParams = new URLSearchParams(window.location.search);
  const chatId = queryParams.get('chatId');

  function download() {
    window.location.href = `http://127.0.0.1:8091/api/v1/file-sharing-bot/download?chatId=${chatId}`;
  }

  return (
      <div className="App">
        <h1 className="display-1"> Click on the button to download</h1>
        <button className="btn btn-primary" onClick={() => download()}>Download</button>
      </div>
  );
}

export default App;
To avoid port conflicts, change the default port for our application by adding the property quarkus.http.port=8091 to application.properties
Now we can build our application with:
quarkus buildand run backend and frontend simultaneously:
quarkus devLet’s check that our app returns at least something. Open http://localhost:8091/

User case
What do we have now?
-
Backend application
-
Frontend application
-
MongoDB and MinIO in docker
And so, the final test case.
1) Open the bot.
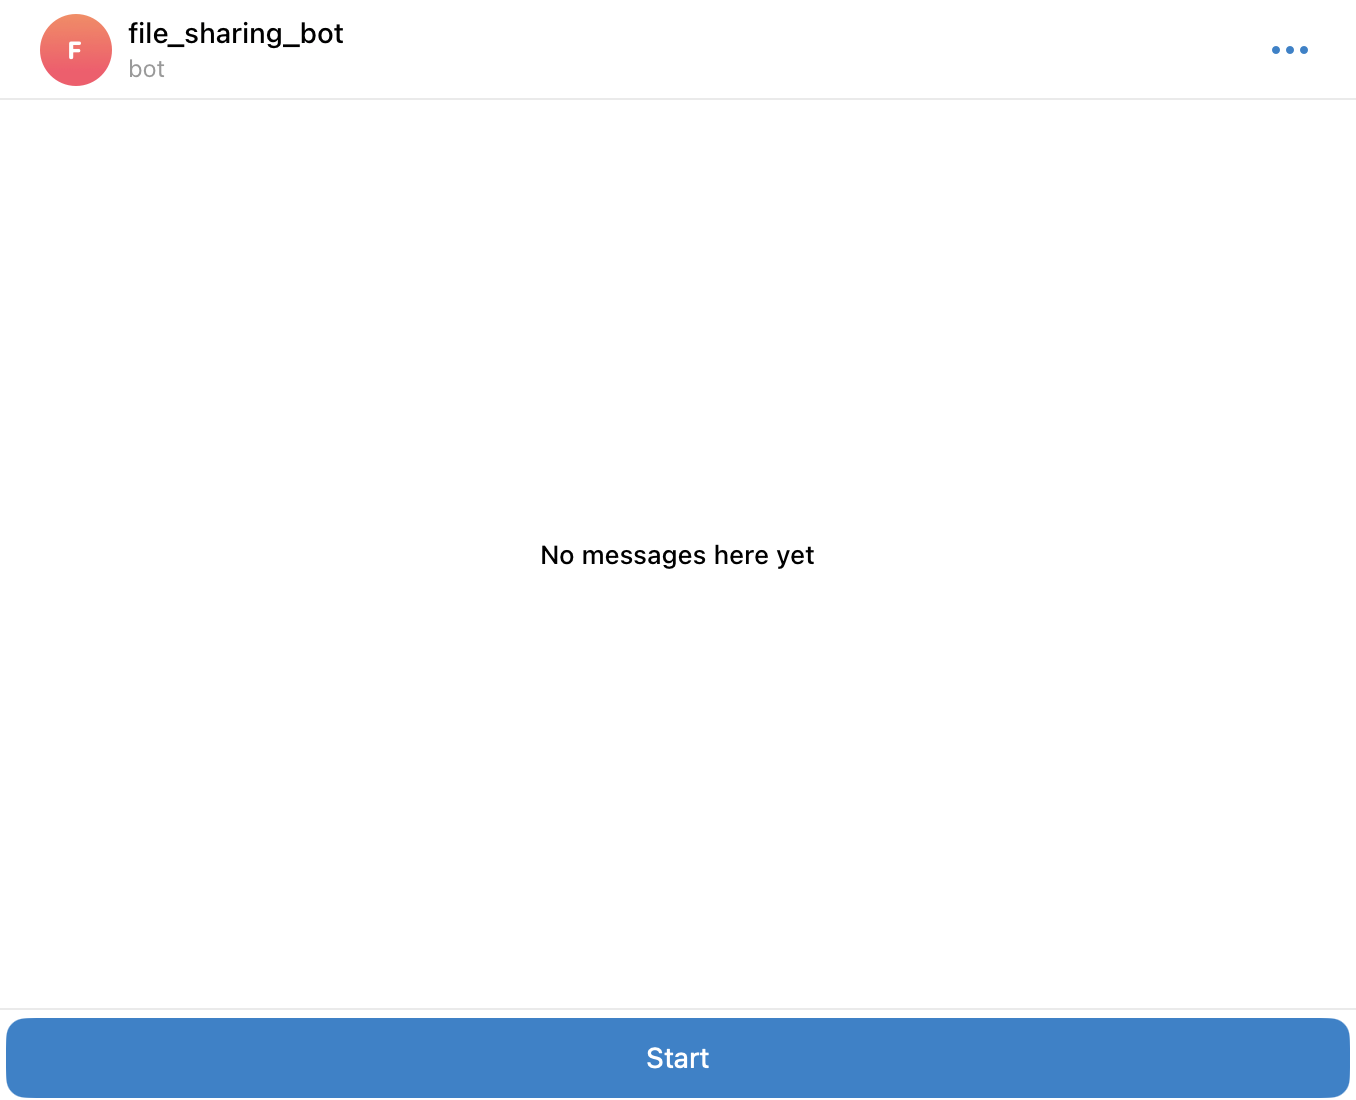
2) Click on the "Start" button, which is sending the /start command.
3) Send file and photo.
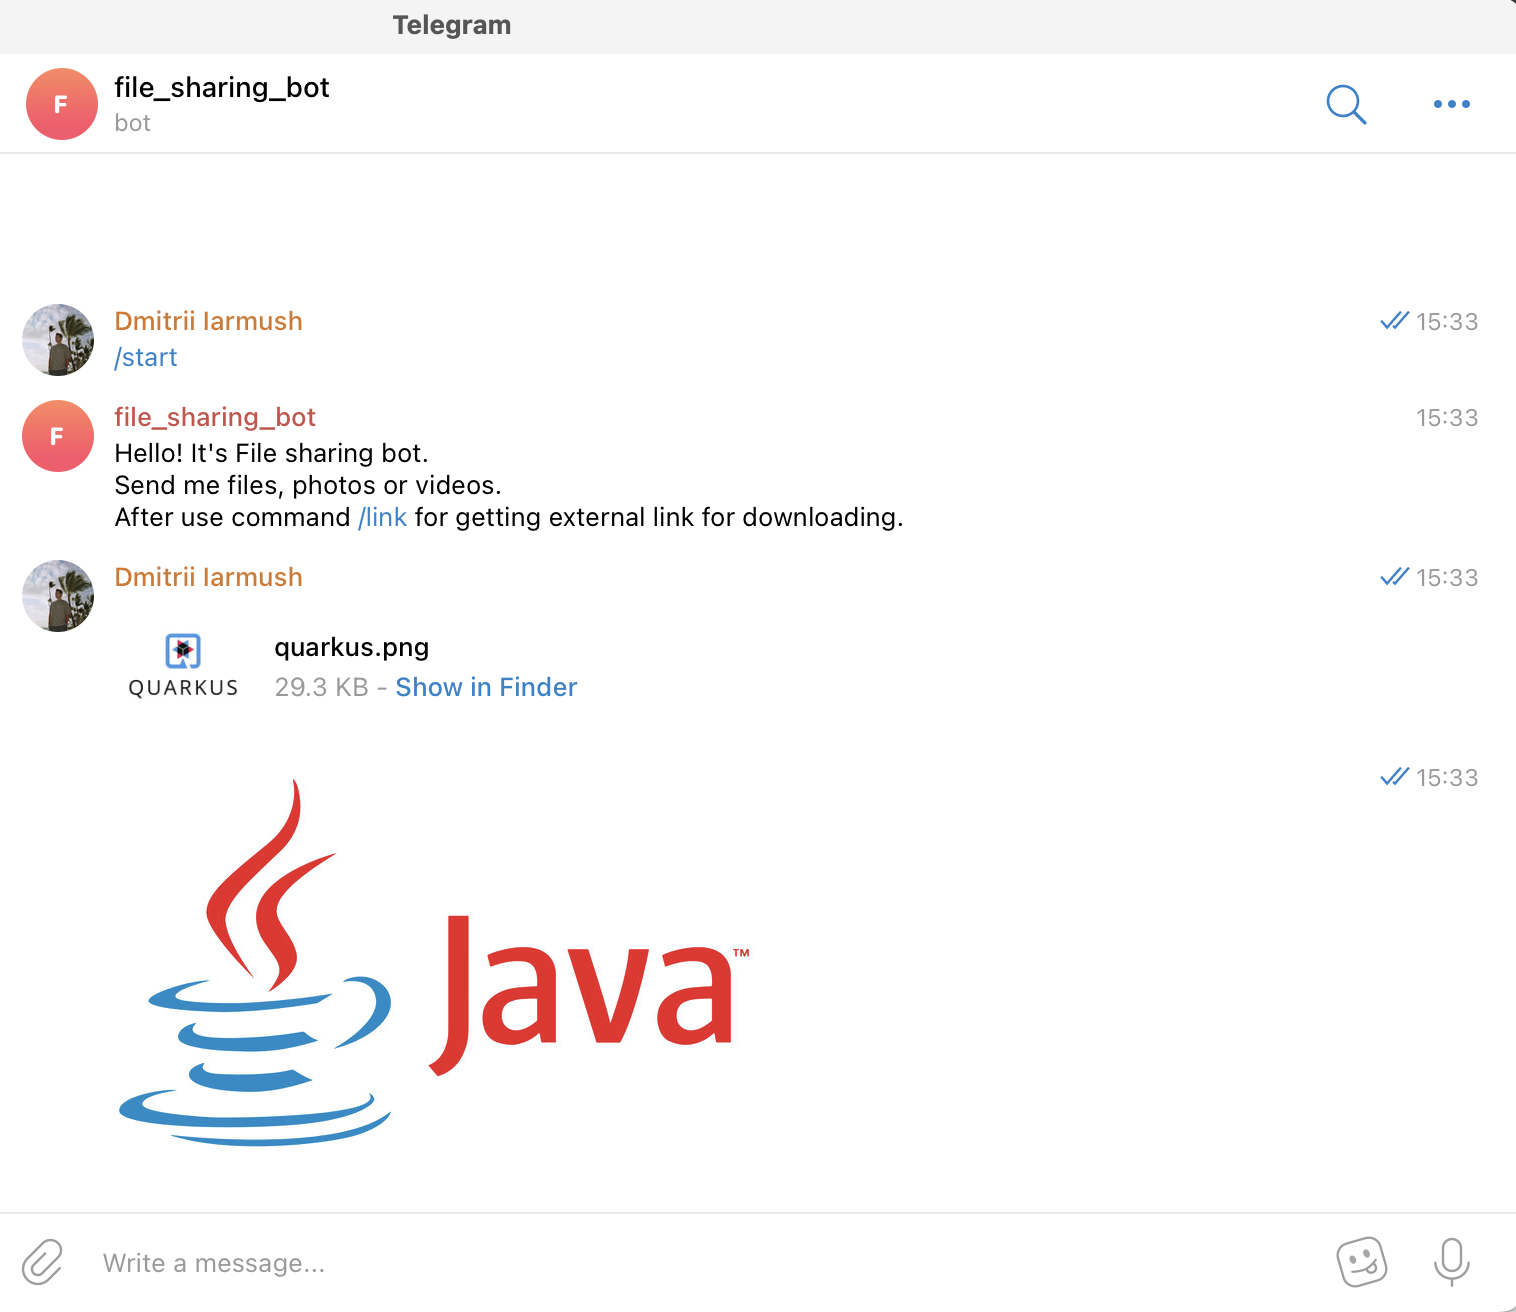
4) Send the text command /link.
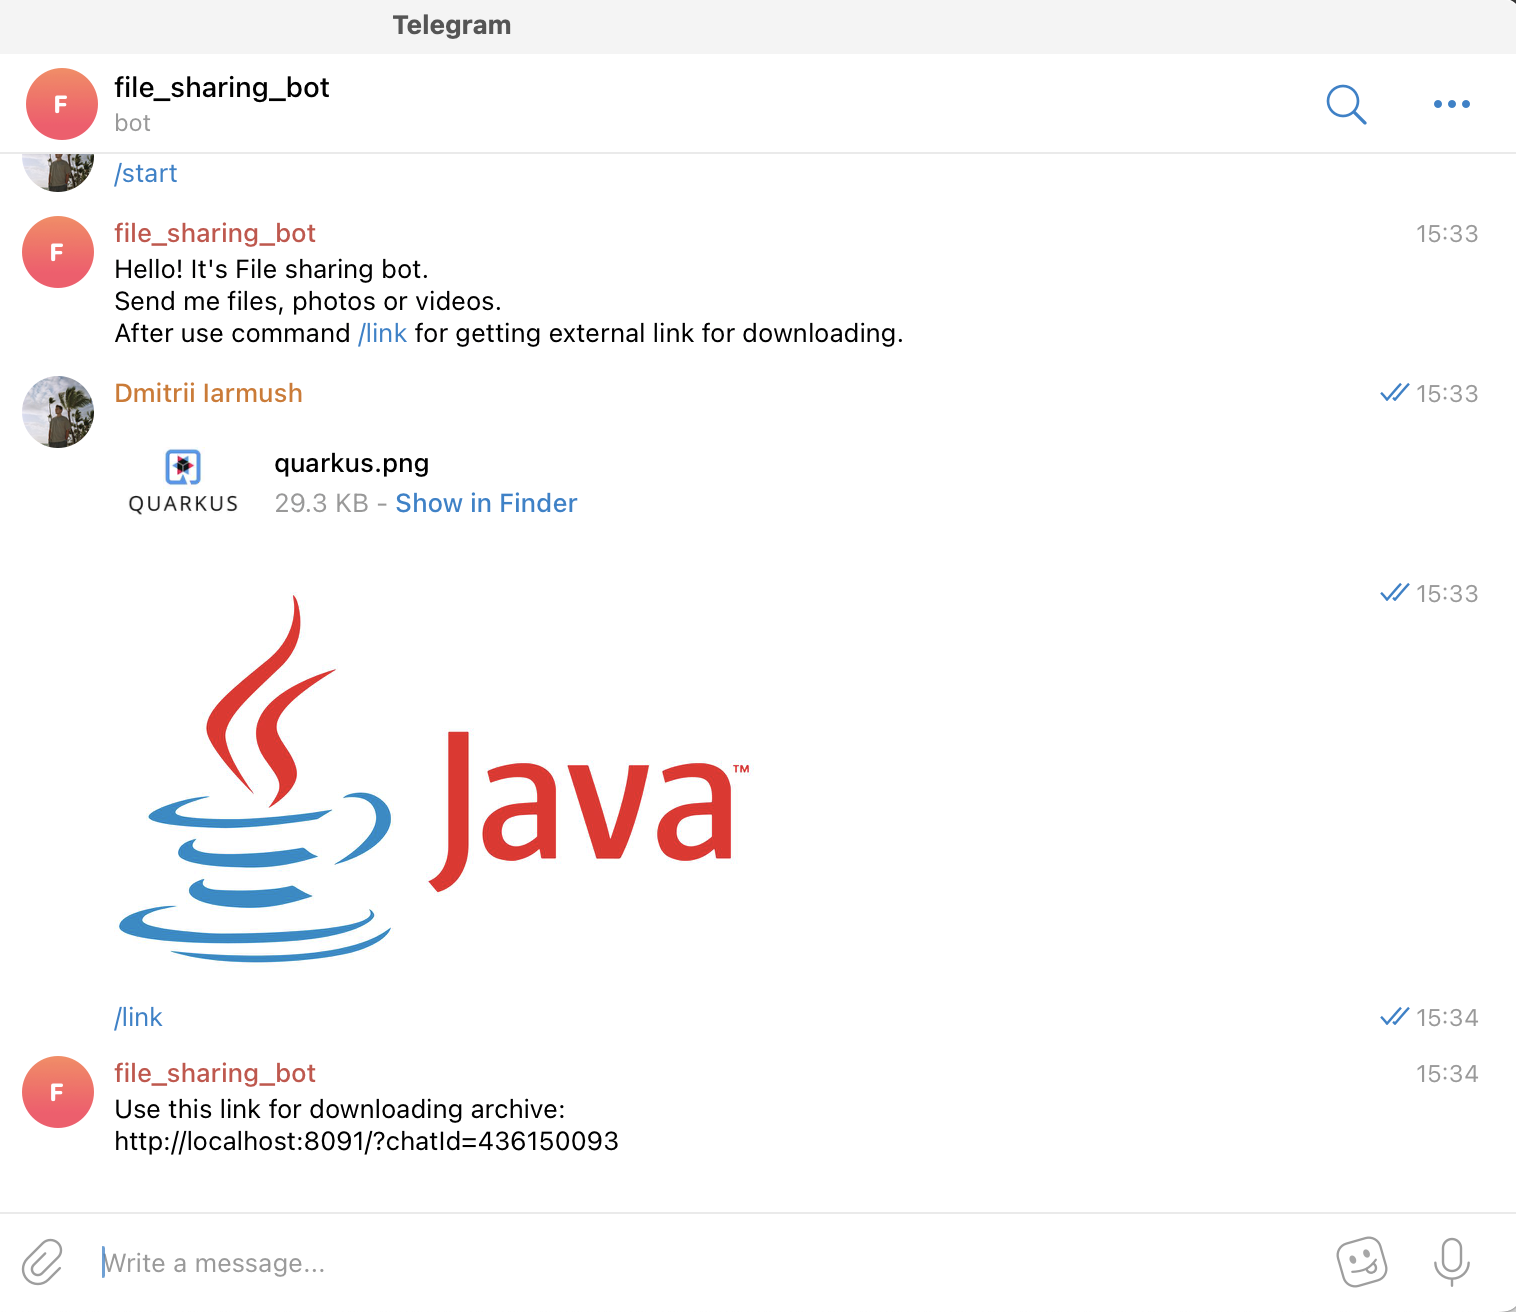
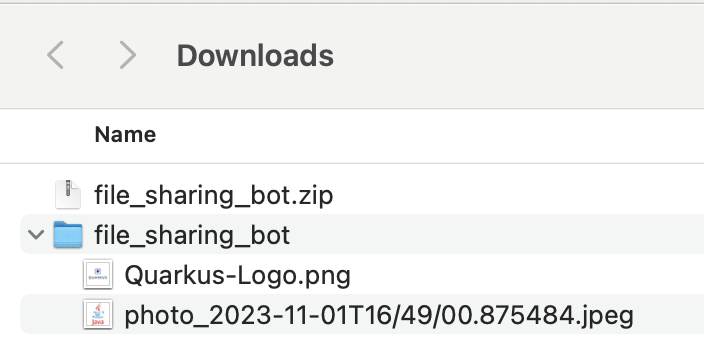
5) Copy the URL and open it in the browser.

6) Click on the "Download" button, unzip the archive and check its content.
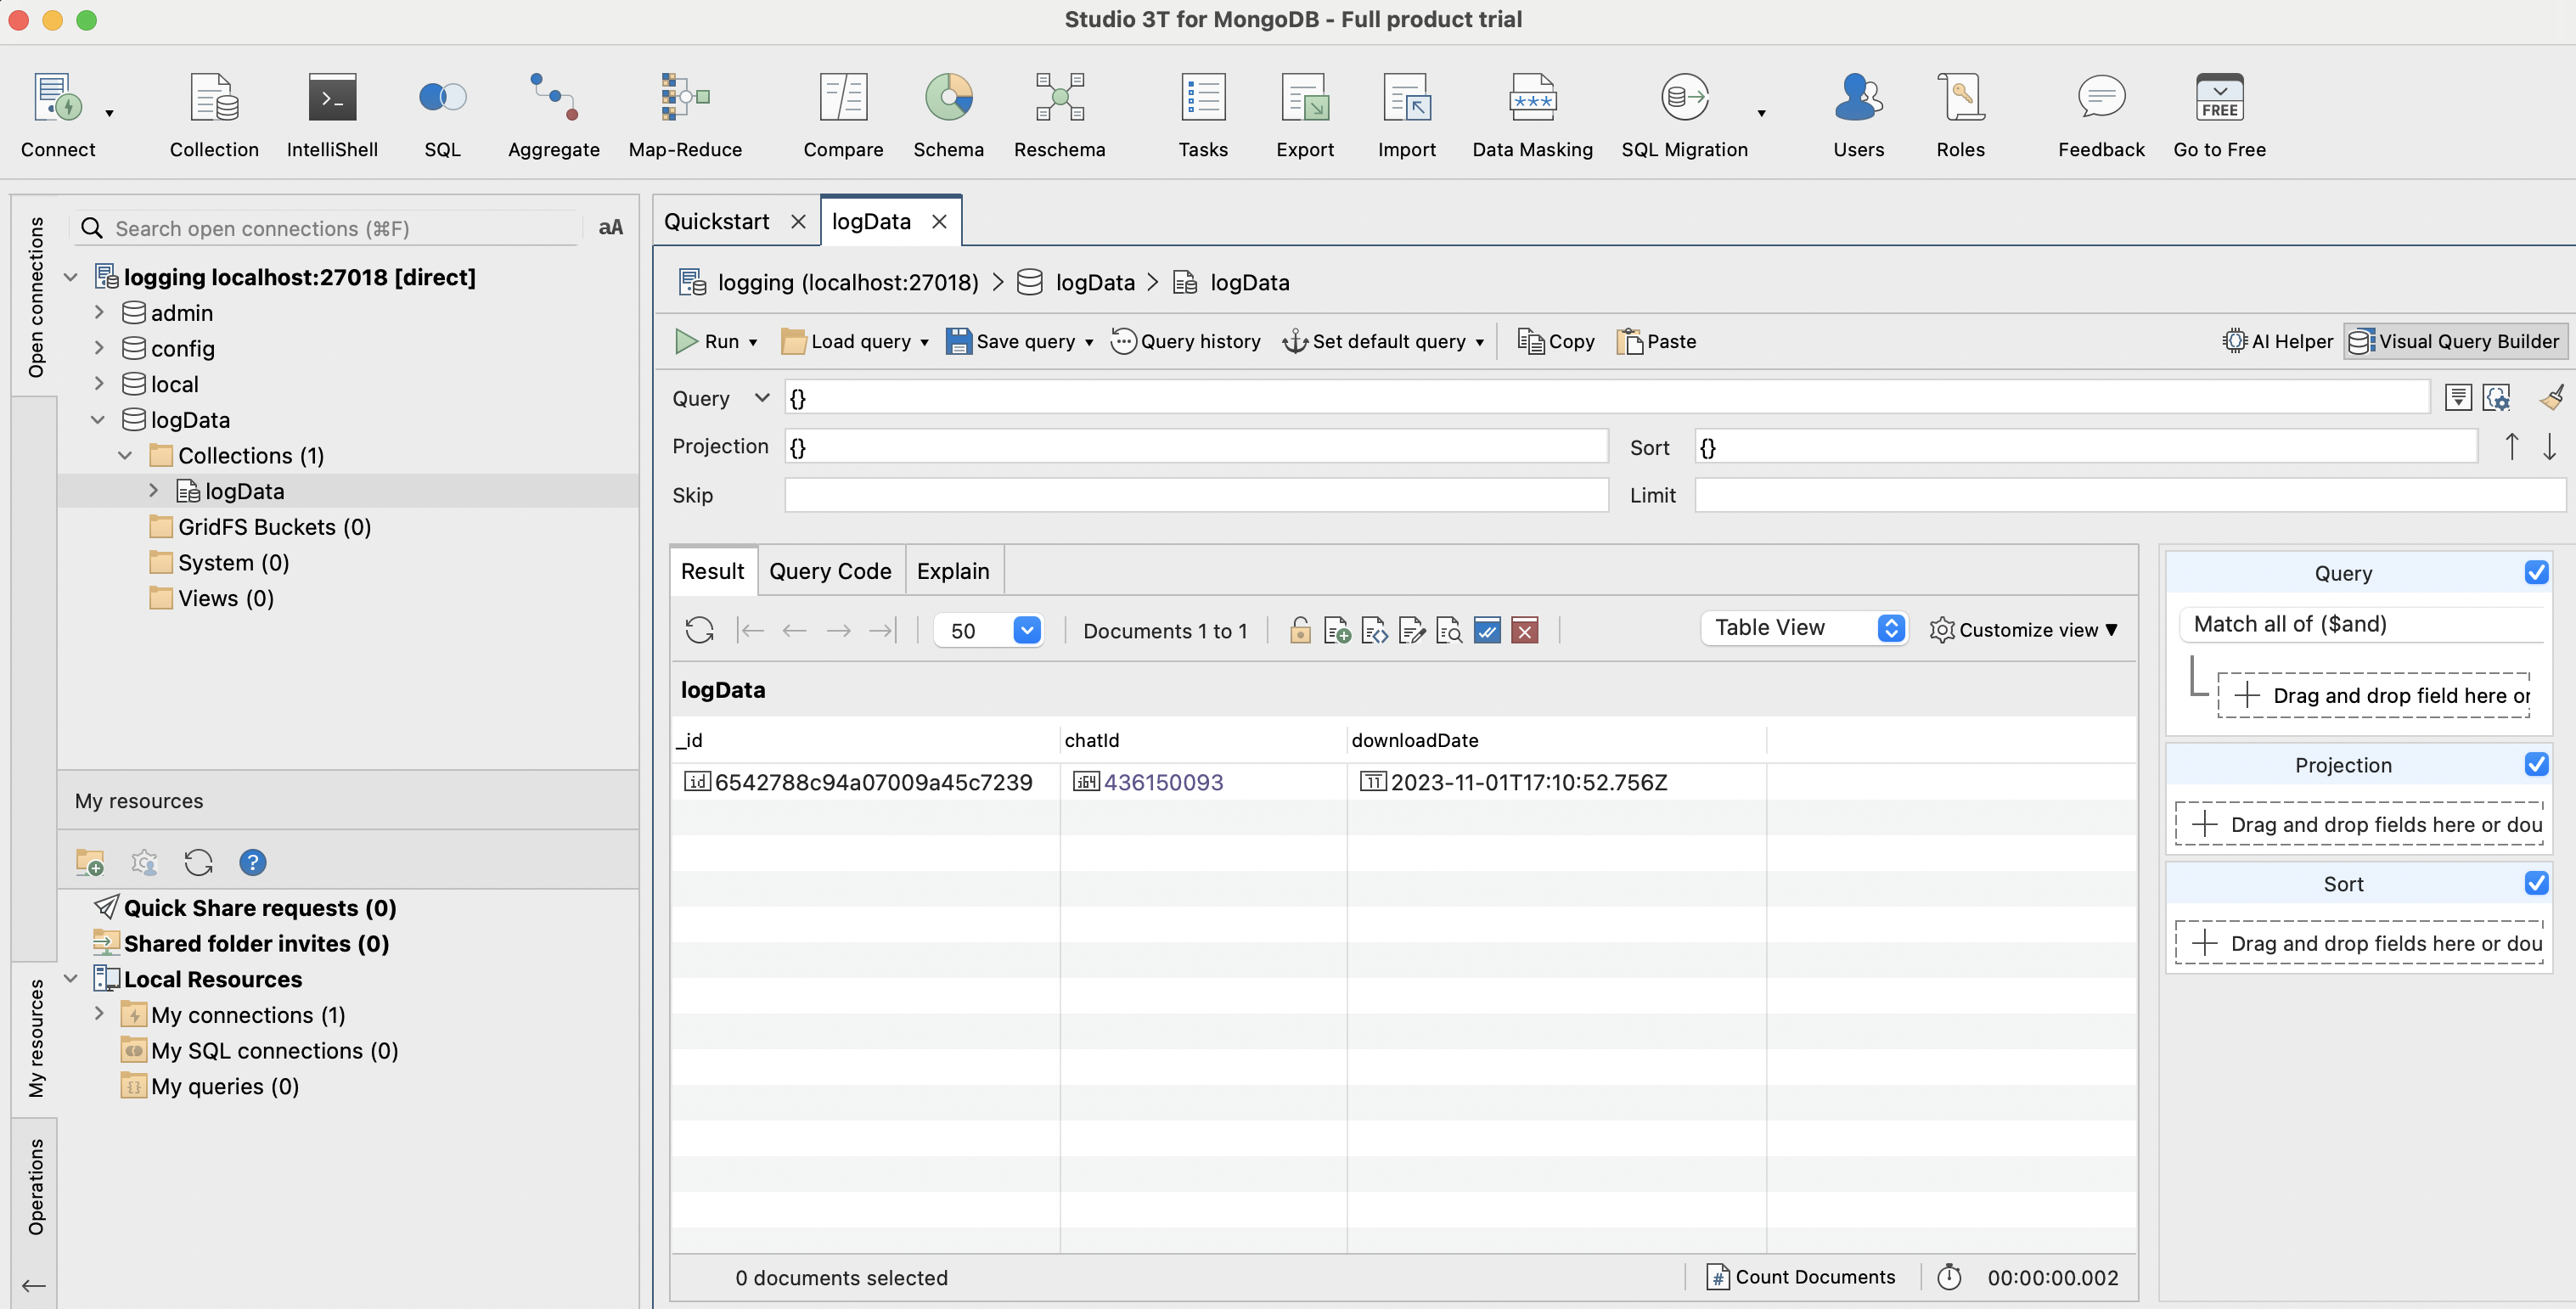
7) Connect to MongoDB using a UI client and confirm the presence of downloadable data.
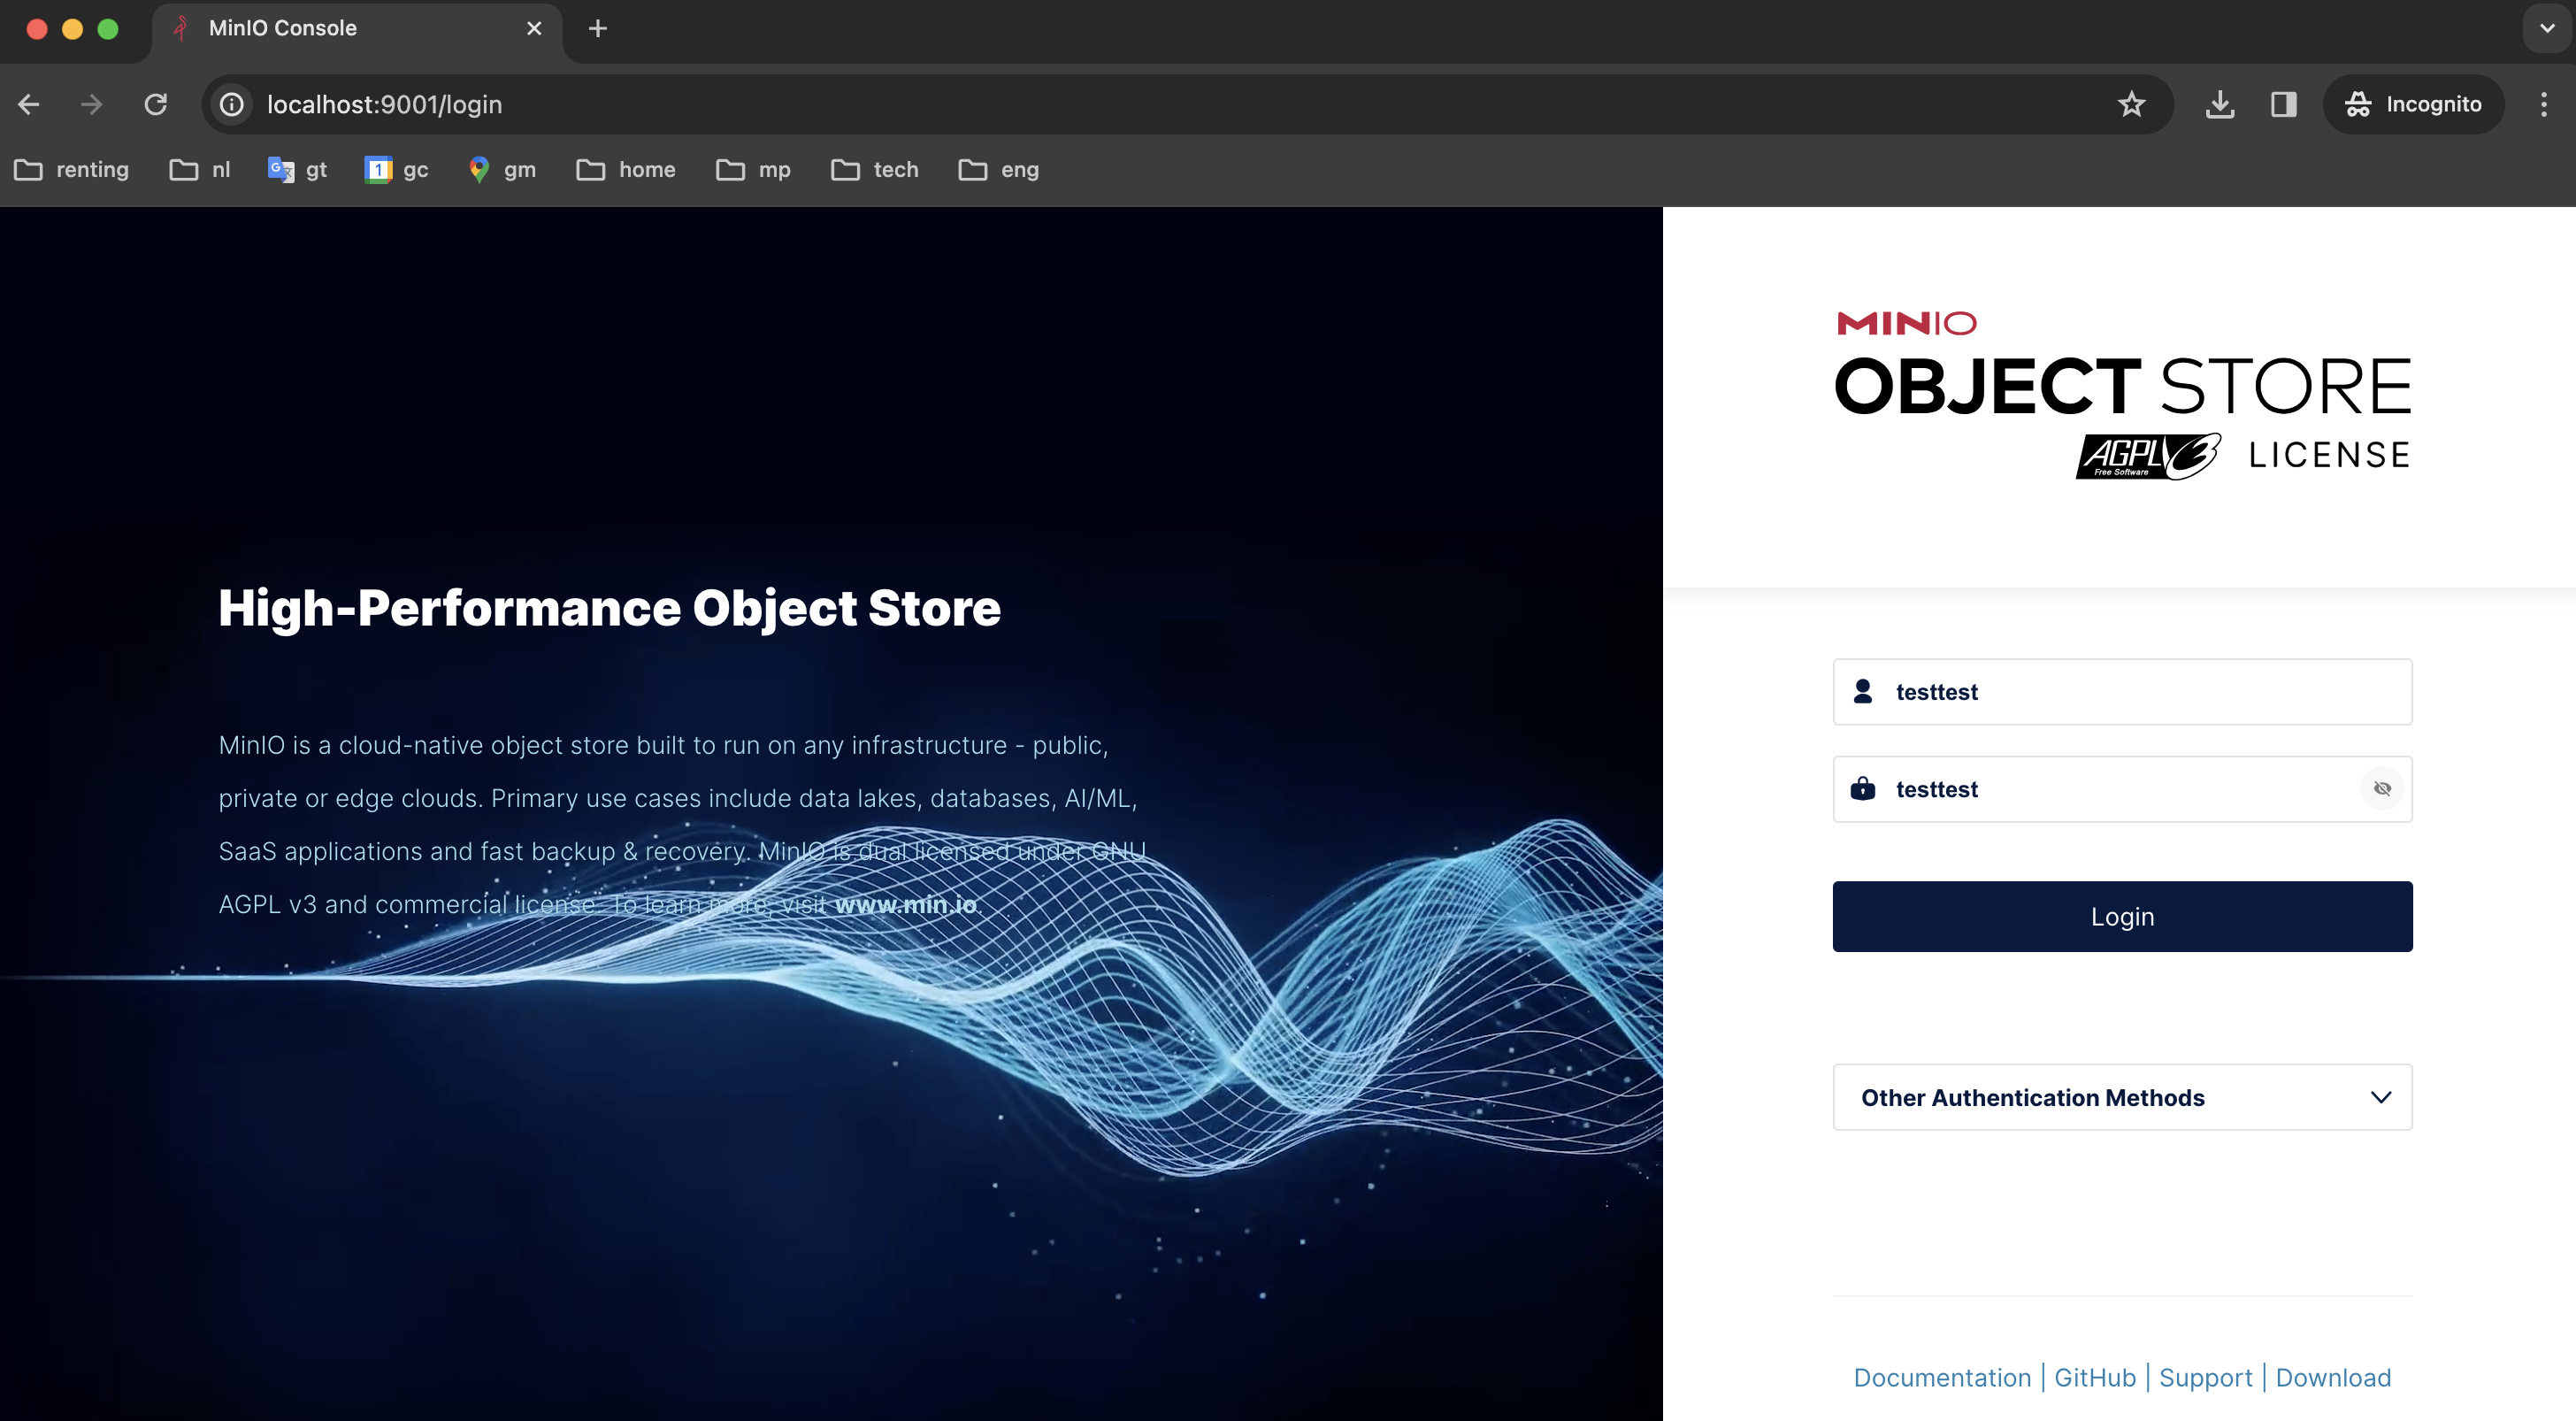
8) Let’s also check what we have it in MinIO. Open the MinIO admin panel (you can find the console admin port by running docker ps) and login with the user and password values that we specified in application.properties.
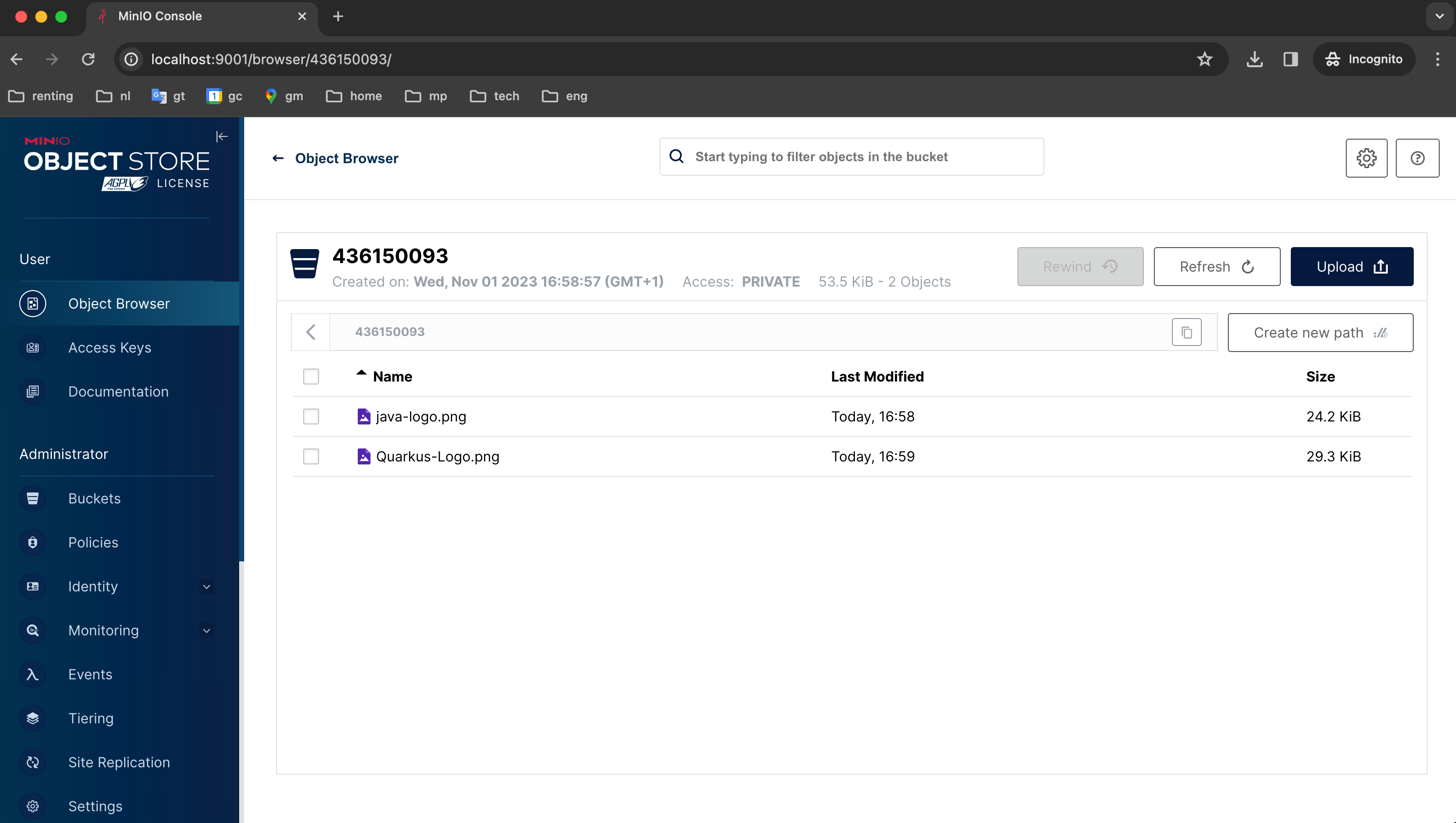
9) Here we have only one bucket. Open it.
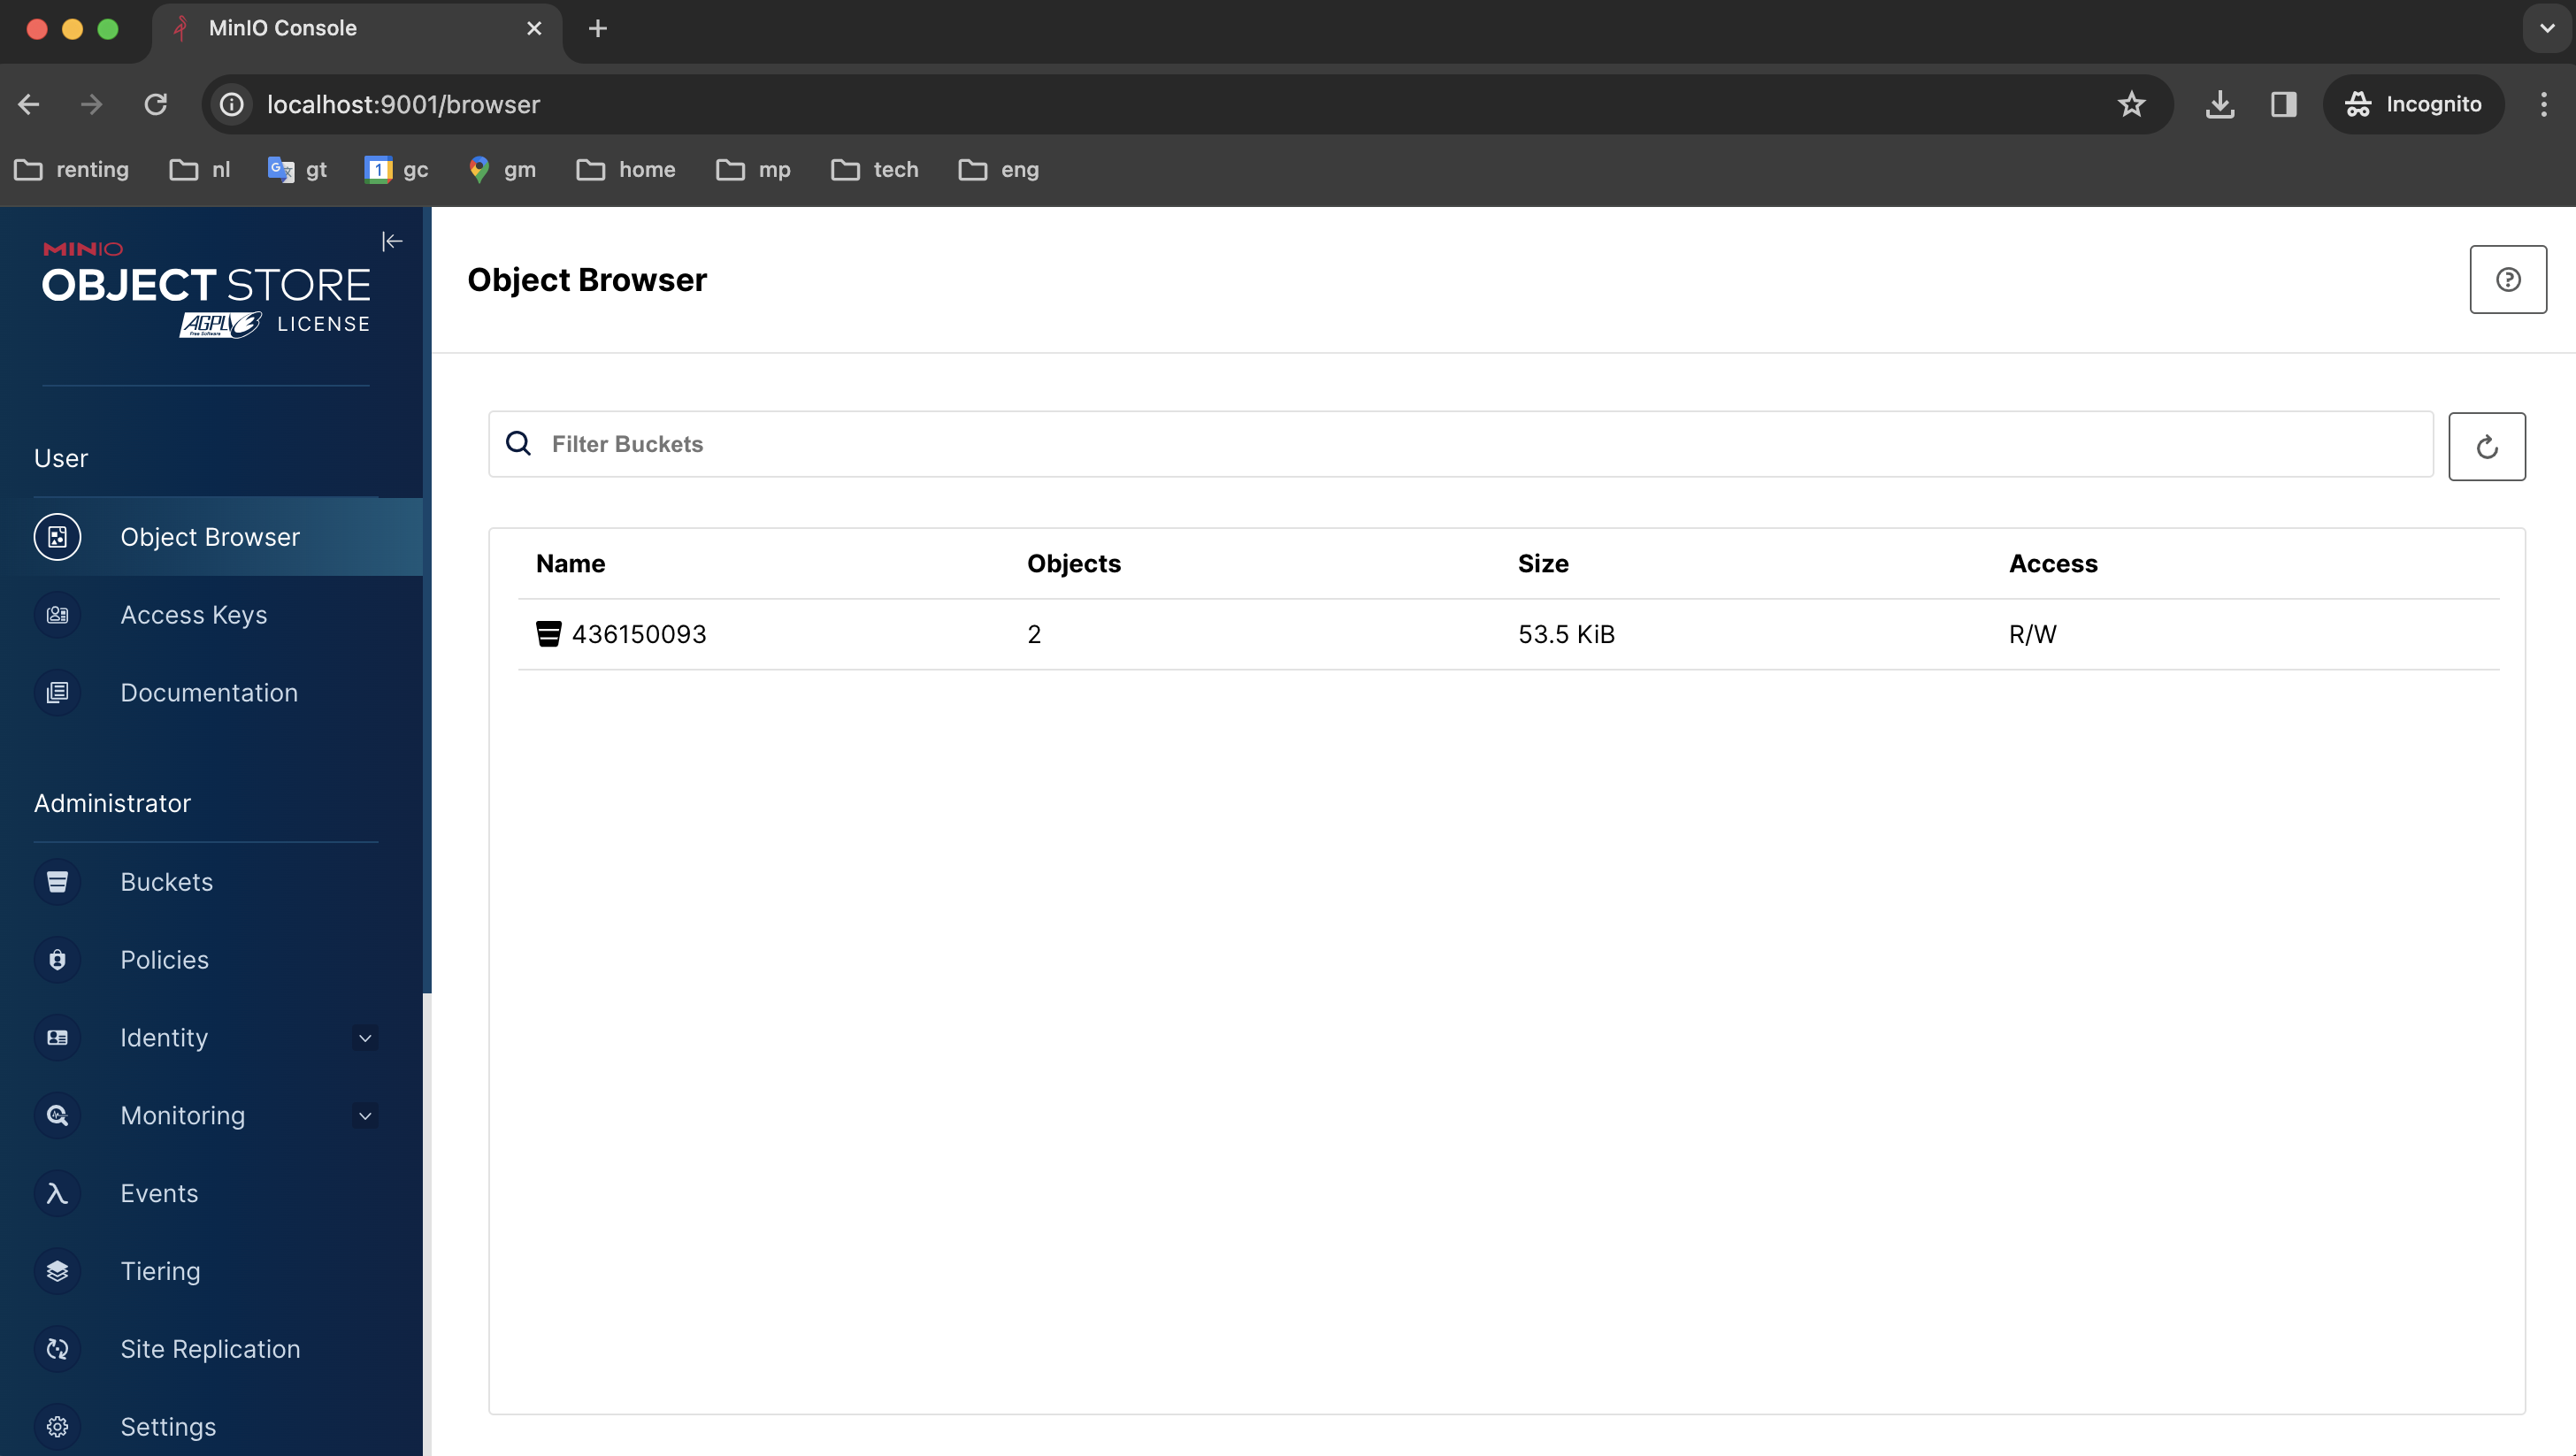
10) Here we can see two sent files.
11) Return to our bot and send the /finish command.

12) Go back to the MinIO admin panel and check that our bucket is empty.
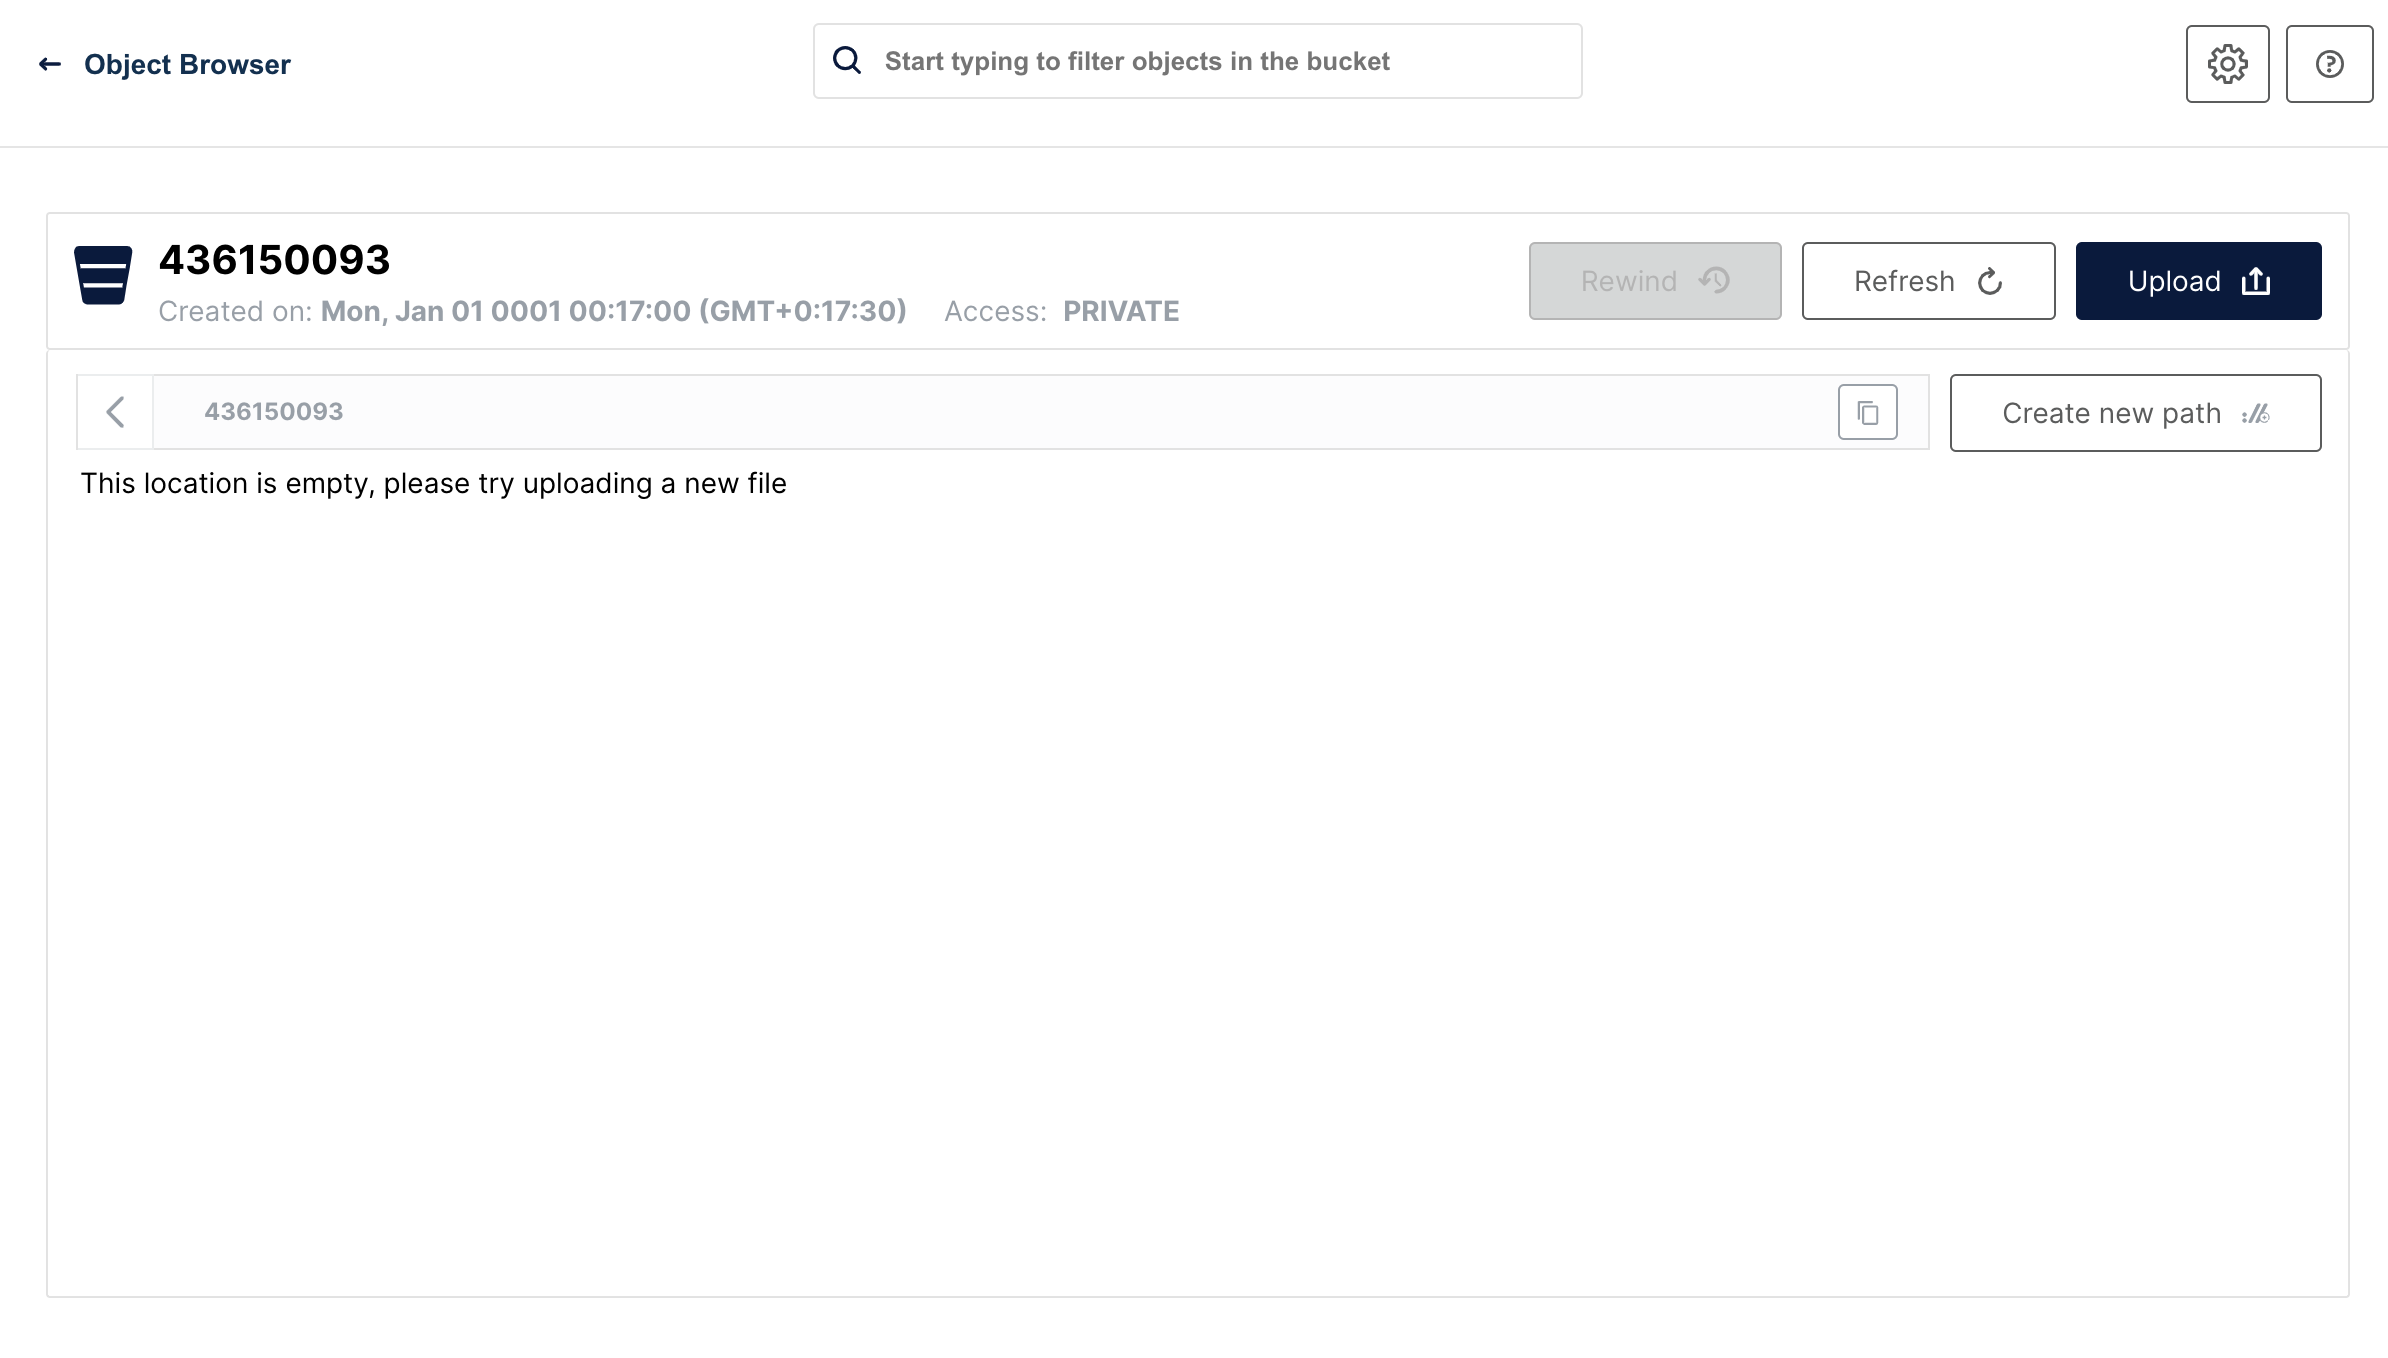
13) Bot is ready for the new session.
Conclusion
In this project, we’ve explored Quarkus' capabilities for both backend and frontend development. The backend is connected to a MinIO file storage and a MongoDB, while the frontend is a simple one-page application with literally one button.
Please note that we haven’t delved into in-depth reviews, and more importantly, we haven’t covered Quarkus' advanced features such as native applications and deployment. In Quarkus guides you can find lots of interesting guides for further exploration.